Are you one of those MS Office users encountering the error “Microsoft Excel is trying to recover your information”. Generally, this error is seen if any virus has been detected on your PC and it can be a false positive. In most cases, the error gets rectified by itself after some time.
Other possible reasons for this error are:
- Certain applications that conflict with the working of Excel
- Outdated version of Excel or Windows
- Corrupted installation of Office or user files.
- Macros or Add-ins conflicting with the normal working of Excel
Read this article to find out some troubleshooting solutions to overcome this issue on your Windows PC. Before moving ahead to the fixes below check the workarounds.
Workarounds
1. If this issue is occurring with only one file and not with the other files, then try repairing that file. Else follow the fixes given.
2. Check if this issue is occurring while working with a file over the network. In that case, download this file and then continue editing it.
3. Reduce the number of shapes.
4. Check that the file doesn’t have any external links associated with either the formulas, charts, shapes, range names, hidden sheets, and queries.
5. Have only one instance of Excel running and make use of only one workbook.
6. The file should not be protected by a password.
7. Files can be corrupted if they are produced by another application. In such a case, open it on another computer without using the third-party app.
8. In some cases when Excel is being used by another task then it may stop responding and show this error. Check in the status bar of the Excel file and wait for this action to complete.
9. If there are many shapes in the file then the size of the file increases. In such a case, it requires a more amount of RAM to run. Make sure you are using a system with higher specifications.
10. Whenever you are modifying an Excel files name, use the Save As menu rather than just renaming it in the File Explorer.
Fix 1 – Turn Off the Antivirus
It is known that antivirus present in the system detects the macros and add-ins present in Excel as malicious and hinders the normal working of MS Excel. Users have reported that turning off the Antivirus temporarily has helped them overcome this error with Excel.
1. Disable your antivirus. The steps differ from one software to another.
2. Now check if Excel is working without the above error.
3. If it works, then enter an exclusion in your antivirus for the file or Excel. Or you can modify your antivirus with another one that may not conflict with Excel.
Fix 2 – Disable File Explorer’s Preview Pane
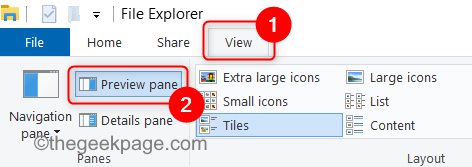
1. Open your File Explorer by pressing Windows + E simultaneously.
For Windows 10
2. Go to the View tab at the top. Now select the Preview pane in the Panes group.
3. Open your file showing the error and check if it is resolved.
For Windows 11
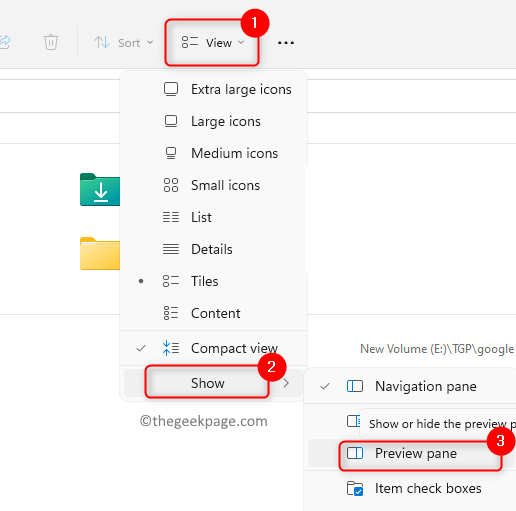
2. Click on the View tab.
3. Select the Show option and choose the Preview pane in the list.
4. Open your file showing the error and check if it is resolved.
Fix 3 – Run in Safe Mode
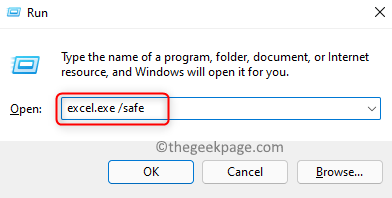
1. Open Run (Windows + R).
2. Type excel.exe /safe to open Excel in safe mode.
3. If Excel works without any error in the safe mode, then try the fixes below to see whether they help resolve the issue.
Fix 4 – Disable Excel Add-ins
1. Open the Excel file in Safe mode as mentioned in Fix 3.
2. Select the File menu.
3. Click on the Options at the bottom.
4. In the Options window, select the Add-ins tab in the left pane.
5. On the right side, use the dropdown next to Manage and select the option Excel Add-in that needs to be disabled. Click on the Go… button.
6. In the Add-ins window, uncheck all the add-ins in the list. Click on OK.
7. Save the file and reopen it again.
8. Now see whether Excel works properly without error. If it works, then try turning on the add-ins one at a time to identify the problematic add-in. Once you know the add-in which was giving this error, try to get an updated version of the add-in installed.
Fix 5 – Recompile Macros
1. Launch Excel.
2. At first, enable the Developer tab in Excel using the steps below:
- Go to the File menu and then select Options.
- Select the Customize Ribbon tab.
- On the right, check the box next to Developer under Main Tabs in Customize the Ribbon.
- Click on OK.
3. Now you can see the Developer ribbon in the menu bar.
4. To open Visual Basic for Applications use the Alt and F11 key combination or go to the Developer tab and click on Visual Basic under the Code group
5. Go to the Tools menu and choose Options… in the submenu.
6. Go to the General tab in Options. Check the box associated with Compile on Demand and click on OK.
7. Select the Insert menu and then choose Module.
8. Go to the Debug menu and choose the option Compile VBA Project.
9. Select File menu. Click on Save to save the file.
10. Press Alt + Q to close Visual Basic and go back to Excel.
11. Reopen the Excel file and check if the problem is fixed.
Fix 6 – Disable Macros
1. Use the steps in Fix 3 to open Excel in Safe mode.
2. Go to the File menu and select Options.
3. Select the Trust Center tab in the left pane.
4. Click on Trust Center Settings… button on the right side.
5. Go to Macro Settings in the Trust Center window. Choose the radio button associated with Disable VBA macros without notification.
6. Select the Trusted Documents tab.
- Check the option Allow Documents on a Network to be trusted
- Uncheck the box next to Disable Trusted Documents
- Click on OK.
7. Relaunch the Excel file after saving and closing it.
8. Check if Excel is working without the error.
Fix 7 – Modify Region Settings
1. Open Run by using the Windows and R keys combination.
2. Type ms-settings:regionformatting to open the Region Settings.
3. Here use the dropdown next to Country or region to choose an option that is your current location.
4. In the Regional format, choose the option that has Recommended in it.
5. Reboot your system. Open Excel and see if the error is resolved.
Fix 8 – Modify the Default Printer
We know that Excel interacts with the default printer set for your system when you open it. This error may be seen when this communication doesn’t happen as expected by Excel.
1. Open Run and type ms-settings:printers to open the Printers & Scanners settings.
For Windows 10
2. Uncheck the box associated with Allow Windows to manage my default printer.
3. Select Microsoft XPS Document Writer and click on the Manage button.
4. Choose Set as default in the next window that appears.
5. Launch the Excel file and see whether it works properly without the error.
For Windows 11
2. In the Printers & Scanners window, make sure you toggle off the settings Let Windows manage my default printer under Printer preferences.
3. Select Microsoft XPS Document Writer.
4. Click on the Set as default button at the top.
5. Check if Excel works as expected without any error.
Fix 9 – Update MS Excel
1. In MS Excel, go to the File menu.
2. At the bottom, click on Account.
3. On the right open the dropdown list by clicking on Update Options. Select the Update Now option.
4. Wait for the update to finish.
5. Restart your computer and check if Excel is now running without any issues.
Fix 10 – Perform a Windows Update
1. Type ms-settings:windowsupdate-action in the Run box to open the Windows Update settings.
2. In the Windows Update, click on Check for updates button.
3. Once you complete installing the available updates restart your PC.
4. Now open Excel and see whether it is working normally without any issues.
Fix 11 – Clean Boot the System
1. Type msconfig in Run (Windows + R) to open System Configuration.
2. In the Services tab, check the box associated with Hide all Microsoft services.
3. Click on the Disable all button.
4. In the Startup tab, select the link Open Task Manager.
5. Go to the Startup tab in the Task Manager.
6. Disable all the applications whose publisher is not Microsoft. Select the application and click on the Disable button.
7. Close the Task Manager to go back to the System Configuration window. Click on Apply and then on OK.
8. Restart your system. Open the Excel file giving the error and check if it has been resolved.
Fix 12 – Make a New User Account
A. Boot PC in Safe Mode
1. Open Run and type msconfig to open System Configuration.
2. Go to the Boot tab.
3. Check the box associated with Safe boot inside the Boot Options group.
4. Click on Apply and then on OK.
5. When prompted to restart click on the Restart button if you want to else click on Exit without restart to perform a restart at a later time manually.
B. Create a New Local Account
1. Open Run (Windows + R) and type ms-settings:accounts to open the Account settings.
2. Select Family & other users.
3. Click on the button Add account next to Add other user.
4. In the new Microsoft Account window that appears, click on I don’t have this person’s sign-in information.
5. Click on Add a user without a Microsoft account.
6. Create a new user with a username and password which can be remembered. Switch over to this local account.
7. Navigate to this path C:\Windows\Temp
8. Select all the files in this folder using Ctrl + A. Press Shift + Delete to remove all the files.
9. Restart your PC and then check if Excel is operating normally.
Fix 13 – Repair MS Office
1. Open Run (Windows + R) and type appwiz.cpl to open Programs & Features.
2. Right-click on the installation of MS Office that you want to repair and select the Change option.
3. Click on Yes if prompted by UAC.
4. Choose the option Quick Repair and click on Repair.
5. In the confirmation, click on Repair again.
6. Restart your PC once the repair process completes. Check if the error in Excel has been cleared.
7. If the error still persists, perform Steps 1 – 3 again.
8. Now choose the option Online Repair and continue with the repair process.
9. Restart once the repair finishes. Again open Excel and see if it works without the error.
Thanks for reading.
We hope you are now able to use Excel without any problems. Comment and let us know the fix that worked for you.


