There is no direct way of playing Minecraft Java Edition without a proper Minecraft Launcher. But some Minecraft gamers have recently pointed out an issue where they are facing an error message while installing or even opening Minecraft Java Edition through the M Launcher or T Launcher.
Fix 1 – Check whether you are using the same account
Have you bought the game using your parent’s account and tried to use your own account to open Minecraft Java? You have to use the same account in both Xbox and Store everywhere.
Step 1 – Open the Store app.
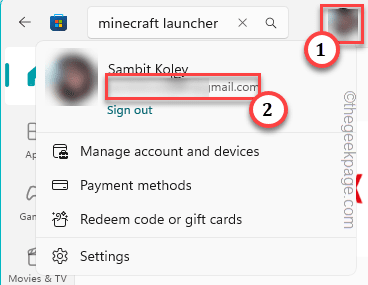
Step 2 – You will notice your account on just the right of the search box. Additionally, you may click it once to actually see which account is this.
Step 3 – When you have seen that, launch the Xbox app.
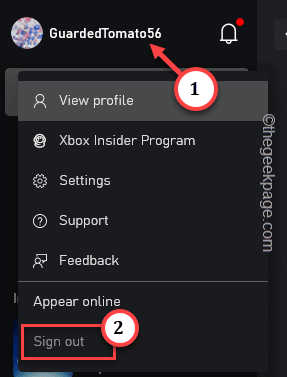
Step 4 – In there, if you look in the top-left corner, you shall see your account.
Make sure you are using the same account that you have seen in the Store. If you see that you are using another account in Xbox, do this –
Step 1 – In Xbox app, click your account image once.
Step 2 – There, click “Sign out” to sign out from the Xbox app.
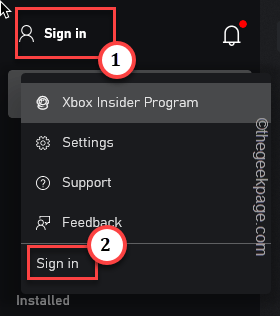
Step 3 – On the Xbox app page, tap “Sign in“.
Step 4 – Wait until the Microsoft log-in console opens up. It should automatically log you in.
If you want to choose a different account (the same one you are using in Microsoft Store) tap the “SWITCH ACCOUNT” option.
Now, as you have logged in with the same account in both places.
Just go ahead and try to launch Minecraft Java Editon from the launcher once more.
Fix 2 – Download from the Minecraft website
You can get Minecraft Launchers from different places. So, if you having any trouble launching Minecraft Java from the Minecraft Launcher that you have downloaded from the Store, do this –
Step 1 – Head on to the Minecraft website.
Step 2 – There, you can find various download links for all the OS Minecraft is available.
Step 3 – Tap “Minecraft.msi” beside the old launcher which is for Windows 7,8. [Don’t worry. It will work just fine on your Windows 10/11 machine.]
Close the browser once you have downloaded the Minecraft installer file.
Step 4 – Go to the directory where you have downloaded the file.
Step 5 – Then, double-tap the “MinecraftInstaller” to run the installer file.
You don’t have to do anything. Minecraft Installer will download the latest version from the server.
Now, wait until Minecraft Launcher is installed.
Step 6 – Write “Minecraft” in the search box.
Step 7 – Then, click “Minecraft Launcher” to open it up.
Step 8 – Select “Minecraft: Java Edition” from the left pane.
Step 9 – Then, tap “Play” to play the game.
If Minecraft Java Edition is yet to be installed on your system, wait for the ML to do so. Otherwise, you should be good to go.
You won’t see the 0xUnknownAppInstall error code again.
Fix 3 – Install the launcher from Xbox or Store
Install the new Minecraft Launcher from the Xbox app if you are using the Store version or vice-versa. We have shown steps on both the Store and the Xbox app.
Installing from Store –
Step 1 – Open Microsoft Store.
Step 2 – After opening the Store, write “Minecraft Launcher” in the search box.
Step 3 – Just tap “Minecraft Launcher” to directly open that.
Step 4 – This will take you to Minecraft Launcher. Then, tap “Install” to install Minecraft Launcher.
Use this new Minecraft Launcher instead the one you have installed from the Xbox app.
Installing from Xbox Store –
Step 1 – Launch the Xbox app from the Start menu.
Step 2 – On the Xbox app, head on to the “Store” tab.
Step 3 – Next, write “Minecraft launcher” in the search bar.
Step 4 – Then, click “Minecraft Launcher” from the search result.
Step 5 – Now, tap “Install” to install the Minecraft Launcher directly from the Xbox app.
Use this instead of the old launcher where you are facing this issue. Try to play Minecraft Java Edition again.
Fix 4 – Clean the Store cache files
Delete particular locally stored Store cache files from your computer.
Step 1 – Close the Minecraft app. Exit Store as well.
Step 2 – Open a Run box using the Win key+R keys at once.
Step 3 – Then, write this there and hit Enter.
control folders
Step 4 – Click on the “View” section.
Step 5 – Then, choose the “Show hidden files, folders, and drives” option in Advanced settings: zone.
Step 6 – Save the settings using “Apply” and “OK“.
Step 7 – Then, head on to this location –
C:\Users\%username%\AppData\Local\Packages\Microsoft.WindowsStore_8wekyb3d8bbwe
[The “%username%” in the ]
Step 8 – After reaching that location, select the “LocalCache” folder.
Step 9 – Use the Delete button on your keyboard to remove it.
Exit everything and try reinstalling Minecraft Java Edition and test.
Fix 5 – Install Xbox Identity Provider services
Install the Xbox Identity Provider service, uninstall Gaming Services, and reinstall it.
Step 1 – Open this link. This will open up the Xbox Identity Provider Service link. Then, tap “Get is Store app“.
Step 2 – Install this app if your machine doesn’t have this.
Step 3 – Write down “powershell” in the search box on the taskbar.
Step 4 – Next, right-tap the “Windows PowerShell” and then choose “Run as administrator” to open that up.
Step 5 – Paste this code and hit Enter to uninstall the Gaming Services from your system.
get-appxpackage Microsoft.GamingServices | remove-AppxPackage -allusers
Wait till Windows uninstalls the Gaming Services package from your system.
Step 6 – Then, type this line in the terminal. Next, press the Enter key to reinstall the Gaming Services package.
start ms-windows-store://pdp/?productid=9MWPM2CQNLHN
Step 7 – When you reach the Gaming Services page on Store, tap “Install” to reinstall Gaming Services.
Exit PowerShell after running this code.
Fix 6 – Run this PowerShell code
Run this particular PowerShell command to re-register all the apps.
Step 1 – At first, start to write “powershell” in the 🔎 box.
Step 2 – Then, just right-click the “Windows PowerShell” and tap “Run as administrator“.
Step 3 – Once the Windows PowerShell terminal opens up, copy-paste this code from this page in the terminal and hit Enter to run it.
Get-AppxPackage -AllUsers| Foreach {Add-AppxPackage -DisableDevelopmentMode -Register “$($_.InstallLocation)\AppXManifest.xml”}
This will re-register all Microsoft apps including Xbox, Store, and Minecraft Launcher.
Exit PowerShell and do not forget to restart the machine.
Next, try to play Minecraft Java Edition and check whether you are seeing the0xUnknownAppInstall error or not.
Fix 7 – Resume these services
Some services are essential for Minecraft to run properly.
Step 1 – Launch a Run box.
Step 2 – Then, type “services.msc” and click “OK“.
Step 3 – Track down the “IP Helper” service.
Step 4 – Then, double-tap the service to open it.
Step 5 – Before you do anything, set the service to “Automatic” mode.
Step 6 – Then, tap “Apply“.
Step 7 – Now, you have to start the service. So, tap “Start“.
Step 8 – Next, tap “OK” to save the change.
Step 9 – Do the same thing to these services as well –
Xbox Live Auth Manager
Xbox Live Game Save
Xbox Live Networking Service
Gaming services
Windows Update
Microsoft install service
After starting these services, exit Services and give Minecraft another try.
Fix 8 – Reset/Repair Store, Xbox
If everything so far has failed, repair or reset the Xbox and Store app.
Step 1 – Write down “Store” in the search box.
Step 2 – Then, right-tap “Microsoft Store” and hit the “App Settings” there.
Step 3 – Go down and you shall find the “Repair” option. So, click “Repair” to repair Microsoft Store.
Once you have repaired the Store, open it and try to install Minecraft Java Edition.
Step 4 – Now, click the “Reset” option once.
Step 5 – When a warning message appears, tap the “Reset” option again.
After you have reset the Store, go ahead and try installing Minecraft Java Edition once more.
If you have installed Minecraft Launcher through Xbox, you have to reset it as well.
Step 1 – Use the Windows key once and start to type “Xbox” in the search box.
Step 2 – There, right-click the “Xbox” app and tap “App Settings“.
Step 3 – On the Xbox app settings page, tap the “Repair” option once to repair the app.
After repairing the Xbox app, make sure to check whether you can open Minecraft Java Edition.
If that still doesn’t solve the issue, you have to reset Xbox.
Step 4 – Come back to the Settings page again. Then, click “Reset” once to reset the app.
After resetting Xbox, check if you can actually launch Minecraft Java Edition and test.
Fix 9 – Uninstall and reinstall Minecraft Java
Uninstall Minecraft Java Edition from your system and reinstall it from Minecraft Launcher.
Step 1 – Write “Minecraft Java” in the search box.
Step 2 – When that opens up, right-tap “Minecraft Java Edition” and click “Uninstall“.
Step 3 – Another warning message will appear. So, tap “Uninstall“.
Wait for a few seconds. Windows will uninstall Minecraft Java Edition from your system.
Step 4 – Then, search “Minecraft” from the search box.
Step 5 – Tap “Minecraft Launcher” to open it.
Step 6 – Log in with your Microsoft or Mojang credentials.
Step 7 – Then, select “Minecraft Java Edition” on the left pane. Then, click “Play“.
Minecraft Launcher will now download the latest version of Minecraft Java Edition files. You can easily play that afterward.
This should fix the issue.


