The File Explorer of Windows 10 comes with a built-in and handy auto complete feature that displays auto-suggestions matching the text that you type in. This is effective for the Run dialog box, File Explorer window, and in the address bar. This way, you can save time and accelerate the work time.
AutoComplete feature is by default set to Enabled in Windows 10. When you go to the Run box or to the File Explorer and type a few letters of the text, it will automatically suggest a few matches in a dropdown. The matches are pulled up from navigation and command history. However, if you want to disable it, you can easily turn it off using a simple adjustment in the Control Panel or in the Registry Editor. Let’s see how.
Method 1: How to Disable Auto Complete Feature via Registry Editor
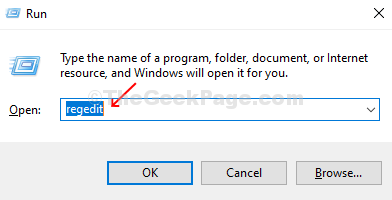
Step 1: Press the Windows key + R to open the Run box, type Regedit in the search box and hit Enter to open the Registry Editor window.

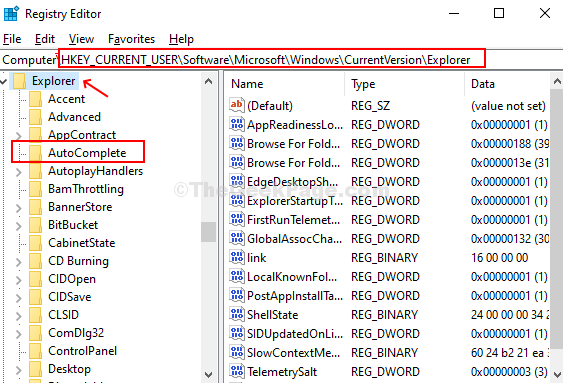
Step 2: In the Registry Editor window, navigate to the below registry key:
HKEY_CURRENT_USER\Software\Microsoft\Windows\CurrentVersion\Explorer
Under the Explorer folder on the left-hand side of the panel, click on AutoComplete.
Note:- If you can’t find Autocomplete folder under explorer, just select explorer , do a right click and choose key. Name this key AutoComplete.

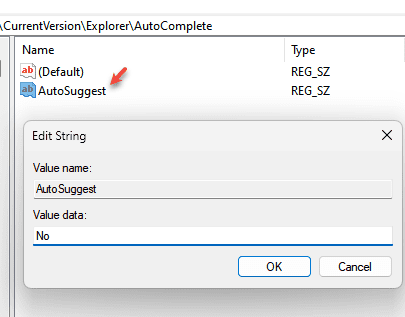
Step 3: In the right side Locate Autosuggest, If it exists Double click on it and set the Value data to No

If Autosuggest do not exists on the right side, then follow the steps below.
Right-click on the empty pane on the right-hand side, select New > click on String Value and name the value as AutoSuggest.

Step 4: Name the new String Value as AutoSuggest, and enter the Value Data as No. Click OK to save the changes.

Step 4: Now, Press CTRL + SHIFT + Esc keys together to open task manager.
Step 5: Right click on Windows explorer and click restart

To enable it back again, enter the value data as Yes.
Method 2: Tweak Internet Options
1. Press Windows key + R key together to open run box.
2. Write inetcpl.cpl in it and click OK.

3. Click on advanced tab.
4. Now, Uncheck Use Inline AutoComplete in File Explorer and Run Dialog.

5. Click OK and close the window.
Method 3: How to Disable Auto Complete Feature via Control Panel
Step 1: Open RUN by jointly pressing Windows and I keys from keyboard

Step 2: Now, click on the Content Tab, press the Settings button under the AutoComplete option.

Step 3: In the next dialog box that appears, under AutoComplete for, uncheck the options you want to disable and you are done.
