Quick Assist feature allows two users to share their machine over a simple remote connection. This feature eliminates the need for any third-party application to assist a remote user on a separate network. But sometimes Quick Assist can get stuck at the loading screen or goes into an endless infinite loop. If the Quick Assist is not functioning properly, follow these fixes to sort out the problem on your computer.
Fix 1 – Uninstall and reinstall the Quick Assist
You can uninstall and reinstall the quick assist feature from the optional features.
1. You have to press the Windows key+I keys together.
2. Then, click on the “Apps“.

3. Once the Apps settings appear, click on the “Apps & Features“.
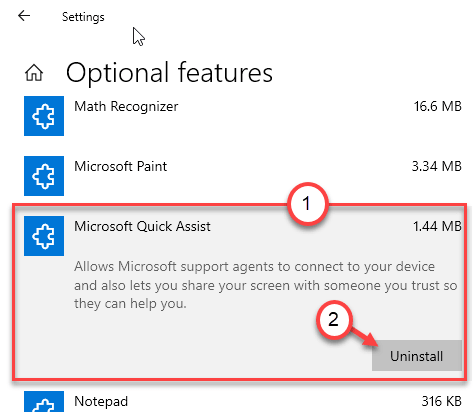
4. Then, click on the “Optional features” on the right-hand side.

5. Now you will see a list of optional features on your screen.
6. Click on the “Microsoft Quick Assist” feature and then click on “Uninstall” to uninstall it.

Once you have uninstalled the feature, close the Settings window. Reboot your system.
7. After rebooting, open the Settings.
8. Then, click on “Apps“.

9. Again, on the left-hand side, click on the “Apps & Features“.
10. Click on “Optional Features“.

11. Then, click on “Add a feature“.

12. Next, scroll down and find the “Microsoft Quick Assist” feature.
13. Finally, click on “Install” to install the feature.

Wait for the feature to be installed. Now try to use the Quick Assist once more. It will work smoothly.
For Windows 11 Users
1 – Search Optional Features in Windows search and click on it.

2 – Search Quick assist in search box.
3 – Click on Microsoft Quick assist which appears in the search result to expand.
4 – Uninstall Microsoft Quick assist.

5 -Now, restart your computer.
6 – Once your PC restart again, Now, click on View Features

7 – Search Quick assist in the search box.
8 – Now, check Microsoft Quick assist option and click on Next

9- Now, click on install to install it.
Fix 2 – Clear File explorer History
1 – Search File explorer options in Windows search box.
2 – Click on File explorer Options from the search result.

3 – Now, Click on Clear to Clear file explorer history.

Fix 2 – Disable saving the encrypted pages
Some users have solved the problem simply by opting not to save the encrypted pages on their system.
1. Right-click on the Windows icon and click on “Run“.
2. After that, type this run command and hit Enter.
inetcpl.cpl

3. Once the Internet Properties window appears, go to the “Advanced” tab.
4. Scroll down through the list to find “Do not save encrypted pages to disk” under the ‘Security’ section.
5. Make sure this setting is unchecked.

6. Then, click on “Apply” and “OK“.

Try to access the Quick Assist once more. This should fix the problem you are facing.
Fix 3 – Clean boot and launch Quick Assist
You can clean boot and launch the Quick Assist on your computer.
1. To boot into clean boot mode, at first right-click on the Windows icon and click on “Run“.
2. Type “msconfig” and click on “OK“.

3. In the System Configuration opens up, click on the “General” tab.
4. Next, just click on the radio button beside the “Selective startup” option.
5. You need to tick the box beside the “Load system services.

6. Next, go to the “Services” section.
7. After that, what you have to do is check the “Hide all Microsoft services“.
8. Finally, click on the “Disable all“.

This will disable all the third-party services on your computer.
9. Just, click on “Apply” and then on “OK“.

If you see a prompt for restart, click on “Restart now” to restart your computer in clean mode.
Your computer will boot into the safe mode without any third-party services. Open Quick assist from the search bar and try it out, once more.
Fix 4 – Run system restore
You can run the system restore to retrieve to a former state.
1. First of all, just type “System Restore“.
2. Then, click on “Recovery” in the elevated search results.

3. In the Control Panel window, click on “Open System Restore“.

4. The System Restore screen will appear, you have to click on “Next“.

5. Choose the restore point from the list of the restore points.
6. Then, click on “Next“.

8. Click on “Finish” to start the process.
Your computer will restart several times to complete the restoration process. Give the quick assist another try.
Fix 5 – Create a new local account
You can create a new local account and try to run the quick assist again. This will help you resolve the problem.