An average hard disk has a life span of three to 5 years. In its life cycle, a hard disk rarely shows up an error message. One of these error messages is ‘Hard disk 1 quick 303’ or ‘Hard disk 1 quick 305’. If you are seeing this error message while running HDD tests, don’t worry. Follow these easy instructions to sort out the issue on your computer.
Workarounds–
1. Try to plug in the HDD drive to another PC. If you still receive the error message, go for these fixes.
2. Open the cabinet after switching off your system. Check the HDD connection properly.
Fix 1 – Check the Windows drive
Windows disk checkup can check and fix any issues with the HDD.
Boot your PC to Windows RE –
You have to access the Windows Recovery Environment. Follow these steps –
1. First of all, completely switch off your computer.
2. Once you are sure that the computer is switched off, press the power button once.
When you see that the computer is starting up, just press-hold the power button for 5 secs to completely switch off your device, again.
3. Keep repeating this process of the start-force shutdown-start process for 2 times and at 3rd time, let the system start normally.
You will notice that the Automatic Repair window has appeared.
4. Once the Automatic Repair window appears, click on “Advanced options“.

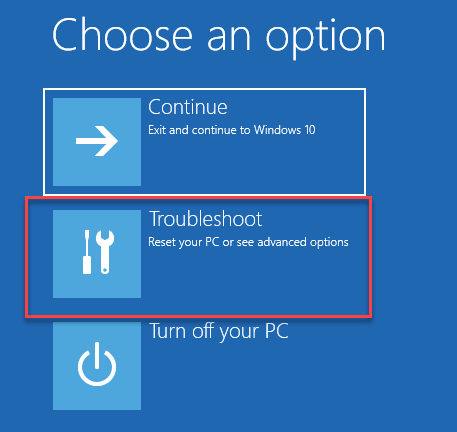
5. In Choose an option screen, simply click on the “Troubleshoot“.

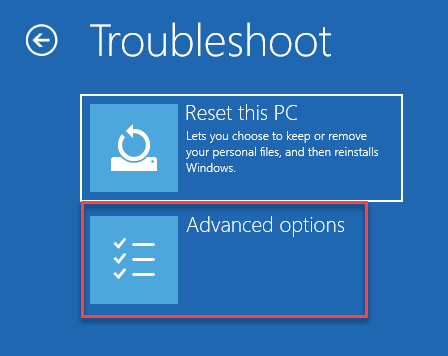
6. Next, you have to click on the “Advanced options“.

7. Just access the Command Prompt screen. Then, click on “Command Prompt“.

8. In the following window, select your administrative account.
9. After that, put your account password in the particular box to log in.
10. Then, click on “Continue“.

11. Once the Command Prompt appears, type this code and hit Enter.
CHKDSK drive letter:
[NOTE– Replace “drive letter:” with the drive letter of the drive where Windows is installed on your system.
Example – In this case, the command is –
CHKDSK C:
]

This process will take some time. Wait patiently. Once the checking reaches 100% completion, close the terminal.
Boot to your system normally. Check if you are still detecting the 303 or 305 error code.
Fix 2 – Prepare a Recovery Drive
A recovery drive of your system files can help in this situation.
[NOTE– You will need a removable media drive of at least 16 GB storage. This removable drive will be the recovery drive. But, it needs to be completely empty.]
1. Plug in the USB drive.
2. Type “recovery drive” in the search box.
3. Then, click on the “Recovery Drive” to access it.

4. Once the Recovery Drive opens up, click on “Next“.

5. When the ‘Select the USB flash drive’ screen appears, select the drive under the ‘Available drive(s);’ section.
6. Then, click on “Next” to proceed further.

6. Click on “Create” and wait for the process to complete.
This should help you fix this issue.
Fix 3 – Recover data from the recovery disk
If you have a recovery disk for the drive, you can easily recover the data from it.
1. Plug in the Recovery disk to your system.
2. Press the Windows key and type “cmd“.
3. After that, right-click on “cmd” and click on “Run as administrator“.

4. Once the terminal appears, paste this code. Modify it and hit Enter.
attrib -h -r -s /s /d drive letter:\*.*"
[NOTE– Alter the ‘drive letter:’ with the drive letter where you are facing this issue.
Example – If you are facing this issue with the D: drive, this will be the command –
attrib -h -r -s /s /d D:\*.*"
]

5. After that, execute this command from the CMD screen.
chkdsk drive letter/f
[Change the ‘drive letter:’ of this command with the drive letter of the recovery drive from which you are trying to recover your files.
Example – Suppose the drive letter of the recovery drive is G:
Then the command will be –
chkdsk G/f
]

6. You have to hit the ‘Y‘ key until you see the command line.
7. Once again you need to input the drive letter and hit Enter to navigate to the drive.
drive letter:
[If the drive letter of the drive is G: then input –
G:
]

8. Finally, input this command in the terminal and hit Enter to initiate the recovery process.
[drive letter: \ >attrib –h –r –s /s /d *.*]
[Don’t forget to alter the ‘drive letter:’ according to the drive letter of the recovery drive.
Example – As the recovery drive is designated as the ‘G:’ drive on our system. The command will be –
[G: \ >attrib –h –r –s /s /d *.*]
]

After completion of the process, close the terminal.
You may notice that all the recovered files on your recovery drive are in .chk format. You can alter the specific file extensions according to your own understanding.
Fix 4 – Try replacing the drive
If any of the above-mentioned fixes didn’t help you resolve this issue, the HDD drive has gone out of order. If that is the case, we recommend you first consult with the manufacturer’s support service.
Otherwise, just buy a new HDD or SDD and replace the older one. If you want to recover the data on the affected HDD, go through this guide of Top 15 Best Free Data Recovery Softwares for Windows to get Back Your Deleted Files.
Your problem should be solved.