With the rise of online frauds and unwanted access, online privacy has become extremely important these days. We tend to save our card details, maintain online wallets, store important official data, and much more on our systems these days without knowing that these details and your online activity are prone to cyber attacks and hacking.
Therefore, some users prefer using proxy servers to browse safely. A proxy server is an intermediary server that keeps the users disconnected from the websites they visit. It works more like a filter and firewall that makes sure that only secured data reaches you, thereby protecting you from all the bad things happening on the internet.
However, some times while trying to remove it, the proxy server won’t turn off in your Windows 10 PC. This can be due to a virus and it could be difficult to turn off. We have come up with a few fixes that can help you get rid of the issue. Let’s see how.
Method 1: Through Settings App
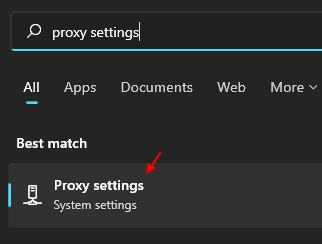
Step 1: Search Proxy settings in Windows search and click on it.

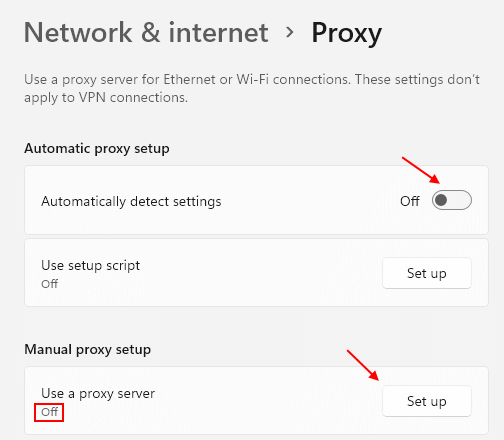
Step 2 – Now, Turn off Automatically detect settings.
Also click on setup located to the right of use a proxy server and turn it OFF also.

Method 2: Using INETCPL.CPL
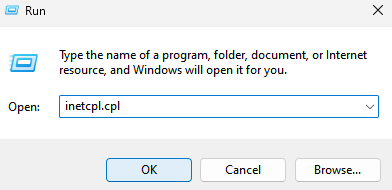
1: Press Windows Key and R key together to open RUN.
Type INETCPL.CPL in it and click OK

2 – Now, Click on connections tab and then click on LAN settings.

3 – Now, Uncheck Automatically detect settings.
4 – Also , Uncheck Use a Proxy server
5 -Click OK.

Method 3: Through Sevices
1 – Press Windows key and R key together to open run command box.
2 -Write services.msc in it and click OK.

3 -Now, Locate WinHTTP Web Proxy Auto-Discovery Service.
4 -Double click on WinHTTP Web Proxy Auto-Discovery Service.
5 -If it is not running, click on start to start it.

6 -Click on Apply and OK and Try again.
Method 4: Through the Registry Editor
Before you go ahead to make any changes to your Registry Editor, make sure that you create a backup of the registry content, so that if you lose any data accidentally, in the process, you can recover it.
Step 1: Go to Start and type Registry Editor in the Windows search field.

Step 2: Left-click on the result to open the Registry Editor window.

Step 3: Copy and paste the below path in the Registry Editor address bar:
HKEY_LOCAL_MACHINE\SOFTWARE\Policies\Microsoft\Windows\CurrentVersion\Internet Settings
Now, go to the right side of the pane and right-click on empty area. Select New from the right-click menu and then select DWORD (32-bit) Value.

Step 4: Now, rename the new DWORD Value as ProxySettingsPerUser.

Step 5: Double-click on ProxySettingsPerUser to open the Edit DWORD (32-bit) Value dialogue box.
Go to the Value data field and set it to 1.
Press OK to save the changes and exit.

*Note – If the ProxySettingsPerUser DWORD Value already exists then skip to Step 5.
Now, restart your PC for the changes to be effective, and the Proxy server should be disabled now.
Method 5 – End task for programs running on port 8080
There are some programs which may use port number 8080 on your pc and therefore results in proxy issues. To locate those program follow the steps given below:-
1 – Search cmd in Windows taskbar
2 -Now, Right click on command prompt icon and choose run as administrator

3 -Now, copy and paste the code given below in command prompt panel and then hit enter key once to run it
netstat -abno | findstr LISTENING | findstr :8080
4 – Now, if you find any program as a result of this command, Just press CTRL + SHIFT + Esc keys together to open Task manager
5- Locate that ptogram , Do a right click and click on end task to end the program

6 -Now, try to change the proxy settings again