SettingsSynchHost.exe process runs in the background that ensures there is a continuous synchronization between the host device (your device) and client devices (your other devices). If you are seeing SettingsSyncHost.exe is eating up too much of the CPU power, there is nothing to worry about. This issue may be triggered due to corrupted Windows Updates that your device has recently received.
Fix 1 – Disable sync settings
Disabling the synchronization settings should fix the issue on your computer.
1. At first, press Windows key+I.
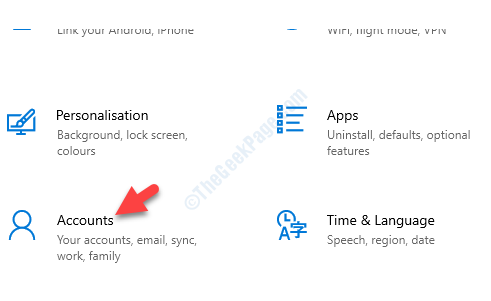
2. Then, you have to click on the “Accounts” settings to access it.

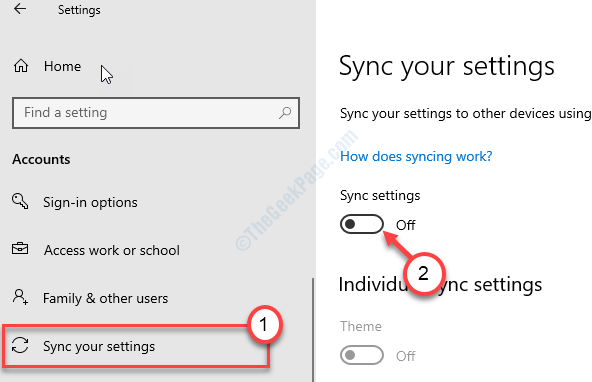
3. On the left-hand side, click on the “Sync your settings“.
4. After that you need to toggle the ‘Sync settings‘ to “Off“.

Close the Settings window.
You may reboot your device. After rebooting the device the ‘SettingsSynchHost.exe’ process won’t eat up huge CPU power.
Fix 2 – Run a PowerShell code
Running a PowerShell code automatically to stop the specified service every 5 minutes should fix the issue.
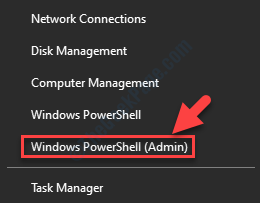
1. Press Windows key+X.
2. After that, click on the “PowerShell(Admin)” to access the PowerShell.

3. When the PowerShell opens up with administrative rights, type this code there and hit Enter.
Register-ScheduledJob -Name "Kill SettingSyncHost" -RunNow -RunEvery "00:05:00" -Credential (Get-Credential) -ScheduledJobOption (New-ScheduledJobOption -StartIfOnBattery -ContinueIfGoingOnBattery) -ScriptBlock { Get-Process | ?{ $_.Name -eq "SettingSyncHost" -and $_.StartTime -lt ([System.DateTime]::Now).AddMinutes(-5) } | Stop-Process -Force}

As soon as you hit Enter, you will see a panel has opened asking for your credentials.
4. Enter your username. Put the account password.
5. Finally, to register the job in your device, click on “OK“.

This will kill the SettingsSynchHost.exe process on your computer.
NOTE–
Stopping the SettingsSynchHost.exe process will pause the sync between your devices. To deactivate this code, you have to execute these steps-
a. Acess the PowerShell terminal again.
b. Then, copy-paste this code and hit Enter to un-register the job.
Get-ScheduledJob | ? Name -eq “Kill SettingSyncHost” | Unregister-ScheduledJob

Close the terminal and restart your computer.
Fix 3 – Modify the permission
Sometimes this issue may occur
1. Press Windows key+R.
2. After that, type “regedit“. Click on “OK“.

3. When the Registry Editor appears on your screen, go to this header-
Computer\HKEY_CURRENT_USER\Software\Microsoft\InputPersonalization\
4. After that, right-click on the “InputPersonalization“.
5. Then, click on the “Permissions“.

6. In the Permissions tab, select the first term in the ‘Group or user names:’.
7. After that, check the “Allow” box beside the option ‘Full control‘.

8. In the same way, select every user group on that list one-by-one and check the ‘Allow’ box to give full control to them.

9. Don’t forget to click on “Apply” and “OK“.

Close the Registry Editor window.
Restart your device and check if this works.
Fix 4 – Check for Windows Updates
Check if there are Windows Update is pending or not.
1. Now, press Windows key+I to open the Settings window.
2. In the Settings window, click on “Update & Security“.

3. After that, click on the “Windows Update“.
4. Then, click on “Check for updates“.

Windows will now download and install the update on your computer.