A printer rarely shows the ‘Printer requires attention’ error message on the system scan. This problem may be caused for any printer issue that can’t be handled by the computer itself. So, you need to take care of the things on your own and manually sort out the problem. If you are also seeing this error message and wondering about the perfect fit for your case, go through these fixes.
Fix 1 – Restart the print spooler service
Try restarting the spooler service.
1. At first, search for “Services” from the search box.
2. Then, hit the Enter to access the Services utility.

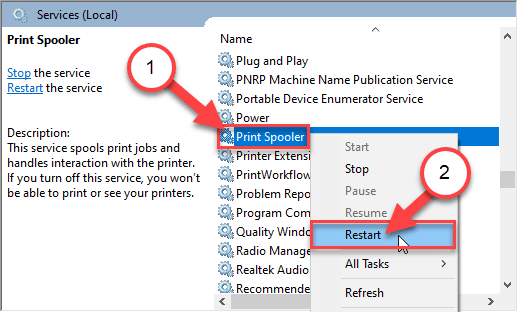
3. Now, right-click on the “Print spooler” service and click on “Restart” to restart the service.

Once you have restarted the service, close the Services window. Try to print again and check the status of the issue.
Fix – 2 Check the printer connections
There is a process called ‘Hard reset’ that resolves most of these cases. Follow these steps –
Shutdown process-
1. At first, turn ON your printer.
2. Once the printer turned ON, simply take out the ink cartridges from it.
3. After that, turn OFF your printer pressing the power switch on it.
4. Then, unplug the printer cables from your system.
4. Next, shut down your system.
5. Ultimately, switch OFF the WiFi router (if you are connecting the printer with the router).
Wait for a minute.
Startup process-
7. Once you have waited for a minute, switch ON the printer.
8. Put the cartridge back in your printer.
9. Now, it is time to switch ON your computer.
10. Subsequently, turn ON the WiFi router to complete the process.
Try to print any document using the printer. Check if this resolves your problem.
Fix 3 – Add your printer using IP address
Sometimes the IP address or the driver that your printer is using can get corrupted and cause this issue.
1. Press the Windows key+E keys together.
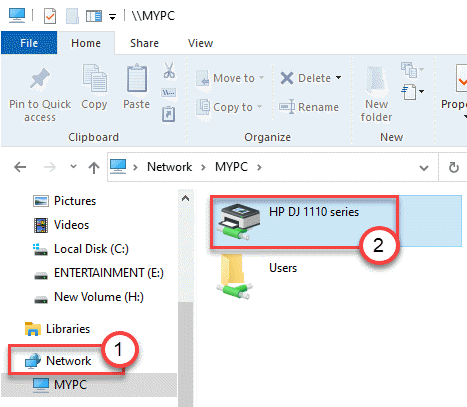
2. Go to the “Network” on the left-hand side.
3. Then, double click on the printer to access its web interface.

4. Once the web interface opens up on your web browser, go to the “Networking” section.
5. Check out the “IP address” for the printer. Note it down properly*.
(We are taking an example of a printer with an IP address – 192.168.1.252)
Close the browser window.
6. Right-click on the Windows icon and click on “Run” to access it.
7. After that, type this code and hit Enter.
control printers

8. Then, click on “Add a printer” to add the device manually.

9. Windows will start to detect the new printer.
10. You have to click on “The printer that I want isn’t listed“.

11. Then, click on the “Add a printer using a TCP/IP address or hostname“.
12. Finally, click on “Next” to add the printer.

13. Now, set the ‘Device type:’ set to the “Autodetect” setting.
14. In the Hostname or IP address box, put the IP address you have noted earlier in the printer web interface.
Port name will be obtained automatically.
15. Then, Click on “Next” to start installing the printer.

16. Once Windows detects the printer, check the “Replace the current driver” box.
17. Again, click on “Next“.
Then, set a name for your printer and finish the installation process.
*NOTE–
a. If you have a printer with a touch-screen panel, you can find the IP address in the ‘Wireless’ section or in the networking area.
b. If you still can’t identify the IP address, search for it on the manufacturer’s website using the model number of your printer.
Once the printer is installed, try to print the document you were facing difficulty printing.
Fix 4 – Delete the printer queue
The files that are already in the spool folder may cause this issue.
1. At first, search for “Services” from the search box.
2. Then, hit the Enter to access the Services utility.

3. Once it opens up, scroll down through the list of services.
4. Double click on the Print Spooler” service once you have noticed it.

4. Just set up the ‘Startup type:’ to the “Automatic” setting.
5. Then, you need to click on “Stop” to stop the service.

6. At last, save the settings, by clicking on “Apply” and “OK“.

Now, minimize the Services utility.
7. Press Windows key+E to open the Run window.
8. Then, go to this location 0n the file explorer.
C:\WINDOWS\system32\spool\PRINTERS
9. If you see a prompt has appeared, click on “Continue“.

10. When the PRINTERS folder opens, select all the files and folders.
11. To empty the folder, press the ‘Delete‘ key.

Close the File Explorer window.
Maximize the Services screen.
12. Finally, right-click on the “Print Spooler” service and click on “Start” to resume the service.

Once you have done these, try to print the document again.
Fix 4 – Troubleshoot the printing issues
If all the previous methods don’t sort out your issue, try the troubleshooter.
1. Press the Windows button and the ‘S’ key and write “Troubleshoot“.
2. Then, hit ‘Enter‘.

3. After that, scroll down and click on the “Additional Troubleshooters“.

4. Click on the “Printer“.
5. Then, click on “Run the troubleshooter“.

6. Then, click on the “Advanced” to view the advanced settings of the printer diagnostics.

5. Just, check the box “Apply repairs automatically“.
6. To go to the next step, click on “Next“.

7. After this, select your printer from the list of devices.
8. Then, again click on “Next“.

9. After that, click on “Apply this fix“.

10. To close the troubleshooter, click on the “Close the troubleshooter“.
This will identify and fix the problem on your device. Try to print anything.
Your problem will be solved.