Some users are complaining about an issue where the printer is not accepting any print command from the users and as a result, not printing anything at all. If you are experiencing the same thing on your system, there are some easy fixes that you can use to solve this print command stall issue with your printer. Generally, this issue is related to the spooler service of the printer.
Fix 1 – Restart the spooler without the printer
Usually, restarting the spooler service and detaching and reattaching the printer should solve this problem.
1. At first, carefully disconnect the USB cable that connects the printer to your system.
[If you are using the printer via WiFi, disconnect it from the settings. ]
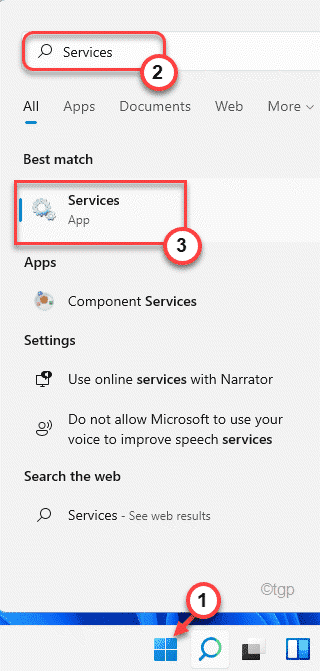
2. Then, click on the Start icon on the taskbar and type “Services” in the search box.
3. Further, tap on the “Services” in the search results.

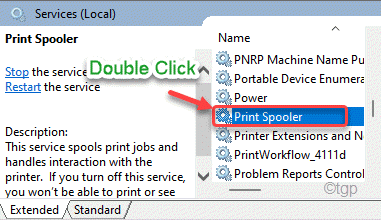
4. When the Services window appears, scroll down to locate the “Print Spooler” service.
5. Just, double-click on it to access it.

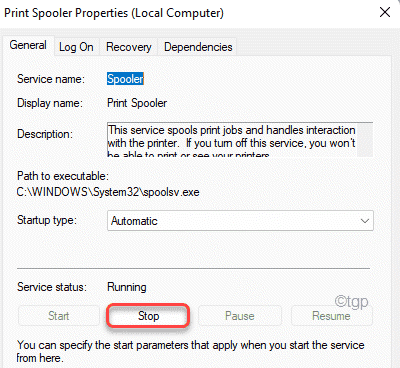
6. Then, tap on “Stop” to stop the Print Spooler service.

7. Now, connect the USB cable of the printer to your computer.
8. Coming back to the Services window, tap on “Start” to start the Print Spooler service.

9. After that, tap on “Apply” and click on “OK” to save the changes.

Now, try to print something on your computer. Check the status of the issue.
Fix 2 – Clear the Spool folder
You can clear the Spool folders on your computer.
1. At first, press the Windows key and type “cmd“.
2. Now, right-click on the “Command Prompt” and click on “Run as administrator“.

3. Simply, write this command on the terminal and hit Enter to stall the spooler service.
net stop spooler

After running the command, minimize the terminal.
4. After that, press the Windows key+E keys together.
5. Then go to this location ~
C:\Windows\system32\spool\PRINTERS
6. You may see a warning message while accessing the PRINTERS folder.
Just tap on “Continue” to proceed further.

7. Select all the contents with your mouse and press the “Delete” key to empty the folder.

8. After clearing the Printers folder, you have to resume the spooler service. Run this code in the Command Prompt terminal.
net start spooler

Finally, close the Command Prompt window.
Restart the printer manually. Then, try to print a test page using the printer.
Fix 3 – Edit the registry
You have to delete the printer subkey in a particular registry place.
1. At first, press the Windows key and type “regedit” in the search box.
2. Then, click on the “Registry Editor” to access it.

[
Important–
In this solution, you have to alter the sensitive registry files. If you delete/modify a wrong key, your system can irreversibly brick. So, you should back up the registry database in a secure location.
a. After opening the Registry Editor, you will need to click on the “File” and then click on “Export“.
b. Save the backup in a secure place.

]
3. When the Registry Edit0r opens up, go to this key location –
HKEY_LOCAl_MACHINE\SYSTEM\CurrentControlSet\Control\Print\Printers
4. Now, on the left-hand pane of the Registry Editor, you will notice the list of printers.
5. Then, right-click on the problematic printer and tap on “Delete“.

6. When you receive a warning message, tap on “Yes” to confirm your action.

Close the Registry Editor.
This will de-register the printer from your current device. So, you have to install it. Usually, a simple restart of your machine may do the trick. But, even after restarting the system, if you see that the printer driver is missing, you can easily download and install the same from the manufacturer’s website.
Fix 4 – Uninstall and reinstall the printer
If nothing is working out for you, you can uninstall the printer device along with the printer software.
Step 1 – Uninstall the printer software
1. At first, press the Windows key+R keys together.
2. After that, type “appwiz.cpl” and then, click on “OK“.

3. You will find the list of printer-related apps in the window.
4. Now, right-click on the first printer-related software you see in the list, and then tap on “Uninstall“.

Follow the on-screen instructions to finally uninstall it from your computer.
5. This way, look for any printer-related software and uninstall those in the same way.
Step 2 – Remove the printer device
You can remove the printer device from your computer.
1. At first, press the Windows key+R keys together.
2. Then paste this command in the Run terminal and hit Enter.
control printers

3. In the Devices and Printers window, right-click on the printer you are facing the problem with and tap on “Remove device“.

This will remove the printer device from your computer.
1. At first, press the Windows key+Rkeys together.
2. Then, type this command in the Run window and click on “OK“.
printui.exe /s

3. In the Printer Server Properties window, go to the “Drivers” tab.
4. Here, select your printer from the list.
5. Then, click on “Remove…” to remove the driver.

6. Further, click on the radio button beside the “Remove driver and driver package” option.
7. Then, tap on “OK” to remove the printer driver.

8. After doing this, tap on “Apply” and “OK” to save the settings.

Now, you can proceed to the last and final step in this solution.
Step 4 – Restart and reinstall the printer
After uninstalling all the printer-related software and printer driver, restart your computer.
After restarting the system, you will see that the default printer driver is installed. Now, try to print a test page using the printer.
If this doesn’t solve the issue, you have to download the latest version of the printer driver from the manufacturer’s website and install it. After this printer will work just fine.
This should have fixed your problem.