Whether if you are a gamer or a power user, Razer keyboards are often considered to be the best in the business. All most all the Razer keyboards are packed with the top of the line specifications like mechanical keys, customizable RGB lightings, etc. But what if the lights on your Razer keyboards don’t lit up? Don’t worry. Simply follow these easy fixes to solve this problem.
Workaround –
1. Disconnect the keyboard from the port of your computer it is connected to. Then, connect it again. Check again.
2. Plug in your keyboard to another computer and check if the RGB lighting is working.
3. Restart your computer. Disconnect and reconnect the USB to your computer. Check further.
Fix 1 – Plug in the keyboard to another slot
The port your keyboard is connected to may be the root cause of the problem.
1. At first, disconnect the keyboard from the port it is using.
2. Brush of all the dust from the keys on your keyboard,
2. Once you have done that, plug in the keyboard to another port (try the ports at the back of the cabinet.)
3. Now, check if the keyboard lights are showing up or not.
Go to the next fix, if that doesn’t work out.
Fix 2 – Turn Off and On the Chroma apps
If you are playing a game that uses Chroma apps (almost all popular game does), this solution is just for you.
1. Open the Razer Synapse center.
2. Here, you will notice all the Chroma apps on your computer.
3. Turn Off the Chroma apps one by one.
4. Then turn those apps On again.
[
NOTE –
If turning Chroma apps Off and On doesn’t work out, try turning the Chroma Apps Off completely and further test it out. Check further.
]
Now, check the lighting again.
Fix 3 – Uninstall and re-install the Razer Synapse
Razer Synapse is the application that is used to control the RGB lighting on the Razer keyboards.
Step 1 – Uninstall the driver
At first, you have to uninstall the Razer software from your computer.
1. Right-click on the Windows icon and click on the “Run“.
2. Then, type “appwiz.cpl” in the Run terminal and then click on “OK“.

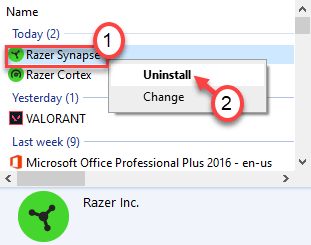
3. You will see the Razer softwares installed on your computer.
4. Now, right-click on the “Razer Synapse” and click on “Uninstall“.

Once you have uninstalled Razer Synapse, close the Control Panel window.
Restart your computer.
Step 2 – Install the latest VerSION oF Razer Synapse
Now, you have to download and install the latest version of Razer Synapse.
1. Go to the Razer Synapse download center.
2. To download the latest version of Razer Synapse, click on “Download Now“.

After downloading the driver, close the browser window.
3. Go to the directory, where you have downloaded the driver.
4. Then, double click on the “RazerSynapseInstaller_V1.0.148.188” to install the latest version.

5. Click on “Run“.

6. Then, simply check the box beside the “RAZER SYNAPSE“.
7. Next, click on “INSTALL” to download and install the latest version of Razer Synapse.

8. Wait till it downloads.

9. Once it is installed, check box the “Launch RAZER SYNAPSE“.
10. Then, click on “GET STARTED” to open the RAZER SYNAPSE.

Once the RAZER SYNAPSE launches, log in with your credentials. You will notice your device in the window.
Try to lit up the keyboard and alter the color combinations.
Check if this works.
Fix 3 – Uninstall the keyboard driver
The last resort for you to do is to uninstall the keyboard driver and re-install them.
1. At first you need to right-click on the Windows icon on the bottom-left corner.
2. After that, click on “Device Manager” to access it.

3. Then click on the “Keyboards” section to expand it.
4. Next, just right-click on your Razer keyboard driver.
5. Then, click on the “Uninstall“.

6. If there is a warning message, just click on “Uninstall“.

After uninstalling the driver, restart your machine. Disconnect the USB keyboard and re-plug it to the computer.
This will solve your problem.