One of the most annoying issues that you may face while printing documents is a printer driver error. The “Printer Driver Error 0x80070705” error message may appear on your system, especially if you are shifting your printer from an old server to a new one. Follow these easy fixes to solve the problem quickly and start printing your important documents again!
Fix 1 – Run the official Printer troubleshooter
The first option that you should try is to use the official printer troubleshooter.
1. At first, press the Windows key+I keys together.
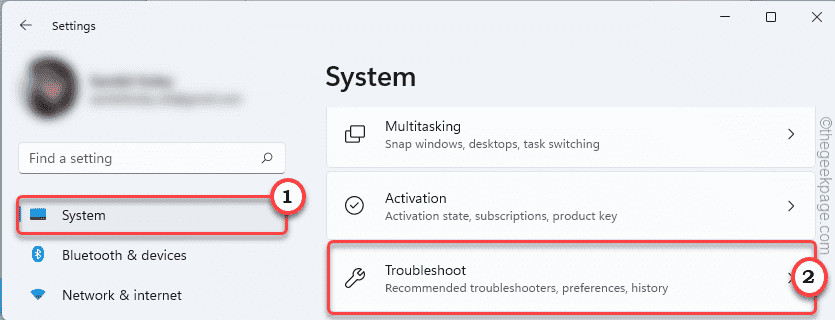
2. Then, tap on “System” on the left-hand pane.
3. Next, click on the “Troubleshoot“.

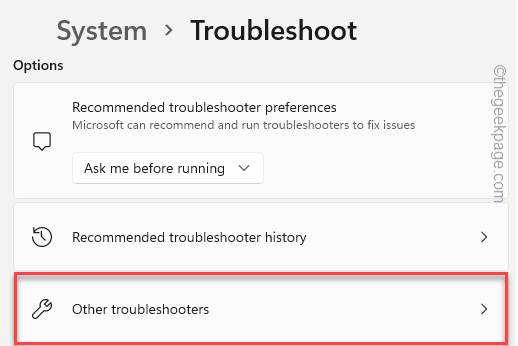
4. After that, tap on “Other troubleshooters“.

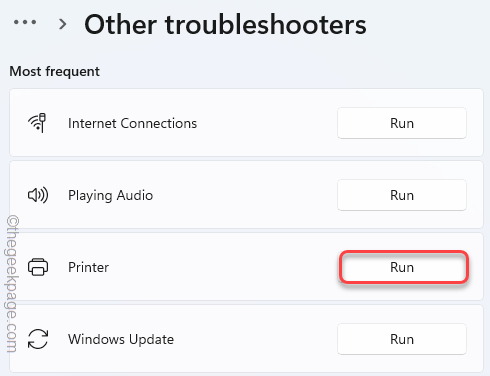
5. Here, you will find the Printer troubleshooter.
6. Next, tap on “Run” to run the printer troubleshooter.

7.. Just, check the box “Apply repairs automatically“.
8. After that, go to the next step, click on “Next“.

9. After this, select the printer you are facing this problem with.
10. Then, tap on “Next“.

11. Next, click on “Apply this fix“.

Let Windows apply this fix to solve the printer-related issue.
Fix 2 – Restart the Printer Spooler service
The printer service requires to be running on your system to printer operate properly.
1. At first, press the Windows key+R keys together.
2. Then, type “services.msc” and click on “OK“.

3. When the Services window opens up, locate the “Print Spooler” service.
4. Then, right-click on the service and tap on “Properties“.

5. When the Properties appears, tap on ‘Startup type:’ and set it to “Automatic“.
6. Tap on “Stop” to stop the service.

7. Wait for a few seconds. Then, click on “Start” to start the service again.
8. Finally, tap on “Apply” and “OK” to save these changes.

After that, close the Services window. Then, reboot your system and check whether this works for you.
Fix 3 – Update the printer driver
You have to install the latest version of your printer driver.
1. At first, right-click on the Windows icon.
2. Then, tap on the “Device Manager” to access it.

3. When the Device Manager opens up, expand the “Print queues” device section.
4. Then, right-click on the printer driver and tap on “Update driver“.

5. Then, tap on the “Search automatically for drivers“.

Windows will download and install the printer device on your system.
Restart the system once you are done.
Try to print something using the printer. Check whether this is working or not.