There are a number of beautiful fonts that come with your Microsoft Office. However, it is quite natural for you to find and fall for a Google font that you don’t have in your Microsoft Word. So how do you get the Google font of your liking in your Windows 11 machine and use it in your Microsoft Word? In this article, we explain in some very simple steps how you can download and install Google fonts in your Windows 11 or Windows 10, so that you can easily use them in applications like Microsoft Word.
Note: Since Google fonts are installed for your Windows and not specifically for Microsoft Word, once these fonts are installed, they will be available for use in any of the supported applications.
How to Download Google Fonts in Windows 11/10
Step 1: The very first step is to download the Google font that you want on your machine. Click here to head straight to the Google Fonts page.
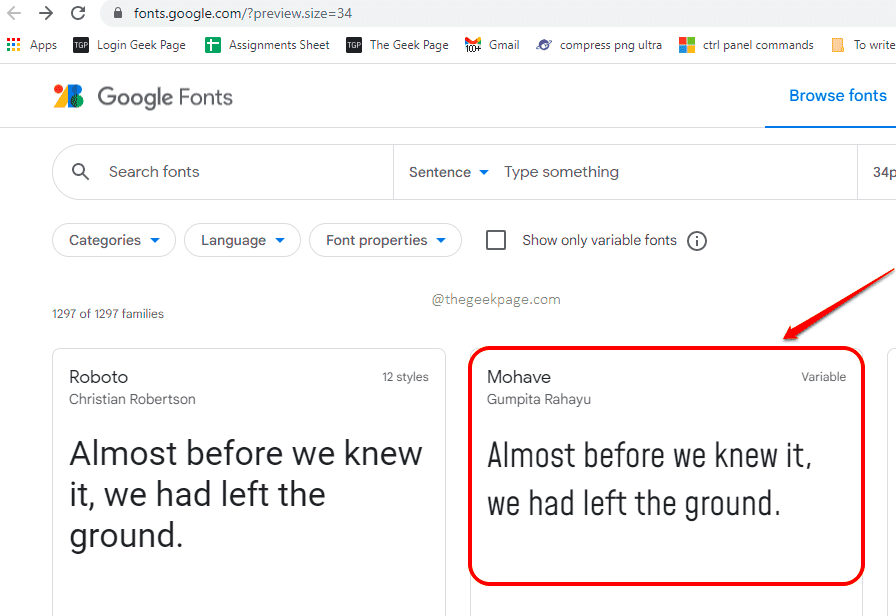
Step 2: Once you are at the Google Fonts page, click on the font that you want to install. In the example below, I have chosen the font Mohave.
Step 3: Once you are at the font specific web page, click on the Download family button at the top right corner of the web page.
That’s it. The selected font will now download in your machine.
Note: If you would like to download the complete set of Google fonts in your machine at once, you can click on this Github URL. This is a direct download link to download all the Google fonts together.
How to Install Google Fonts in Windows 11/10
Step 1: To install the Google font, double click on the zip file that you just downloaded and then double click on the file with the extension TrueType font file.
Step 2: When the following preview window launches, click on the Install button to install the font in your machine.
If there are multiple TrueType font files in the downloaded zip file, you will have to install all of them. Also, if you have downloaded the entire Google fonts pack, then you have to install each font in the zip file.
How to Use the Installed Font in Microsoft Word
Using the installed font in Microsoft Word is the easiest of all the tasks. Since the font is installed in your Windows, applications that support the fonts will have them available automatically.
Step 1: If you would like to use the font in your Microsoft Word, you need to launch Microsoft Word first. If Word is already open, you have to close it and open it again.
Step 2: Once Word is open, click on the HOME tab first. Then click on the Fonts dropdown. Scroll down and locate the newly installed fonts.
Click on the font to select it and start typing, your brand new font is all ready for you!
Please tell us in the comments whether you found the article useful or not.


