Is the Preview Pane not working correctly in the Microsoft Outlook app on your device? Previewing emails in the Preview pane without tapping it to open is a blessing. So, not being able to preview the emails in the Preview Pane can directly affect your productivity as it can become quite troublesome getting through all of your emails. It will take just a few minutes to fix this.
Fix 1 – Rectify a registry key
Modify a particular registry key using the Registry Editor.
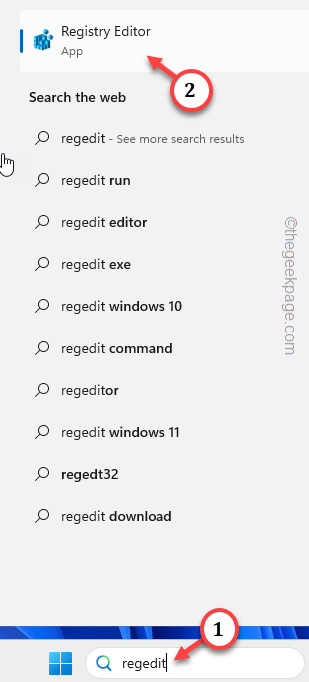
Step 1 – Go ahead and hit Start button and begin to write “regedit” in the box.
Step 2 – Then, click the “Registry Editor” to access that.
Step 3 – After accessing the Registry Editor page, get to this pane –
HKEY_LOCAL_MACHINE\SOFTWARE\Microsoft\Office\ClickToRun\REGISTRY\MACHINE\Software\Microsoft\Windows\CurrentVersion\PreviewHandlers
NOTE – This address can be different on your system depending upon the version of the Microsoft Office, OS version.
So, if you can’t locate the address there, go to this location instead –
HKEY_LOCAL_MACHINE\SOFTWARE\Wow6432Node\Microsoft\Windows\CurrentVersion\PreviewHandlers
Or,
HKEY_LOCAL_MACHINE\SOFTWARE\Microsoft\Windows\CurrentVersion\PreviewHandlers
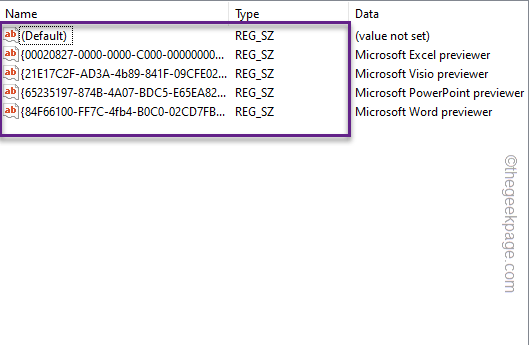
Step 4 – On the right-hand pane, you shall find the registry strings associated to the Microsoft Office components and their respective values.
Step 5 – These should be the values –
Name                                                                       Data

{21E17C2F-AD3A-4b89-841F-09CFE02D16B7}                        Microsoft Visio previewer

{65235197-874B-4A07-BDC5-E65EA825B718}                        Microsoft PowerPoint previewer

{84F66100-FF7C-4fb4-B0C0-02CD7FB668FE}                        Microsoft Word previewer

{00020827-0000-0000-C000-000000000046}                        Microsoft Excel previewer
Check if any of the items differ.
Step 6 – If any of the string value is different from the value that we have mentioned above, double-tap that value.
Step 7 – Erase the old value and replace that with the value from the table.
Step 8 – Tap “OK” to save the changes.
After modifying the values, quit the Registry Editor window and reboot the machine.
Fix 2 – Enable the Preview Pane
Enable the Preview Pane feature in Microsoft Outlook.
Step 1 – In the Microsoft Outlook window, get to the “Views” tab.
Step 2 – Next, just switch the “Message Preview” and set it to any of the lines you want to see in the menu bar.
Step 3 – Now it will ask your permission to enable this in which mailbox. Select the appropriate option to impose that preview setting.
After this, go ahead and check the preview pane on your Outlook client.
Fix 3 – Switch the Reading Pane style
The main problem can just be the wrong Reading Pane settings.
Step 1 – Visit the “View” tab in Microsoft Outlook app.
Step 2 – Go to the “Reading Pane” tab.
Step 3 – Switch it to the “Right” mode to program the reading mode
You should be able to preview the emails in the Outlook client.
Fix 4 – Clean the Outlook view
Sometimes the customized format of Microsoft Outlook can lead up to this problem.
NOTE – All the customizations that you have made in Microsoft Outlook will be gone. So, before doing this, make sure to note down those so that you can customize it again later.
Step 1 – Just right-click the Windows button and select the “Run” in the context menu.
Step 2 – Then, paste this in the blank Run dialog box. Then, click “OK“.
outlook.exe /cleanviews
As the default version of the Microsoft Outlook loads up, tap a message to check whether you can preview the email or not.
Proceed to the next solution to fix the issue.
Fix 5 – Quick Repair the Office app
Try quick repairing the Microsoft Office client and check if that helps you with the preview pane in Outlook.
Step 1 – Go ahead and open up the Settings. To do this, you can use the Win+I key combinations.
Step 2 – Go straight to the “Apps“.
Step 3 – On the opposite side of the Settings page, find the “Installed apps” and tap to open that up.
Step 4 – In the Installed Apps section, find the “Microsoft Office” in the right-hand section.
Step 5 – Once you have found that out, tap “⋮” and choose “Modify“.
Step 6 – In the Office setup page, you have to choose the “Quick Repair“.
Step 7 – Then, tap “Next” to start the repairing process.
After running this operation on the program, Microsoft will automatically fix the Office apps.
Step 8 – When it is done, you will see this message –
Done Repairing!
Close the message and relaunch the Outlook app.
Check whether you can view the preview pane in Microsoft Outlook.
Fix 6 – Create a new Outlook profile and use that
The customization you have done in your profile may have corrupted it completely. So, create a new profile and use that instead.
Step 1 – On the Outlook client on your computer, and click the “File” menu.
Step 2 – Then, go to the “Info” tab.
Step 3 – Simply, click the “Account Settings” on the right-hand side and click “Manage Profiles” further to open that up.
Step 4 – In the Mail Setup page, tap the “Show Profiles…” option to access that.
Step 5 – You have to create a new profile. So, tap “Add” to do this.
Step 6 – Name this profile anything you want. Next, tap “OK” to create the profile.
Step 8 – There are two options here. Either use the “Email account” or use the “Manual setup or additional server types”.
Step 9 – Then, click “Next” to start the account creation process.
Follow the subsequent steps to complete the profile creation process.
Step 10 – Returning to the Profile page, make sure to choose the “Always use this profile“ and choose the profile that you have just created.
Step 11 – After this, quickly tap “Apply” and “OK” buttons consecutively.
Now, close the Outlook client. Then, restart the Outlook app.
As it opens up, it will prompt you to choose the profile. Choose the new profile and let the client load up. When it does, you should be seeing the preview pane in Outlook again!


