APC Index mismatch error message may appear on your computer while starting it up. It is not a regular Blue screen of Death issue as this error prohibits your access to your computer. To solve this issue, follow our guide minutely.
Fix 1 – Clean boot in Safe mode
Clean booting your computer in Safe Mode should fix this issue.
Before going ahead you have to access the Advanced Repair window manually.
Follow these steps to do so~
a. At first you need to switch off your device.
b. After switching it off, just press the power button to start it up again.
c. The moment you see that the manufacturer’s logo has appeared, just press-hold the power button.
d. After that, what you need to do is to continue this for 2-3 more times.
Then, the fourth time, your pc should automatically come to the startup repair screen.
Once the Automatic Repair opens up, proceed this way-
Step – 1 Boot up your computer in Safe Mode
You need to boot up your computer in safe mode.
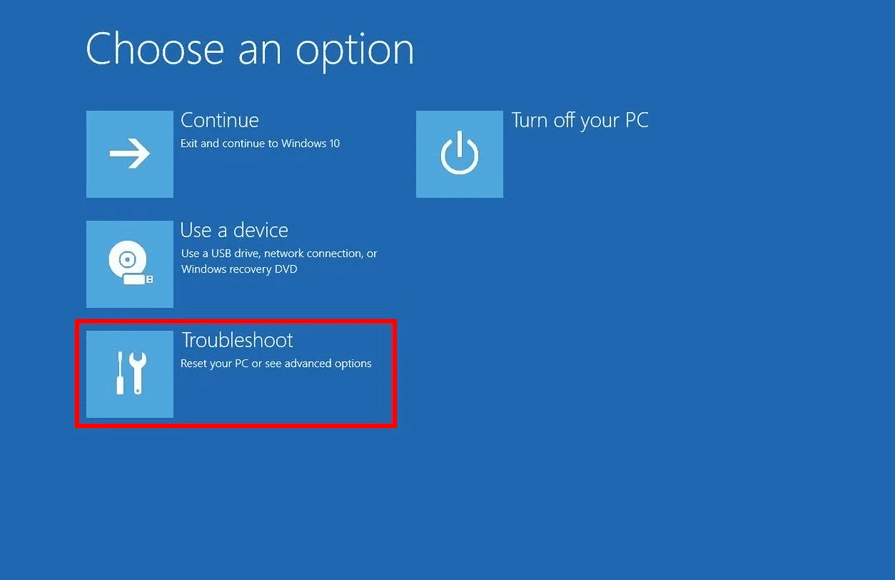
1. Click on the “Advanced Repair“.

2. After that, you need to click on “Troubleshoot” to check out the advanced startup options.

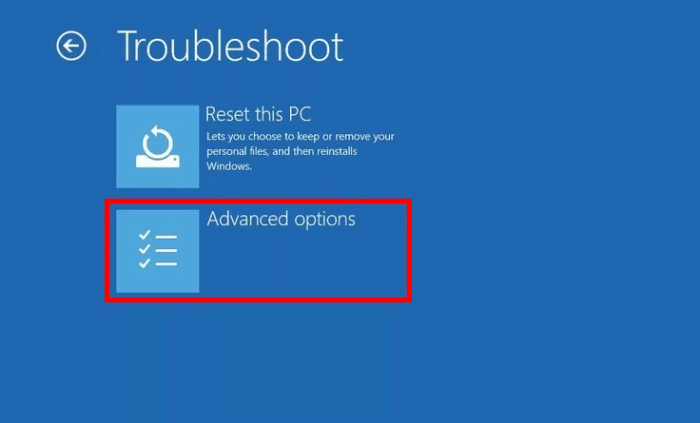
4. Then click on the “Advanced options“.

5. Then, click on the “Startup Settings“.

6. On the bottom-left corner of the corner you will notice “Restart“.
7. Click on it.

7. Simply press the ‘F4‘ key to “Enable Safe mode “.
After pressing the F4 key, your system will start to boot into the safe mode.

In safe mode, your computer will look like black, ‘safe mode’ written at four corners of your screen.
If your computer goes in Safe Mode, proceed to the next step.
Step 2 – Clean boot your device
In Safe mode, clean booting your device should identify and fix the issue.
1. Just right-click on the “Windows icon“. After that, click on the “Run“.
2. Here you need to write “msconfig” and click on “OK“.

3. In the System Configuration window, go to the “General” section.
4. Check the “Selective startup” option.
5. Then you have to check the box beside the “Load system services.

6. After that, go to the “Services” tab.
7. Do not forget to check the “Hide all Microsoft services” box.
8. Finally, to disable the third-party drivers on your computer, you have to click on “Disable all“.

9. Next, step, go to the ‘Startup‘ tab.
10. Click on the “Open Task Manager“.

11. When the Task Manager opens up, right-click on each item one-by-one and click on “Disable” to disable them all.

Once you have done disabling every startup item, close the Task Manager window.
12. Coming back to the System Configuration screen, click on “Apply” and “OK”.

Reboot your computer and check if the error code is still showing or not.
Fix 2 – Update graphics driver
Updating the graphics driver has fixed this problem on many computers.
Boot your computer in Safe mode just following the steps explained before. Follow these instructions once you are in Safe mode
1. Press Windows key+X. Then, click on the “Device Manager“.

2. Once the Device Manager appears, expand the section named “Display adapters“.
You will notice the graphics driver you are using.
3. Right-click on your graphics driver and then click on “Update driver“.

4. After that, click on “Search automatically for drivers“.

You will have to wait for a while as Windows will install the latest update.
5. Then, click on “Network adapters“.
6. After that, right-click on the network driver you are using and then click on “Update driver“.

7. Again you have to click on the “Search automatically for drivers“.

This will update the network driver on your computer.
Reboot your computer and check if this fix is working or not.
Fix 3 – Change DNS
Diagnosing the network adapter should identify the problem and fix it. After booting up in safe mode, follow these steps.
1. Just right-click on the network icon on the taskbar.
2. Then, click on the “Open Network & Internet Settings“.

3. Then, click on “Change adapter options”

4. Right-click on the adapter you are using and then click on “Diagnose“.

Now, follow the on-screen instructions.
If Windows can’t detect any problem with your network, close the troubleshooter and follow these steps-
5. Again right-click on the adapter and this time, click on the “Properties“.

6. To modify the IPv4 settings, you have to double click on “Internet Protocol Version 4 (TCP/IPv4)“.

7. When you see that the Internet Protocol Version 4 (TCP/IPv4) Properties window has opened up, click on “Use the following DNS server addresses:”
8. After that input these following DNS servers settings-
Preferred DNS server: 8.8.8.8
Alternate DNS server: 8.8.4.4
9. Click on “OK“.

Once you have done so, close the window.
The problem should be solved.
Fix 4 – Reset the network adapter
Resetting the network adapter on your computer should fix the issue.
[Warning– Resetting the network adapter will remove every network adapter from your computer and reinstall them again. In the process, all the network settings (login ID, password, network addresses) will be erased. VPN softwares will be removed along the way. ]
1. At first open the Settings by pressing the Windows key+I.
2. After opening the Settings, you have to click on the “Network & Internet“.

3. On the left-hand side, click on “Status“.
4. After that, on the right-hand side scroll down to click on “Network reset“.

5. Then, click on “Reset Now” to reset the adapter.

After resetting the network, restart your computer.
After restarting your PC, connect to the internet once again. This should fix your issue.