Outlook Templates keeps on disappearing as you begin to compose the emails in there? This problem seems to be affecting a small group of Outlook users. Generally, if the default location of the Templates stored on your computer has altered.
Fix 1 – Check the default Template location
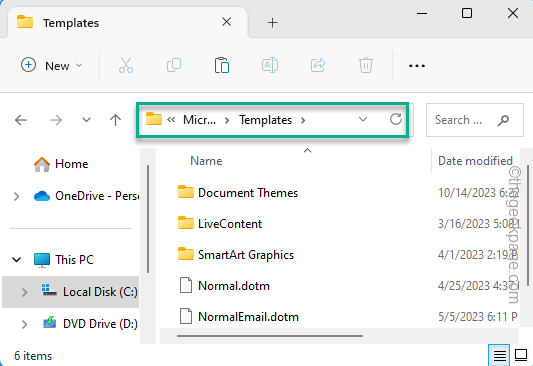
Office stores all the Templates in a default location on your local drive. Make sure the folder is there.
Step 1 – Visit the File Explorer.
Step 2 – Paste this is the address bar and press the Enter key to open it up.
C:\Users\<YourUserName>\AppData\Roaming\Microsoft\Templates
Step 3 – If you can’t locate the “Templates” folder in there, the Templates folder is corrupted.
In that case, you have to repair the Outlook app.
Fix 2 – Disable all the third-party add ins
There are some third-party plug-ins in the Outlook application that can cause this Templates issue. Disabling those add-ins should help.
Step 1 – Maximize or open the Outlook app.
Step 2 – Then, open the “File” menu and tap the “Options“.
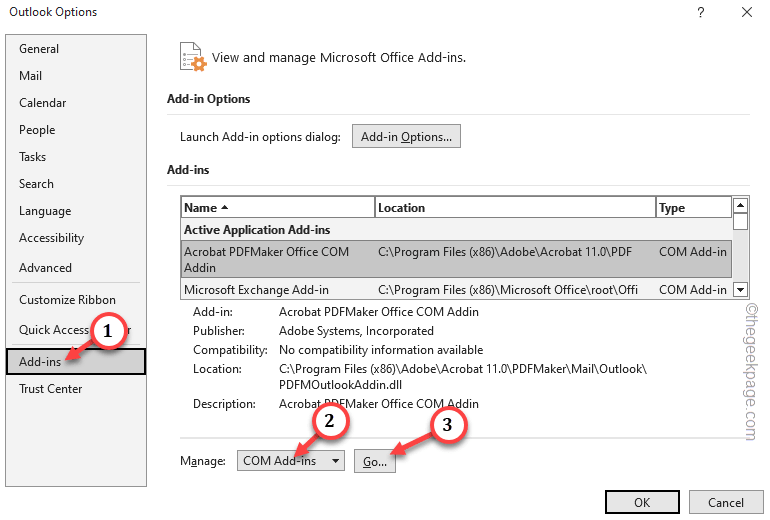
Step 3 – On the Outlook Options window, go to the “Add-ins” section.
Step 4 – Go to the ‘Manage:’ and set the “COM Add-ins” from the drop-down list.
Step 5 – Finally, tap “Go“.
Step 6 – This will load up the list of COM Add-ins in there.
Step 7 – Make sure to uncheck the boxes one-by-one to disable all the Add-ins in there.
Step 8 – Tap “OK” to disable all those Add-ins.
Close the Outlook options window.
After this, try to use the templates one more time and test.
Fix 3 – Create a new profile and migrate the data
Maybe the older profile has got corrupted. So, create a new profile and migrate the data there.
Step 1 – After opening the Outlook, visit the “File” menu and choose “Account Settings 🔽“.
Step 2 – Next, choose the “Account Settings…” to access that.
Step 3 – After this, switch to the “Data Files” tab.
Step 4 – This tab keeps the tab of the data files associated to your email address. Just, select your associated email ID and tap “Open file location“.
This will take you to the location of the Outlook data file.
Quit the Outlook application.
It is impossible to transfer the Outlook data file while Outlook is opened.
Step 5 – Quickly choose the .ost file associated with your email address. Then, right-click the data file and tap the copy button to copy it.
Step 6 – Next, go to a secure folder and paste it there to create the backup there.
Step 7 – After this, go back to that data file again.
Step 8 – Select the data file and use the Delete button to remove it from your computer.
Just open the Outlook.
It may show error codes. Just ignore that and proceed. You may have to log in to your email account to start the email syncing process.
Outlook will create a new .ost file during this process.
Fix 4 – Create a new Outlook Profile
If deleting the associated Outlook data file doesn’t fix the issue, try creating a new profile and setting it up using the older Outlook data file.
STEP 1 – Get the data file address
Step 1 – If the Outlook is already opened, go to the “File” menu.
Step 2 – There, tap the “Account settings” and choose the “Account settings” more.
Step 3 – Visit the “Data Files” tab.
Step 4 – Check the data files according to the associated gmail address. We are interested in the location of this data file. So, note that down.
Close the Account Settings tab.
STEP 2 – Create a new Outlook profile
Create a new Outlook profile and switch the data file to that profile.
Step 1 – On the Outlook, click the first option on the menu bar, “File“.
Step 2 – On the other pane, just tap the “Account settings“. But, this time, choose the “Manage profiles” option.
This will load up the Mail Setup page on your system.
Step 3 – On the Mail Setup screen, tap “Show Profiles” to view the Outlook profile.
Step 4 – We are going to create a new Outlook profile. So, use the “Add” option to start the process.
Step 5 – Give a personalized name to this Outlook profile. Make it stand out.
Step 6 – Choose “Manual setup or additional server types“.
Step 7 – Select the account type you are using from this page and tap “Next“.
Step 8 – On the following page, find the ‘Deliver new messages to:’ and choose the “Existing Outlook Data File” option.
Step 9 – Then, select the “Browse” to proceed.
Step 10 – As the Open Outlook Data File loads up, proceed to the location of the Outlook data file that you have noted before.
Step 11 – Select the Outlook data file carefully, if you can find multiple data files there.
Step 12 – Then, tap “OK” to open that up.
Finally, you should back in the main Outlook Settings page.
Step 13 – Fill up the email address, incoming, outgoing server addresses. Finally, click “Next“.
Finish setting up the email account.
You should be back to the Mail page after this.
Step 14 – Then, set the ‘When starting Microsoft Outlook, use this profile:’ to “Always use this profile” and choose the new profile that you have created.

Step 15 – Finally, it is time to tap the “Apply” and “OK” buttons to save the settings.

You have successfully migrated your Outlook profile to a new profile.
Try to use the Templates once more.
Fix 5 – Repair the Office
Try to repair the Office app (which includes the Outlook app) to solve this problem.
Step 1 – Quickly right-tap the Start icon and tap “Run“.
Step 2 – To open the Programs & Features window, paste this and click “OK“.
appwiz.cpl
Step 3 – Locate the Microsoft Office app.
Step 4 – Next, right-click that and choose the “Change” option.
Step 5 – There are two options there. Choose the “Quick repair” option.
Step 6 – Choose the “Repair” option to start the repairing operation.
[NOTE – You can choose the Online repair as well. But, it takes comparatively longer time as all the Office files get analyzed in this process.]
Let the Word take care of the repair process.
When this task completes, test using the email Templates once more.


