Recently, many users have reported that the Search feature is not working in Outlook. When you enter the search keyword and hit Enter, search results are not received or the results are wrong. In certain cases, even the search box is not displayed in Outlook.
If you are facing these issues, don’t panic. In this troubleshooting guide, we have covered all the fixes that can help you solve the Search is not working issue in MS Outlook.
Fix 1: Check the indexing status and ensure it is complete
Before arriving at a conclusion that the search is not working, check the indexing status and ensure it is complete.
Step 1: Open MS Office Application.
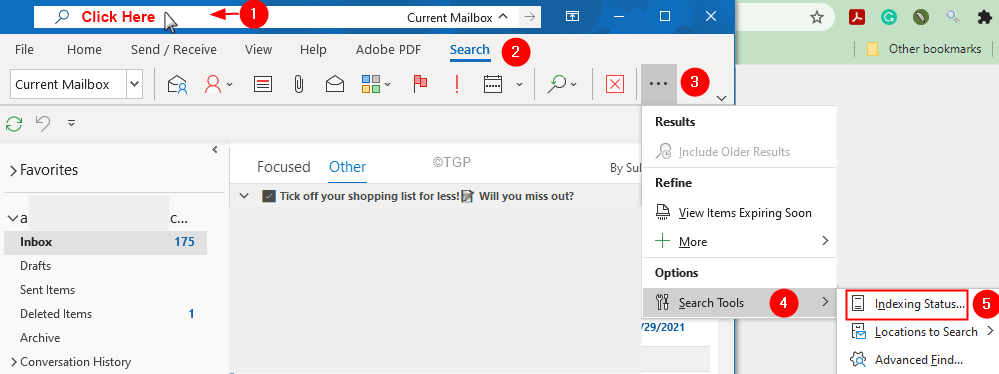
Step 2: Click on the Search bar.
Step 3: Now, you should be able to the Search tab in the top ribbon. Click on Search.
Step 4: Click on the three dots and then select Search Tools from the drop-down.
Step 5: Select Indexing Status
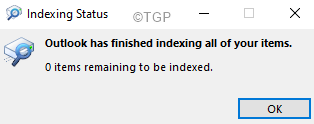
Step 6: In the Indexing Status window, check if the indexing is completed.
Step 7: In case, the indexing is still not complete, wait for it to finish and then run your search again.
Fix 2: Alter the Search Results Settings
Step 1: Open MS Outlook.
Step 2: Click on File Menu Option.

Step 3:From the left bottom corner of the window, select Options.

Step 4: From the Outlook Options window, choose Search from the left-hand side.
Step 5: From the right side, under the results section, tick on All mailboxes.
Step 6: Check the option Include messages from the Deleted Items folder in each data file when searching in All items
Step 5: Click on the Ok
Fix 3: Check and Add necessary Index Locations
Step 1: Open the Outlook Options window. ( Follow steps 1-4 from the Fix 1)
Step 2: Select Search from the left-hand side panel.
Step 3: At the right side, under Sources, click on the Indexing Options button as shown below.
Step 4: Check if the following locations are listed:
- Internet Explorer History
- Microsoft Outlook
If you see these options, go to Step 8.
Step 5: If you don’t see them listed, click on Modify.
Step 6: Tick on Microsoft Outlook and Internet Explorer History.
Step 7: Click on the Ok button
Step 8: In the Indexing Options window, click on Advanced
Step 9: Go to the FileTypes tab
Step 10: Scroll down and locate the .pst filetype in the list.
Step 11: Ensure the .pst filetype is listed and checked.
Step 12: If you don’t see the .pst file listed, under the Add new extension to list section, enter the filetype, in this case, .pst
Step 13: Click on Add
Step 14: Finally click on the OK button
Fix 4: Rebuild Indexing in Outlook
Step 1: Open the Outlook Options window. ( Follow steps 1-4 from the Fix 1)
Step 2: Select Search from the left-hand side panel
Step 3: At the right side, under Sources, click on the Indexing Options button as shown below.
Step 4: In the Indexing Options window, click on Advanced
Step 5: Under the Troubleshooting section, click on the Rebuild button
Step 6: In the confirmation dialog that shows up, click on Ok
Step 7: Close and Re-open Outlook. Check if the search is working as expected.
Fix 5: Repair the .pst or .ost file
The .pst file in case of pop3 accounts and, the .ost file in case of IMAP accounts hold all the data wrt to an account in the system. When MS Outlook connects to the internet, this file is updated with the new contents. This file is responsible for showing the existing mails in MS Outlook when the system is Offline. Now, when this file gets corrupted, the synchronization issues are bound to occur.
Step 1: Identify the location of the .pst or .ost file. Follow the below steps,
1. Open the MS Outlook Application.
2. Click on File from the top menu options.

3. In the appearing window, go to the Info tab.
4. Click on Account Settings.
5. Then click on Account Settings again.

6. In the Account Settings window that opens, Go to the Data Files tab, Note the location of the file of the required account.

Step 2: Open SCANPST.EXE and run the application.
The location of the application is different for different versions of Outlook.
- Outlook 2019 or 2016: C:\Program Files (x86)\Microsoft Office\root\Office16
- Outlook 2013: C:\Program Files (x86)\Microsoft Office\Office15
- Outlook 2010: C:\Program Files (x86)\Microsoft Office\Office14
- Outlook 2007: C:\Program Files (x86)\Microsoft Office\Office12
Based on the Outlook version on your system, go to the appropriate location and double click on SCANPST.EXE

Step 3: When the SCANPST application opens, paste the filename in the Enter the name of the file you want to scan section. The location that we noted in Step 1, point 6.
Step 4: Click on the Start button.
NOTE: The OST files can also be repaired using the SCANPST application.

Step 5: Once the scan finishes, it will notify if there are any errors. Repair the file with the instructions shown.
Step 6: Restart the system and open the Outlook application and check if this fixed the issue.
If this doesn’t help, try the next fix listed below.
Fix 6: Repair MS Office Application
Step 1: Hold the keys Windows+r at the same time.
Step 2: In the Run window, type appwiz.cpl, and press Enter.

Step 3: In the Program and Features window that opens, locate Microsoft Office Suite or Microsoft 365. Right-click on it and choose Change.

Step 4: If the UAC pops up asking for permissions, click on Yes.
Step 5: In the appearing window, check Quick Repair.
Step 6: Click on the Repair button.

Step 7: Follow the instructions shown and repair the Office programs.
Step 8: If the issue is encountered due to a corrupted Outlook application, this fix will resolve the issue.
Step 9: Restart the application and check if the issue has been fixed.
Step 10: If the error is still seen, try choosing Online Repair and click on Repair. Make sure you have a working internet connection.

Step 10: In the Ready to start an Online Repair Dialog, click on Repair.

Fix 7: Repair the Outlook Account
Step 1: Open the MS Outlook application.
Step 2: Click on File Menu Option.

Step 3: Click on Account Settings.
Step 4: From the drop-down, choose Account Settings.
Step 5: In the Account Settings window that opens, select your account and then click on Repair.
Step 6: Follow the on-screen instructions and complete the process.
Fix 8: Ensure the Group Policies on Search are not configured
NOTE: This fix is only for Windows 10 Professional Users. Group Policy Editor is not present in Windows 10 Home.
Step 1: Open Run Dialog with the keys Windows and R.
Step 2: Type gpedit.msc and hit Enter.
Step 3: In the Group Policy Editor window that opens, from the left-hand side panel, navigate to the following location.
User Configuration > Administrative Templates > Windows Components > Search
Step 4: On the right side, you will notice certain policies listed, these policies should not be configured.
Step 5: If you notice that the policies are enabled, double-click on the policy that is Enabled.
Step 6: Select the Not Configured option.
Step 7: Click on Apply and then click on OK.
Fix 9: Add a Registry Key
Step 1: Open the Run Dialog(Windows+R).
Step 2: Type regedit and press OK.

Step 3: If you see a UAC popping up asking for permissions, click on Yes.
NOTE: Registry editing can have an adverse effect on the system even with the slightest mistake. It is advised to take the backup of the registry before proceeding. To take a backup, In the Registry Editor–> Go to File –> Export –> Save your Backup file.
Step 4: In the Editor window, go to the following location,
HKEY_LOCAL_MACHINE\SOFTWARE\Policies\Microsoft\Windows\Windows Search
NOTE:
If you don’t find the Windows Search Key,
1. Right-click on the Windows Folder, Choose New > Key
2. Name the newly created key as Windows Search
Step 5: Within the Windows Search Folder, check if the DWORD PreventIndexingOutlook is present.
Step 6: If it is not present, right-click anywhere on the right-hand side.
Step 7: Choose New > DWORD(32-bit)
Step 8: Name the newly created DWORD as PreventIndexingOutlook. It should be set to 0
Step 9: By default, the value is 0. However, if it is not in your case. Double-click on PreventIndexingOutlook
Step 10: In the Edit DWORD window, set the value to 0 and press Ok
Step 11: Restart your System.
Check if this helps.
Fix 10: Create a New Outlook Profile
If none of the fixes listed above works, then try creating a new user profile and check if the search works.
Step 1: Open the Run Dialog using the keys Windows and R.
Step 2: Type control and press the Enter key.

Step 3: In the search bar located at the top right corner of the Control Panel window, search for Mail. Click on the Mail option that shows up.

Step 4: In the Mail Setup window that opens, click on the Show Profiles as shown below.

Step 5: Click on the Add option.

Step 6: Enter the desired name, and press Enter.

Step 7: Ensure the newly created Profile is selected.

Step 8: Add your account to MS Outlook.
Step 9: Once, the setup is completed, check if the search works as expected.
If you are still noticing issues with the Search in Outlook, try the following general fixes :
- Update your Outlook application
- Uninstall and Re-install Outlook
- Run Windows Search and Indexing troubleshooter
- Ensure Windows Search Service is enabled
That’s All. We hope this article has been informative.
Kindly comment and let us know if you were able to solve the issue with these fixes.
Thank you for Reading.

