While opening MS Outlook on your computer, you may have stumbled upon this critical error message – “Outlook.pst has reached its maximum size.” Usually, if you receive a lot of emails with big attachments on a regular basis, you are bound to face this error prompt. The Outlook data file for your email address has reached its maximum limit, and you need to take some action to manage the mailbox size.
Fix 1 – Increase the mailbox size using regedit
You can use the Registry Editor to increase the default mailbox size for Outlook. The default allocated size is just 15 GB.
Warning – You are supposed to edit the registry in this solution. Usually, this Outlook edit won’t affect the rest of the system. But to be on the safer side, you should always create a registry backup beforehand.
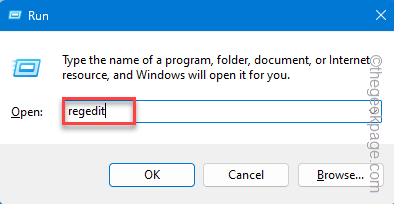
Step 1 – Quickly open the Run box using the Win+R key combinations.
Step 2 – Next, type “regedit” in the box and hit Enter.
Step 3 – Get straight to this point –
HKEY_CURRENT_USER\Software\Microsoft\Office.0\
[NOTE – The sub-folder is named 16.0 is the version of the Office installed on your system. If you have other versions of the Office installed, this will change accordingly.
Like, if you have Outlook 2013, this address will be –
HKEY_CURRENT_USER\Software\Microsoft\Office.0\
]
Step 4 – Look whether you can find the “Outlook” key.
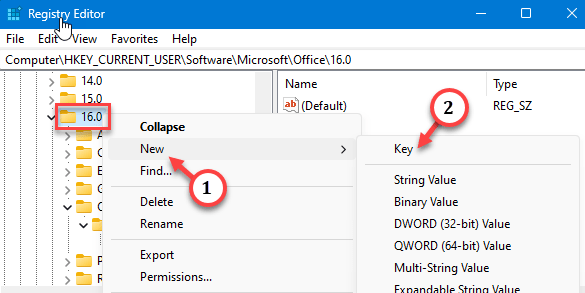
Step 5 – If you can’t, right-click the “16.0” key and tap “New>“, and tap “Key“.
Step 6 – Rename the key “Outlook“.
Step 7 – Make sure that you have selected the “Outlook” key.
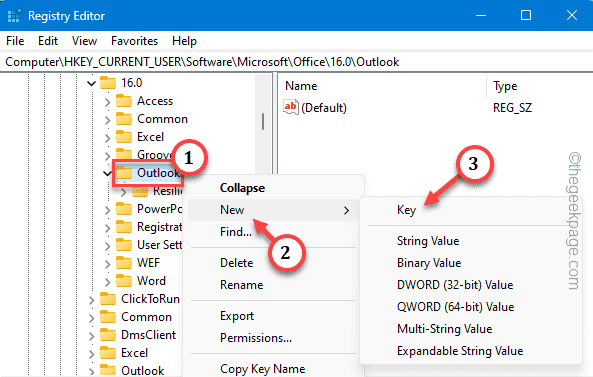
Step 8 – While selecting the key, right-click that and click “New>” and tap “Key“.
Step 9 – Name this one “PST“.
Now, we have to create two new values to mitigate the Outlook error.
Step 10 – Go to the right-hand section. Right-click on the space and tap “New>” and “DWORD (32-bit) Value” to create one.
Step 11 – Rename the value “MaxLargeFileSize“.
Step 12 – After creating the value, double-tap that.
Step 13 – At first, set the Base of the value to “Decimal“.
Step 14 – This value that you are supposed to put here involves a calculation.
You can write the size of the allowed space in MB. Like, if you want to allocate 90GB, the calculation will be – 90*1024 = 92160.
Step 15 – Put that calculated value in the ‘Value data:’ box and click “OK“.
Now, it is time to create the second value.
Step 16 – Go to the right pane. There, right-click on the space and tap “New>” and use “DWORD (32-bit) Value” to make one.
Step 17 – You have to change the name to “WarnLargeFileSize“.
Step 18 – Double-click this value so that you can change it.
Step 19 – Shift the “Base” to the “Decimal” number system.
Step 20 – This value is set to warn when the size limit that you have set has been reached. So, you can set this to 90% of the actual size limit.
Example – Suppose, you have set the previous limiter to 90GB. So, you have to set this value to 90% of that. Means 90*0.90*1024=82994
Input the calculated value in the Value Data box.
Step 21 – Then, click “OK“.
Finally, when you are done creating these limiters, exit the Registry page and restart your system.
This change will take effect at the next system startup. Check Outlook and you won’t see the “Outlook.pst has reached its maximum size.” message anymore.
Fix 2 – Compact the email data file
There is a way you can compact the .ost files directly in MS Outlook.
Step 1 – Launch Outlook. Ignore the error message for now.
Step 2 – Click the “File” option.
Step 3 – Then, click “Account settings” > “Account settings” to open it.
Step 4 – Get to the “Data files” tab.
Step 5 – Select your email account and tap “Settings“.
Step 6 – Just click “Compact” to make the .ost file compact.
Exit the Outlook client and check.
Fix 3 – Archive the old emails
Clean up older mail to save up more space.
Step 1 – Open Outlook.
Step 2 – Click “File“.
Step 3 – Then, click “Tools” and tap the “Clean Up old items…” option.
Step 4 – Now, select the email address you are working with.
Step 5 – Set the date to at least 3 months prior to the date you are working. This way, Outlook won’t archive newer emails.
Step 6 – Then, click “OK” to start the process.
Test if the issue still persists.
Fix 4 – AutoArchive unnecessary emails in Outlook
AutoArchiving the older email should clear more space for the PST file.
Step 1 – On the Outlook home page, click “File“.
Step 2 – Then, go to the “Info” section.
Step 3 – Click “Tools” on the opposite side and tap “Mailbox Cleanup“.
Step 4 – Directly tap the “Autoarchive” option to auto-archive all the emails.
You won’t get the “Outlook.pst has reached its maximum size.” error message again.
Fix 5 – Free up more space
Lack of storage space may also result in this error. So, you should take a look at the status of the C: drive and clear it up, if necessary. Start from the Recycle Bin and then use Disk Cleanup. You can get the complete guide from here.


