A few users are facing sync issues in Outlook. The most common sync error is “Task reported error (0x8004102A) Error with Send/Receive. There was an error synchronizing your folder hierarchy. Error 80041004”. Basically, this error occurs when there is no sync between the Outlook mail (the web app) and Microsoft Outlook (the desktop app) in the Exchange Mail Server. Due to this users cannot send or receive emails from their Outlook.com to the Outlook server. The sync issues happen when the Outlook account settings are changed, credentials changes, certificate issues, cache issues, file corruption, using older versions of Outlook, etc. In this article let us see the different methods to solve the sync issues in Windows 10.
Method 1 – Check Mail settings
1 – Open Control panel
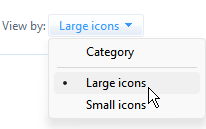
2 – Select large icons in View by option from dropdown

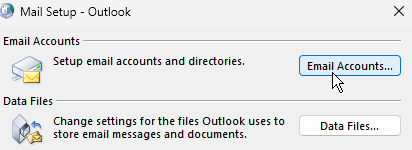
3 – Click on Mail

4 – Click on Email Accounts

5 – Double click on your email account

6 – Click on More settings

7 – Click on Outgoing server Tab
8 – Make sure My outgoing server requires authentication is selected as shown below

9 – Click on Advanced Tab
10 – Make sure Incoming server and outgoing server settings are as shown.
11 – Increase the server timeout settings by dragging the slider to the right and click OK

12- Click Next and follow on screen instructions

Method 2: Verify The Credentials
Before trying different methods, check the basic things like credentials and account settings. Check if the credential is appropriate and if any changes in the account settings happened. If all seems correct and even then the issue is occurring go ahead and try the below methods.
Method 3: Click the Send/Receive Settings
Step 1: Open the Outlook app, you can do this by double clicking on the outlook icon app. Or open the run prompt using Windows + R keys together, type outlook.exe and hit enter
Step 2: At the top, click on the Send/Receive tab
Step 3: There appears a list of operations, click on Send/Receive All Folders
Step 4: Wait for the Sync to finish and then check if all goes well.
Method 4: Run Microsoft Outlook In Safe Mode
Step 1: Open the run prompt using Windows + R keys together
Step 2: Type outlook.exe /safe and hit enter
Step 3: Now Outlook will open in the safe mode where all the add-ins will be disabled.
If there is no error now, that means the error was caused due to some add-in. To check which add-in caused the issue, disable the add-ins one by one and figure it out.
Method 5: Manually Sync The Folders
Step 1: Open the Outlook app, you can do this by double clicking on the outlook icon app. Or open the run prompt using Windows + R keys together, type outlook.exe and hit enter
Step 2: At the top, click on the Send/Receive tab
Step 3: Click on Send/Receive Groups dropdown. From the drop down list, select Define Send/Receive Groups
Step 4: In the opened Send/Receive Groups dialog box click on New button
Step 5: Enter a name for the new group under send/receive group name and click on OK
Step 6: Select the checkbox beside Include the selected accounts in this group by clicking on it, a tick mark should be seen in the box
Step 7: In the Account Options section tick the checkboxes beside Send mail items and Receive mail items by clicking on them
Step 8: In the Folder Options section select the folder where you want the new emails to be delivered.
Step 9: To save the changes click on OK
Step 10: Click on the close button to exit from the Send/Receive Groups window and now check if the error is solved
Method 6: Disable The Certificate Revocation Options
Step 1: Open the run prompt using Windows + R keys together
Step 2: Type inetcpl.cpl and hit enter. This will open the Internet properties window
Step 3: Choose the Advanced tab
Step 4: Scroll down and find the Security section
Step 5: In the Security section uncheck / disable the Check for publisher’s certificate revocation and Check for server certificate revocation* options. You can uncheck them by clicking on the checkboxes, tick mark should not be present in the checkbox
Step 6: To save the changes click on Apply and then click on OK. Now check if the issue is solved.
Method 7: Enable The Use Cached Exchange Mode feature
Step 1: Open the Outlook app
Step 2: From the top left corner click on File
Step 3: By default Info tab options will be opened, click on Account Settings
Step 4: From the dropdown list click on Account name and sync settings
Step 5: In the exchange account settings window, click on More settings which is at the bottom left
Step 6: Microsoft Exchange window will be opened, go to the Advanced tab
Step 7: Select the checkbox beside Use Cached Exchange Mode to enable it
Step 8: To save the changes click on Apply and OK
Step 9: Re-open the Outlook app and check if the issue is resolved.
Method 8: Repair .pst and .ost Files
Step 1: Open the Microsoft Outlook app
Step 2: Click on the File tab which is at the top. By default Info tab options will appear.
Step 3: Click on Account settings. From the dropdown list choose Account settings
Step 4: In the opened Account settings window go to the Data Files tab
Step 5: Note down the path of folder that has issue and close the window
Step 6: Identify the location of SCANPST.EXE on your system. The locations are different for each versions of Outlook
Example:
Outlook 2016: C:\Program Files\Microsoft Office\root\Office16
Outlook 2013: C:\Program Files (x86)\Microsoft Office\Office15
Outlook 2010: C:\Program Files (x86)\Microsoft Office\Office14
Outlook 2007: C:\Program Files (x86)\Microsoft Office\Office12
Step 7: Search for the SCANPST.EXE file on your system and double click on it
Step 8: In the opened window, type the path you had noted (Step 5) in the Enter the name of the file you want to scan.
Step 9: Then click on Start button
Step 10: If SCANPST.exe finds an error, click Repair to fix it. Wait for the repair to complete and then open the Outlook and check if the issue is solved
Method 9: Delete And Re-add Outlook Account
Step 1: Open the Microsoft Outlook app
Step 2: Click on the File tab which is at the top. By default Info tab options will appear.
Step 3: Click on Account settings. From the dropdown list choose Account settings
Step 4: Go to the Email tab and select the account you want to remove and click on Remove option
Step 5: In the confirmation pop up click on yes
Step 6: Click on the New option which is under the email tab to create a new account
Step 7: Enter your email address and press on Connect. Follow the on screen instructions to re-add the account.
Step 8: It will take a few minutes to finish the process, once done click on Finish. Now check if there is no issue
Method 10: Add The Account To A New Profile
Step 1: Open run prompt using Windows + R keys together, type control and hit enter
Step 2: Control panel is opened. Click on view by dropdown and select large icons
Step 3: Click on Mail. Here I have Mail(Microsoft Outlook) since I have set is as default
Step 4: In the mail set up window click on Show profiles
Step 5: Click on the Add button
Step 6: In the opened window type a name to your new profile under Profile Name and click on OK
Step 7: Select the created profile and choose Always use this profile option by clicking on the radio button beside it
Step 8: Click on Apply and OK. Now open the outlook with the newly created profile and check if the issue is solved
Method 11: Repair The Outlook Application
Step 1: Open the run prompt using Windows + R keys together, type appwiz.cpl and hit enter.
Step 2: This will open Programs and features window. Find for Microsoft Office Application (Microsoft Office Suite or Microsoft 365) and click on it
Step 3: There appears a change button at the top, click on the change button
Step 4: A UAC (user account control) window pops up asking for permissions, click on yes
Step 5: In the appeared window, click on the radio button beside Quick repair then click on repair
Step 6: If the issue is because of a corrupted Outlook application, this fix will resolve the it.
Method 12: Update The Outlook Application
Step 1: Open the Microsoft Outlook app
Step 2: Click on the File tab which is at the top
Step 3: In the left, scroll down and select the Office Account
Step 4: Click on Update options which is on the right side, and from its dropdown list select update now
Step 5: It will take a few minutes for the updates to install. Once done check if there is no error.
Method 13: Create A New Windows Local User Account
Step 1: Open windows settings using Windows + I keys together. Click on Accounts
Step 2: From the left click on Family & other users
Step 3: On the right side under other users click on Add someone else to this PC
Step 4: Now you will get How will this person sign in? screen. Click on I don’t have this person’s sign-in information which is at the bottom
Step 5: Select Add a user without a Microsoft account on the create account screen.
Step 6: In the opened window, enter your username and password, also re-enter the password and click on Next
Step 7: Wait for few seconds for your account to be created. Once done, login with your new account and check if the issue is resolved.
That’s it! I hope this article is helpful and let us know which of the above methods you applied and got it resolved. Thank you!!