Automatic Send/ Receive feature is the main part of the Outlook email client. So, if this Automatic Send/ Receive feature stops working you won’t be able to properly deliver any email (starting from sending the email to getting the delivery report) or receive any emails to your inbox. There are many
Fix 1 – Enable the Send/Receive group
You may have mistakenly disabled the Send/Receive group in Outlook. Enable the Send/ Receive group in the Outlook client.
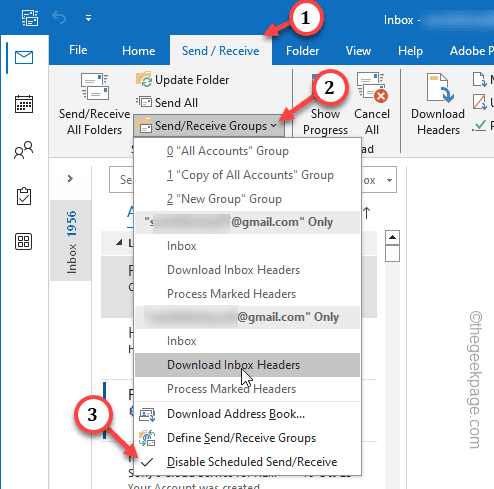
Step 1 – After opening the Outlook client, go to the “Send/Receive” group on the menu bar.
Step 2 – Tap the “Send/Receive Groups” drop-down and check what it says. If the “Disable Scheduled Send/Receive” option is checked, tap that once to disable that.
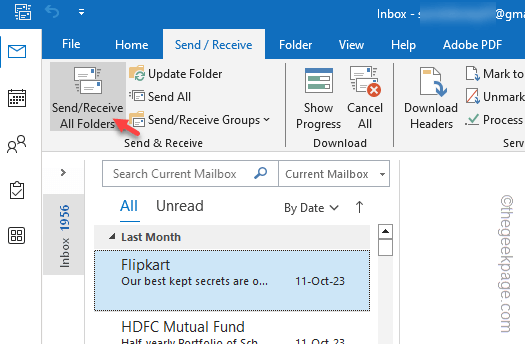
Step 3 – Then, click the “Send/Receive All Folders” button in the same menu bar.
After turning this Send/Receive feature in the Outlook client, your emails will begin to sync again. Check the inbox and Sent items to ensure that.
Fix 2 – Define the Send/ Receive group
If the Send/Receive group feature is enabled and it is still disabled, you should create a new Send/Receive group in the Outlook client.
For Outlook 2010 and later users –
If you are using Outlook 2010 or later version, follow these steps –
Step 1 – Tap the “File” and next tap the “Options” menu.
Step 2 – Go straight to the “Advanced” tab.
Step 3 – On the left-hand pane, go to the Send and receive zone. So, tap “Send/Receive…” to open that.
Step 4 – Just select the current group from the Group Name section.
Step 5 – Then, tap “Copy” to copy the group.
Step 6 – In the Send/Receive Group Name: box write a name of your profile “New Group” and click “OK“.
Step 7 – Coming back to the Send/Receive Groups window, select the old group name in the box.
Step 8 – Now, uncheck the ‘Setting for group ‘All accounts’ area, uncheck the “Include this group in send/receive (F9)” box.
Step 9 – Similarly, in the ‘When Outlook in Offline’ box, untick the “Include this group in send/receive (F9)” box.
Step 10 – After this, tap “Close“.
After doing all these, quit the Outlook and relaunch it.
For Outlook 2007 or before –
If you are an old Outlook user, the steps are a little bit different. So, follow these steps –
Step 1 – After opening the Outlook client, go to the “Tools” menu and open the “Send/Receive Settings“.
Step 2 – Go to the “Define Send/Receive Groups” option to access that.
Step 3 – Just like before, select the group name and tap “Copy” to copy the group name.
Step 4 – Type a new group name in the blank box and tap “OK“.
Step 5 – After creating the account, uncheck “Include this group in Send/Receive (F9)” in both the ‘When Outlook is Online’ and ‘When Outlook in Offline’ boxes.
Step 6 – Tap “Close” to close this.
Close and relaunch the Outlook and test.
Fix 3 – Check the internet connection
This problem can be directly linked to a faulty internet connection. Unstable internet connection to mail exchange server can prohibit the Automatic Send/Receive feature from working properly.
Step 1 – Go to the Office portal to check the status of the Microsoft services.
Step 2 – Check the status of the Outlook.com. If it shows the “✅” sign, the connection is good.
If the Outlook servers are down due to any reason, wait for the servers to come up again and retry.
Fix 4 – Repair the Outlook client
Even after tweaking the Send/Receive group, if you aren’t receiving any emails in the Outlook inbox, try repairing the Office client.
Step 1 – Just press the Windows key once to open the Start menu.
Step 2 – Write down this in the and hit Enter.
appwiz.cpl
Step 3 – Find out the “Microsoft Office” program as you scroll down through the list of installed apps.
Step 4 – After locating that, right-tap the program and choose “Manage“.
Office Setup should appear on your screen within a few seconds.
Step 5 – There should be two options there. Use the first one, “Quick Repair“.
Step 6 – After this, click “Repair” to commence the quick repairing operation.
After running this quick fixing operation, check if this helps you resolve the problem.


