Many Outlook users doesn’t know about this ‘recurring email’ or ‘automatic email’ message feature which can be very useful at times. You can use this Power Automate tool to automate the email sending process on a regular interval (like every day or twice a week or anything different). This neat trick will take care of the sending the mail for you, without any user input at all.
How to send Recurring Emails in Microsoft Outlook using Power Automate
Follow these steps to setup a recurring email program from Microsoft Outlook, using the Power Automate tool.
NOTE 1 – Power Automate tool comes bundled with the Windows 11 automatically. Though you can do this in Windows 10 as well. Just download the Power Automate from Microsoft Store and good to go.
NOTE 2 – You can either use the Microsoft 365 (Office) app on your machine or you can do the entire thing in a compatible browser as well. But, the Outlook app needs to be installed on the machine.
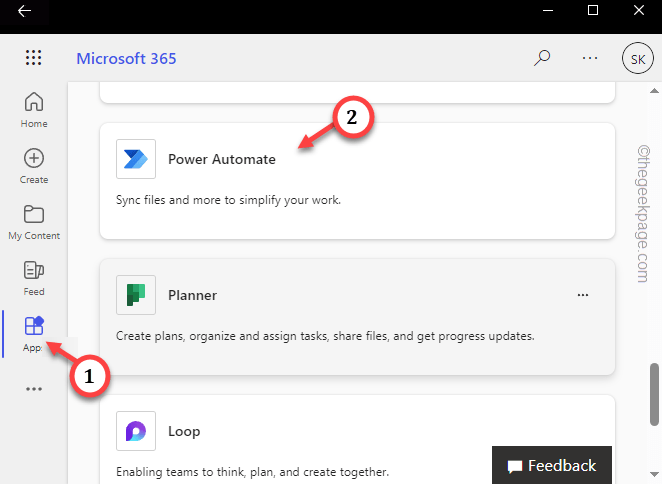
Step 1 – Search and open the “Microsoft 365(Office)” program.
Step 2 – Go to the “Apps” tile on the left pane.
Step 3 – Find the “Power Automate” app and open that up.
Power Automate should load up there.
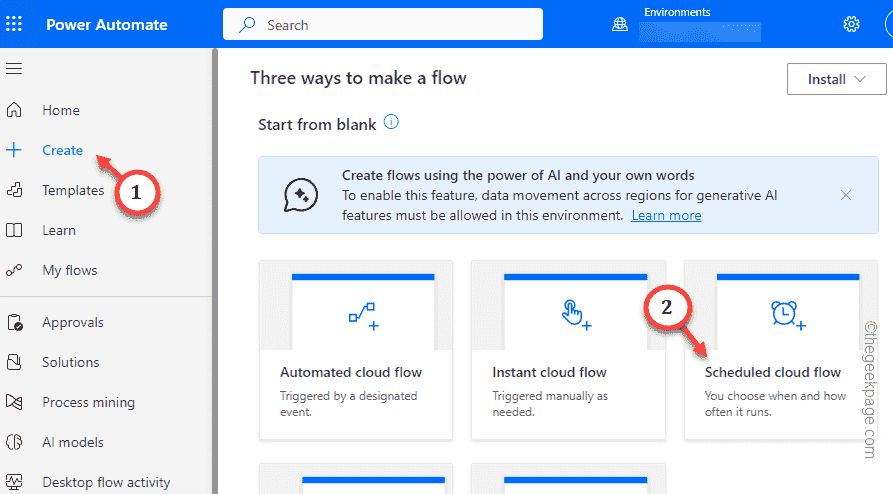
Step 4 – Next, expand the left-ribbon if needed and tap “Create“.
Step 5 – Choose the “Scheduled cloud flow“.
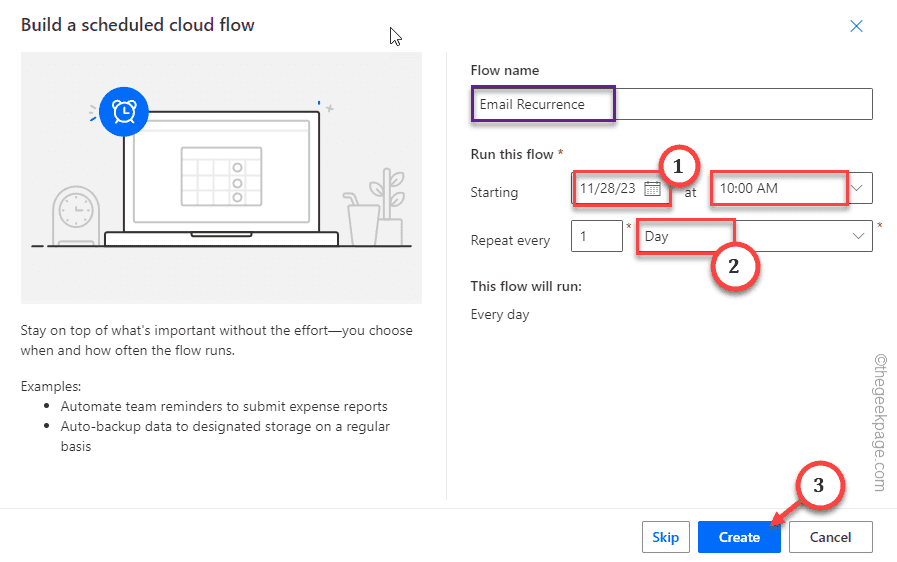
Step 6 – Now, this step is very important. Give the flow a name. Like, we have named it as “Recurring Email“.
Step 7 – Next, set the ‘Run this flow’ and choose an initialization date and time from the drop-down menu.
Step 8 – After this, set the ‘Repeat every‘ to a number and select the frequency of the email delivery from the next drop-down.
Example – Suppose, you have to deliver a mail in every 2 days of the week. So, write 2 in the first box and choose “Day” in the next one.
Step 9 – After doing all these, tap “Create” to create the flow.
Now the default whiteboard loads up in Power Automate.
Step 10 – Tap the plus sign below the name of the flow and tap “Add an action“.
Step 11 – There are a ton of actions available in Power Automate. To sort things up quickly, search “outlook“.
Step 12 – Find the “Outlook.com” tile and tap the “Send email with options” option.
Step 13 – Now, go to the “Parameters” tab. Here, you can designate the email recipients, subject, body and other parameters of the email to be sent.
Step 14 – If you want to add some parameters (like a Header Text or attach files with the mail), tap the “Advanced parameters” section and select the appropriate option from the drop-down list.
If you don’t want anything in there, tap the “❌” beside that to remove that.
There are several other advanced email modifications available in other tabs of the same window.
Like – If you want to alter the security settings of that email, you can do it from the Settings tab.
Step 15 – Finally, once you are satisfied with the whole thing, tap “Save” to save the flow.
You shall notice the “Your flow is ready to go. We recommend you test it.” message in the corner.
Step 16 – Now, as you have finally saved the flow, tap “Test” to run a flow test.
Step 17 – In the test flow step, choose the “Manual” mode (we are doing this due to the indefinite time condition of the flow.)
Step 18 – Tap “Test” to run it.
Step 19 – Click “Run flow” for the final time to run it.,
Step 20 – On the next screen, tap “Flow Runs Page” to visit and check the result of the flow.
Step 21 – If the flow results turns out to be negative or unsuccessful, just go to the “My flows” in the main Power Automate page.
Step 22 – Go to the “Cloud flows” and find out the outlook mail recurrence flow that you have just created. Tap the “✏” icon to modify that.
That’s it! You can easily setup an automated email messaging setup that can send your emails on it’s own in the specified frequency.
Hope these have helped you!


