Usually when a user logs on to the computer he / she can see the different user accounts created for that computer and could be used. But a few users are worried when these user accounts names are not being displayed on the login screen. Well, this might be because there might be some changes in the settings taken place wherein displaying the accounts might have disabled. In this article let us see the different methods to solve this and you can get to see all the user accounts back on your log in screen.
Method 1: Execute The Commands In Command Prompt
Step 1: Open the command prompt as an administrator. To do that, type cmd in the windows search bar and hold Ctrl + Shift keys then hit enter
Step 2: A user account control pop-up will appear, click on yes
Step 3: Copy the following command and paste it into the command prompt then hit enter
secedit /configure /cfg %windir%\inf\defltbase.inf /db defltbase.sdb /verbose
Step 4: Wait for the execution to complete and then restart the system. Now check if the issue is solved.
Method 2: Find Users Using Local Users And Groups Window
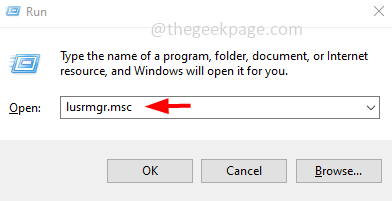
Step 1: Open the run prompt using Windows + R keys together
Step 2: Type lusrmgr.msc in the run prompt and hit enter. This will open the local users and groups window
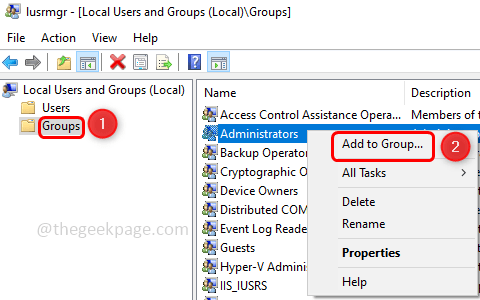
Step 3: Now on the left side click on Groups. On the right side right click on Administrators
Step 4: From the appeared list click on Add to group
Step 5: In the next window click on Add
Step 6: In the select users window, click on object types
Step 7: Now select users by clicking on the checkbox beside it and uncheck all other options in the window
Step 8: Click on Ok
Step 9: In the select users window click on Advanced
Step 10: Click on Find now button
Step 11: From the search results select the username that is not appearing on the login screen
Step 12: Click on OK and again in the next window click on OK
Step 13: Restart the system and check the issue, it should be solved.
Method 3: Enable The User Accounts Manually
Step 1: Open the run prompt using Windows + R keys together
Step 2: Type lusrmgr.msc in the run prompt and hit enter. This will open the local users and groups window
Step 3: On the left side, double click on the Users option
Step 4: On the right side you can see the list of users on your computer
Step 5: If any of the users have a down arrow mark listed in the icon then those accounts are disabled. These should be enabled manually
Step 6: Right click on that particular user and click on Properties
Step 7: Remove the checkmark from the Account is disabled option by clicking on the checkbox beside it
Step 8: To save the changes click on Apply and OK
Step 9: Repeat the steps for all the users whose account is disabled. Then log out from the current user account
Step 10: Restart the computer and check if the issue is solved.
Method 4: Check The Registry Editor
Note: If the registry is modified incorrectly there might occur major issues. So make sure to take a backup of the registry and then proceeed.
Step 1: Open the run prompt using Windows + R keys together
Step 2: Type regedit.exe in the run prompt and hit enter
Step 3: A user account control window will open click on yes. This will open the Windows registry editor
Step 4: Navigate to the following path in the registry
Computer\HKEY_LOCAL_MACHINE\SOFTWARE\Microsoft\Windows NT\CurrentVersion\ProfileList
Step 5: Click on each profile list and make sure the value of State with the type REG_DWORD is 0X00000000 (0). If its value is 0X00000000 (1) then the user profile is disabled
Step 6: If it is disabled then you have to change it to 0X00000000 (0). You can do this by double clicking on the state and change its value to 1 in the value data field
Step 7: Click on OK
Method 5: Use Group Policy Editor
Step 1: Open the run prompt using Windows + R keys together
Step 2: Type gpedit.msc in the run prompt and hit enter. This will open local group policy editor
Step 3: On the left expand Computer configuration by clicking on the arrow beside it.
Step 4: Further expand Administrative Templates and then System
Step 5: Then click on Logon
Step 6: On the right side double click on Enumerate Local Users on Domain-Joined Computer
Step 7: In the opened window click on the radio button beside Enabled
Step 8: To save the changes click on Apply and OK
Step 9: Also in the same logon window, double click on Hide Entry Points for Fast User Switching
Step 10: In the opened window click on the radio button beside Not configured
Step 11: To save the changes click on Apply and OK
Step 12: Close the window and restart the system. Check if the issue is solved.
Disable Block user from showing account details on sign-in
Step 1: Again on the logon window page [follow above Step 1 – 5] on the right side double click on Block user from showing account details on sign-in
Step 2: Click on the Disabled option by clicking on the radio button beside it
Step 3: To save the changes click on Apply and OK
Step 4: Close the window and restart the system. Check if the issue is solved.
Disable Do not enumerate connected users on domain-joined computer
Step 1: Back on the logon window page on the right side double click on Do not enumerate connected users on domain-joined computers
Step 2: Click on the Disabled option by clicking on the radio button beside it
Step 3: To save the changes click on Apply and OK
Step 4: Close the window and restart the system. Check if the issue is solved.
Method 6: Edit Security Options
Step 1: Open the run prompt using Windows + R keys together
Step 2: Type gpedit.msc in the run prompt and hit enter. This will open local group policy editor
Step 3: On the left expand Computer configuration by clicking on the arrow beside it.
Step 4: Expand Windows Settings and then further expand Security Settings and then Local Policies
Step 5: Click on Security Options
Step 6: On the right side, double click on Interactive Logon: Don’t Display Last Signed-in
Step 7: In the opened window check the radio button beside disabled
Step 8: Click on Apply and OK
Step 9: Restart the system and check if the issue is solved.
That’s it! I hope this article is helpful and let us know which of the above method you applied and got the issue solved. Thank you!!


