Origin or Ea Play stores your gaming profile and saved points on their server. But, if you have played the same offline for a while and then, the next time you start it up in online mode, it throws up a choice of loading up either offline or online saved data. Sometimes, Origin may fail to sync the saved data from their servers, ultimately annoying gamers to their extent if you are one of these affected users.
Simple Workarounds –
1. Before you do anything, exit Origin and restart your computer. Restarting the system should help you resolve the issue.
2. Quit Origin and as usual the game also shuts down automatically. Now, the next time you launch the game, Origin should automatically load the online cached data.
3. Restarting the router+modem has worked out for several users. This should help you resolve the issue easily.
Fix 1 – Clear out the Origin cache
The best way to deal with this issue is to clear out the Origin cache from your computer.
Step 1 – Close Origin
You have to close and end all the threads of Origin.exe before you can clear out the Origin cache.
Step 1 – Close the Origin app.
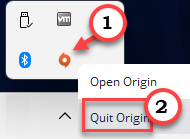
Step 2 – Origin still continues to run in the background. So, tap the arrow button on the taskbar and locate the “Origin” logo there.
Step 3 – Just, right-click the app and tap “Quit Origin“.
Now you have to go around to the Task Manager and check whether any Origin processes are still running in the back.
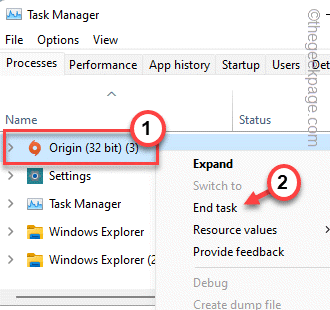
Step 4 – You can open the Task Manager using the Win key+X keys together and tap “Task Manager“.

Step 5 – Now, look for any Origin processes you can find. If you can find any such processes, right-tap that and tap “End task“.
Scroll down through all the processes and ensure no other Origin processes are running.
You may close the Task Manager.
Step 2 – Clear the Origin folder
Now, as you have exited Origin, you can clear out Origin cache stored on your local computer to fix this problem.
Step 1 – Call upon a Run box using the Windows key+R keys together.
Step 2 – Then, paste this in the box and click “OK“.
%ProgramData%/Origin
Origin stores all its local data here.
Step 3 – Now, select all the folders at once except the “LocalContent” folder and use the Delete key from your keyboard to remove these folders.
All the folders except the “LocalContent” folder will be removed from the system.
Step 4 – Now, again use the Win key+R keys together to call the Run box.
Step 5 – So, write down this and click “OK” to open that.
%appdata%
Step 6 – Once you reach there, go back to the “Appdata” folder on the address bar.
Step 7 – Open the “Local” folder to open it.
Step 8 – Here, select the “Origin” folder here and tap the Delete icon to completely delete this folder from your computer.
After clearing these folders, you must close File Explorer and then, restart your computer once.
When the device restarts, make sure it is connected to the Internet. So, open Origin and launch the game again. This time it will sync with the saved cloud data and you will start from the saved point again.
Fix 2 – Try running Origin as the system admin
The second solution is to run the Origin application with administrative rights. This clears out bugs and occasional permission-related crashes.
Step 1 – Using the Windows search bar, search “Origin“.
Step 2 – Then, right-click the “Origin” app and tap “Run as administrator” from the context menu.
[If you have the Origin app icon on your Desktop, you can do this with it also.]
Now, run the game and test it out yourself. If this works, then you should make sure to modify the settings so that Origin only launches in administrative mode.
Step 1 – Locate the Origin icon on your desktop.
Step 2 – Once you do that, right-tap “Origin” and click “Properties”.
Step 3 – Now, head on to the “Compatibility” tab.
Step 4 – Then, just check the “Run as administrator” box to make sure to run Origin with administrative rights.
Step 5 – Finally, click “Apply” and “OK” to save this change for the application.
This should have resolved the issue.
Fix 3 – Switch the Origin to Offline and to online
Origin stores offline caches on your local drive, and in Online mode, it creates the saved file in the cloud. Go offline and then Online to solve the issue.
Step 1 – Open the Origin app.
Step 2 – In the Origin client, click “Origin” in the menu bar. In the drop-down option, click “Go Offline” to boot Origin in offline mode.
Wait for a while. Origin will load up in Offline mode.
Step 3 – Close the Origin app.
Step 4 – Now, launch Origin.
Step 5 – Now, click “Origin” and tap “Go Online” to go online again.
This way, you can troubleshoot the game.
Fix 4 – Allow Origin.exe through the firewall
You have to allow Origin through the firewall settings.
Step 1 – Open a Run box using Win key+R keys together.
Step 2 – Then, type this in the box and click “OK” to open the Run box.
firewall.cpl

Step 3 – On the extreme left-hand pane, click “Allow an app or feature through Windows Defender Firewall” to open that feature.

Step 4 – You cannot reset the settings with administrative permissions. So, click “Change settings” to change the settings.

Step 5 – Now, in the list of Allowed apps and features: group, check whether you can find Origin.exe in the list.
Step 6 – Now, make sure the “Public” and “Private” network box is checked.
This way, you are allowing Origin through any and all the networks you connect.
Step 7 – Finally, click “OK” to save this change.

Once you are done, close and relaunch Origin. Now, the next time you launch the game, check if this solves the issue.
Fix 5 – Add Origin to the exclusion list
You can add Origin.exe to the exclusion list in Windows Security.
Step 1 –At first, type “windows security” in the search bar.
Step 2 –Next, click “Windows Security” to open it.
Step 3 –On the Windows Security utility page, click “Virus and threat protection” settings to open that up.
Step 4 – Under the Virus & threat protection settings, click “Manage settings“.
Step 5 – Now, you can view all the protection-related settings. Toggle the “Real-time protection” settings “Off“.
Step 6 – Then, set the “Cloud-delivered protection” to “Off” mode as well.
You have to give administrative consent in UAC in both cases.
Step 7 – After disabling both settings, go down through the page until you reach “Exclusions“.
Step 8 – Here, click “Add or remove exclusions“.
Step 9 – In the Exclusions page, tap “Add an exclusion” and click “File” to start the process.
Step 10 – Now, have to navigate to the Origin installation directory. Usually, it is installed in this location –
C:\Program Files (x86)\Origin
Step 11 –Then, scroll down and select the “Origin” application from the list of files.
Step 12 – Finally, click “Open” to select the file and add it to the exclusion list.
Finally, close Windows Security and restart the system once.
After you have restarted the system, load the game in Origin and check if the issue still persists.
Fix 6 – Clear out the DNS cache
This is another hack you can try to solve the Origin sync error.
Step 1 – Write “cmd” in the search bar.
Step 2 –Then, right-click the “Command Prompt” and click “Run as administrator” to open the CMD terminal as an administrator.
Step 3 – Once the terminal appears, type this in and hit Enter.
ipconfig /flushdns
When the IP configuration is flushed, this statement will appear –
Successfully flushed the DNS Resolver Cache.
Step 4 – After running the flush DNS cache command. So, write these two commands one at a time and hit Enter to release and renew the DNS cache.
ipconfig /release
ipconfig /renew
Now, you may close the CMD prompt. Check if this solves the issue.
Fix 7 – Add Origin to the Trusted sites list
You can add Origin to the list of trusted sites.
Step 1 – You can open Internet Properties directly. So, just open a Run box.
Step 2 – There, type this and click “OK“.
inetcpl.cpl

Step 3 – On the Internet Properties page, head on to the “Security” section.
Step 4 –Next, select the “Trusted sites” option.
Step 5 – After that, tap “Sites“.
Step 6 – Now, type “origin” in the Add this website to the zone: box. Select the web address that appears in the drop-down list.
Step 7 – Then, click “Add” to add it to the trusted list.
Step 8 – Finally, click “Apply” and “OK” to save the change.
After this, close the Internet Properties page. Open Origin and run the game to test this out.
Fix 8 – Use another network
If none of the other fixes have solved your issue, you can use another network (like a smartphone hotspot).
Step 1 – Exit Origin.
Step 2 – Then, turn ON the WiFi hotspot on your smartphone or any device with a hotspot.
Step 2 – Then, connect your system to that WiFi network.
Step 3 – Next, launch Origin again.
Now, launch the game and opt to load the cloud save. Wait for Origin to load the cloud save and start the game.
Fix 9 – Use the EA App
Our final solution in the list is to use the all-new EA App. This is the improved version of Origin, and all your settings, saved points for all of your games will be present here.
Don’t worry. It won’t contradict the existing Origin cache or installed games.
Step 1 – Open the EA app.
Step 2 – Once you reach there “Download the EA app” to download the installer.
Step 3 – Then, run the “EAappinstaller” to launch the installer on your computer.
Now, just the steps on your screen to install the EA app.
When it is installed, it should be automatically launched. But, if it isn’t, launch the EA app.
Step 4 – Here, input the same credentials you used in Origin, and click “Sign in” to enter into the EA app.
Now launch the problematic game from the EA app. This time, you won’t face any syncing issues with it.

