Using your office printer to print something is usually a regular task, but only if everything goes correct. If even a single thing goes wrong, the pages won’t be printed and you will see this error message “Operation could not be completed (error 0x000006ba). Please restart the spooler on the server or restart the server machine.” The best solution for this issue is stated directly in the error message.
Workarounds –
1. You should restart the system once and retry the printing operation.
2. If you are using an Office printer, ensure no other printing process is happening. That may stall your work and show you the error message.
Fix 1 – Restart the Print Spooler
You have to restart the Printer Spooler service.
1. You have to open the Services utility.
2. So, type “services” in the search box.
3. Then, tap “Services” to open the Services utility page.
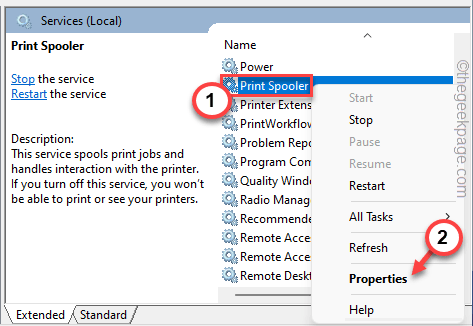
4. Once the Service page opens up, go down and search for the “Print Spooler” service.
5. When you have located the service, right-tap the service and tap “Properties“.
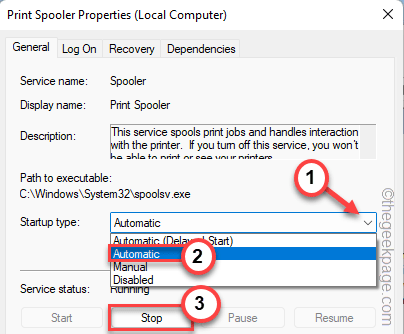
5. When the Properties appear, go to the ‘Startup type:’ and set it to “Automatic” from the drop-down list.
6. Next, look at what the ‘Startup status’ is reading. Check whether it is “Running” or “Stopped“.
7. If the service is running, tap “Stop“. Then, wait for a few seconds and tap “Start” to start the service.
If the service is already, stopped, tap “Start” to start the service.
8. Once you have stopped service, tap “Start“.
9. Now, go to the “Recovery” tab.
10. Here, set the “First failures:“, “Second failures:” and “Subsequent failures:” to “Restart the Service“.
11. Finally, click “Apply” and “OK” to save the changes.
Once you have restarted the printer spooler service, go back to the printing page and retry printing the document.
Fix 2 – Isolate the printer driver
You should isolate the printer driver and then retry the printing operation.
1. Hit the Windows key+R keys together.
2. Then, type/copy-paste this and click “OK“.
printmanagement.msc
3. On the Print Management page that opens up, you may find all the printer tools on the left-hand pane.
4. Now, on the left-hand side, select “All Drivers“. Then, right-tap it and tap “Refresh“.
5. You can find all the printer drivers on the right-hand pane.
6. Once you have found the driver, right-tap the printer driver and tap “Set Driver Isolation>“.
7. Then, select the “Isolated” from the drop-down.
This will move the print drivers into a separate process.
Now, print the document again. Check if this works.
Fix 3 – Clean the Printer Spool files
You can clean the Printer Spool files but before that you have to stop the spooler service.
2. To do that, hit the Windows key from your keyboard and type “cmd“.
3. Now, just right-tap the “Command Prompt” and tap on “Run as administrator“.
4. With just one command you can stop the spooler service. Paste this and hit the Enter button.
net stop spooler
Minimize the Command Prompt terminal page. You will need this later.
5. Now, press the Win key+E keys together.
6. Navigate to this section –
C:\Windows\system32\spool\PRINTERS
7. You may see a permission-related prompt on your screen. Click on the “Continue” button.
8. Once you are inside the folder, select all the files and folders at once.
9. Then, click the ‘Delete‘ icon on the File Explorer.
After this, close the File Explorer page.
9. Go back to the terminal again.
10. Then, write these words and hit Enter.
net start spooler
This will resume the stalled spooler services.
Once you see the “The Print Spooler service was started successfully.” message has appeared on the terminal, you may close it.
Fix 4 – Use the Printer Troubleshooter
The printer Troubleshooter is just the tool you need.
1. You can find the Printer Troubleshooter on the Settings page.
2. Just press the Win key+I.
3. When the Settings page opens up, click “System” on the left-hand pane.
4. On the right-hand side, click “Troubleshoot” settings.
5. Then, tap on the “Other troubleshooters“.
6. This will open up an extensive list of troubleshooters. See if you can find the “Printer” troubleshooter.
7. Just select the troubleshooter and tap “Run” to run it.
8. When the printer troubleshooter starts up, just tick mark the “Apply repairs automatically” option.
9. Then, tap “Next“.
10. A number of printers are listed on the next page. Select the problematic printer.
11. You can then move on by tapping “Next“.
12. Once Windows detects the problem and prescribe something.
13. So, tap “Apply this fix” to apply the solution.
Your printer problem should be solved. So, try printing a test page using the computer.
Fix 5 – Reinstall the Printer drivers
If all the solutions have failed, try uninstalling and reinstalling the printer drive
1. Pressing the Win key+I keys together.
2. Then, click on the “Device Manager” to access it.
3. After opening the Device Manager, tap the “Print queues” section.
3. Try to find the printer with the problem. Then, right-click that device and click on “Uninstall device“.
[In this case, our faulty printer is the “HP DJ 1110 series“.]
4. Simply click on “Uninstall” to uninstall the driver.
After uninstalling the printer, you may close the Device Manager window.
Method -1
Close every window and restart your computer. While the system is restarting, Windows does detect the uninstalled printer driver and automatically reinstalls it.
Method- 2
In case restarting your system didn’t work out. Scanning your system for hardware change may solve the issue-
1. Open the Device Manager by pressing the Windows key+X together and followed by a click on the “Device Manager“.
2. After opening the Device Manager page, just click on the “Action” from the menu bar.
3. Then a simple tap on the “Scan for hardware changes” option.
This way, the printer should automatically be reinstalled.
After doing this, check whether this has worked for your printer or not. Test if this works.


