When trying to open the files in OneDrive or you want to copy something from the OneDrive folder, you may often encounter the “OneDrive error 0x80070194: The cloud file provider exited unexpectedly”. OneDrive is the built-in cloud storage in Windows 10 that allows you to access and share files from anywhere, and even store files online.
The error code 0x80070194 is a common issue and usually arises due to a syncing problem in your Windows 10 device. Overlooking the error may cause the OneDrive application or the Windows Explorer to collapse. This will automatically prevent you from copying files from the OneDrive storage and return the error message.
The good news is, there are a few possible solutions for the OneDrive error 0x80070194 in Windows 10 that may help fix the issue.
Method 1: Reset OneDrive App
You can try and reset the OneDrive app to restore it to its original state minus any changes you have made. This will help you get an all new app and possibly get rid of the error 0x80070194. Here’s how to reset the app:
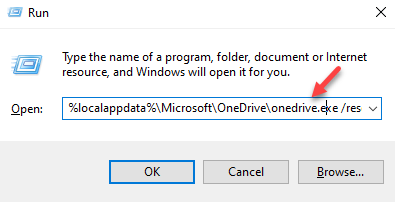
Step 1: Press the Win + R keys simultaneously on your keyboard to launch the Run command window.
Step 2: Copy and paste the below path in the Run command search field and hit Enter:
%localappdata%\Microsoft\OneDrive\onedrive.exe /reset

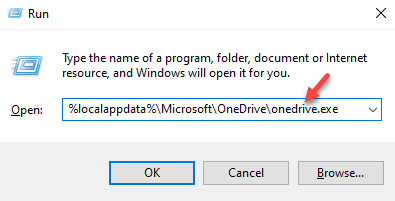
However, if it returns message – “Windows cannot find “%localappdata%\Microsoft\OneDrive\onedrive.exe /reset“, follow the below step.
Step 3: Again open Run command following Step 1.
Now, copy and paste the below path in the search bar and press OK:
%localappdata%\Microsoft\OneDrive\onedrive.exe

Once done, try to launch OneDrive and it should open normally.
Method 2: Pause and Resume Sync
You may also try this simple trick to potentially fix the issue. Let’s see how to fix the OneDrive error by pausing and resuming it through the app:
Step 1: Go to the System Tray on the Taskbar, right-click on the OneDrive app icon.

Step 2: In the OneDrive app panel, click on Help & settings option at the bottom right.

Step 3: Click on the OneDrive app icon again in the system tray, click on Help & settings and then tap or click on the resume icon to resume syncing option.

Once done, try launching the OneDrive app and you should not encounter the error code 0x80070194 again.
Method 3: Uninstall and Reinstall OneDrive Through Settings
There are chances that the OneDrive app is corrupted and that leads to this error. This prevents you from accessing any files or folder from the OneDrive folder. Therefore, uninstalling and installing the app itself can help fix the issue. Follow the below instruction:
Step 1: Press the Win + I keys together on your keyboard to launch the Settings app.
Step 2: In the Settings app, click on the Apps option.

Step 3: Next, in the Apps & features settings window, go to the right side of the pane and under the Apps & features, select Microsoft OneDrive.
Now, click on the Uninstall button.

Step 4: Press Uninstall in the prompt again to confirm the action.

Step 5: Once the installation is complete, open Microsoft Store.
In the search field, look for OneDrive and select from the results.

Step 6: Now, click on Get to download and install the Microsoft OneDrive app.

Now, try to open the app and it should work fine.
Method 4: Unlink the PC
If the above methods fail to fix the issue, you can try this method to unlink the PC from the OneDrive app and check if it helps. Here’s how to unlink the PC:
Step 1: Go to the Taskbar, expand the system tray and click on the OneDrive icon.

Step 2: In the OneDrive panel, click on Help & Settings at the bottom.

Step 3: From the menu, select Settings.

Step 4: In the Microsoft OneDrive dialogue box that opens, go to the Account tab and under the OneDrive (your_email_id) section, click on Unlink this PC.

Step 5: Finally, click on Unlink account to confirm the action.
Now, wait for sometime and link your PC again with OneDrive, and then sync.
You should now be able to launch the OneDrive app without any errors.
Method 5: Uninstall and Reinstall OneDrive Using Windows PowerShell
You can try this method to uninstall and re-install the OneDrive and this may help you fix the OneDrive error code 0x80070194. Let’s see how:
Step 1: Press the Win + X keys at the same time on your keyboard and select Run to launch the Run command window.

Step 2: In the search field, type Powershell and press the Ctrl + Shift + Enter keys together on your keyboard to open the elevated Windows PowerShell.

Step 3: In the PowerShell (admin) window, run the below command and hit Enter:
taskkill /f /im OneDrive.exe

This will terminate all the open processes of OneDrive.
Step 4: Copy one of the below commands (based on your system architecture), paste it in the PowerShell (admin) window and hit Enter:
For 32-bit Windows 10 -

%SystemRoot%\System32\OneDriveSetup.exe /uninstall

For 64-bit Windows 10 -

%SystemRoot%\SysWOW64\OneDriveSetup.exe /uninstall
*Note – To know how to check if your Windows 10PC is 32-bit or 64-bit, read this article.
Step 5: Now, repeat the Step 1 again to open the Run command window.
Here, type regedit and press OK to open the Registry Editor window.

Step 6: In the Registry Editor window, navigate to the below path:
HKEY_CURRENT_USER\Software\Microsoft\OneDrive
Here, under the OneDrive key make sure to delete all folders that have the numeric versions, for example – 18.172.0826.0025 folder.

Once done, close the Registry Editor, restart your PC and re-install the latest version of OneDrive. You should not encounter the error anymore.
Method 7: Temporarily Disable the Files on Demand Feature
Turning off the files on-demand feature for sometime can help fix the OneDrive error. Follow the below steps to possibly resolve the issue:
Step 1: Expand the System Tray section in the Taskbar and click on the OneDrive app.

Step 2: Next, click on the Help & Settings option on the bottom right.

Step 3: Select Settings from the context menu.

Step 4: In the Microsoft OneDrive dialogue box, under the Settings tab, go to the Files On-Demand section.
Now, uncheck the box next to Save space and download files as you use them.

Step 5: You will now a see a Microsoft OneDrive prompt – Disable Files On-Demand.
Click OK to confirm the action.
Press OK to save the changes and exit.

Step 6: Now, wait for sometime and follow the Step 1 and Step 2 as above to open the Help & Settings menu.
Click on Close OneDrive option in the menu to exit the OneDrive app.

Then, relaunch the OneDrive app and by now you should get rid of the OneDrive error code 0x80070194.