LMHOSTS file is a text file containing IP address mappings of the Domain Names or the remote servers connected to the system via TCP/IP protocol. For some reason, if you want to disable the LMHosts lookup in Windows 10, then read along.
In this article, we have come up with 3 different ways to disable the LMHOSTS lookup in the system
Fix 1: From Adapter Properties
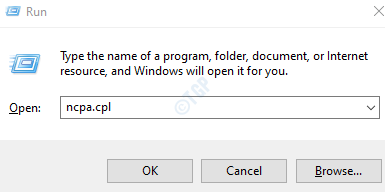
Step 1: Open the Run dialog by pressing the keys Windows + R
Step 2: Type ncpa.cpl and hit Enter

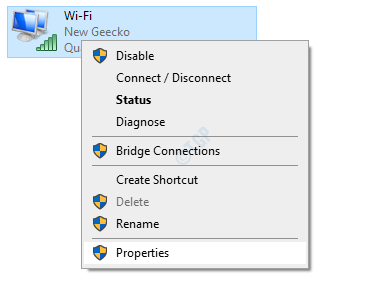
Step 3: In the opening window, right-click on the Adapter and choose Properties

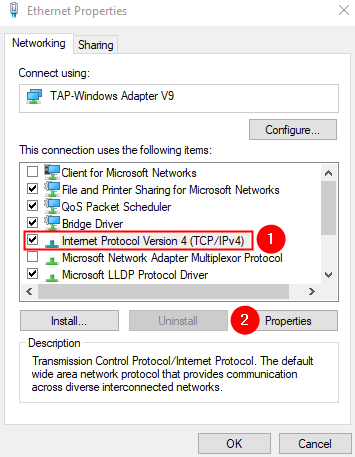
Step 4: The Ethernet Properties window opens. Under the This connection uses the following items section, click on Internet Protocol Version 4(TCP/IPv4).
Step 5: Click on the Properties button

Step 6: In the Internet Protocol Version 4(TCP/IPV4) Properties window, click on the Advanced button

Step 7: In the Advanced TCP/IP Settings window, go to the WINS tab
Step 8: Untick the Disable LMHOSTS lookup option
Step 9: Click on the OK button.

Step 10: In the Internet Protocol Version 4(TCP/IPV4) Properties window, click on the OK button
Step 11: In the Ethernet Properties window, click on OK
Step 12: Restart the system
Fix 2: From Registry Editor
Step 1: Open Run Dialog pressing the keys Windows+R at the same time.
Step 2: Type regedit and hit Enter

Step 3: You will see a UAC prompt asking for permission, click on Yes
NOTE: Registry editing can have an adverse effect on the system even with the slightest mistake. It is advised to take the backup of the registry before proceeding. To take a backup, In the Registry Editor–> Go to File –> Export –> Save your Backup file.
Step 4: In the Registry Editor window, in the search bar at the top, copy-paste the following location and press Enter
HKEY_LOCAL_MACHINE\SYSTEM\CurrentControlSet\Services\NetBT\Parameters
Step 5: On the right-hand side, double click on EnableLMHosts

Step 6: In the Edit DWORD window, change the value from 1 to 0

Step 7: Restart the system
Fix 3: From PowerShell
Step 1: Open the Run Dialog by holding the buttons Windows and R at the same time.
Step 2: Type powershell and hold the keys Ctrl+Shift+Enter. This opens the PowerShell window with the Administrator rights.

Step 3: When you see a dialog popping up asking for permission, just click on Yes.
Step 4: In the PowerShell window that opens type, the below commands one after the other. Make sure to press Enter after every command
$DisableLMHosts_Class=Get-WmiObject -list Win32_NetworkAdapterConfiguration
$DisableLMHosts_Class.EnableWINS($false,$false)

That’s All
We hope this article has been informative. Thank you for Reading.
Please comment and let us know which of the above fix helped you disable the LMHOSTS lookup.