Many Windows users have reported seeing an error while taking a backup of Windows. The complete error message reads as follows,
A shadow copy could not be created. Please check “VSS” and “SPP” application event logs for more information.
Details: the writer experienced a non-transient error. If the backup process is retried, the error is likely to reoccur.
As mentioned in the error message, this error is related to VSS and SPP. This issue is known to be present only in Windows 10. The error code associated with this error is 0x81000019. This issue is mainly seen when :
- The PC has some memory issues.
- Corrupt System Files.
- Thirty-party antivirus is interfering.
In this article, we have curated some fixes that will help you solve this backup error.
Fix 1: Start the Services
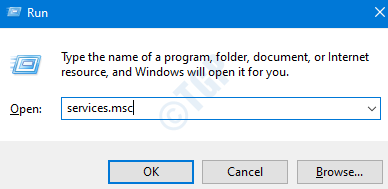
Step 1: Open the Run Dialog using the keys Windows+R.
Step 2: Type services.msc and hit Enter.
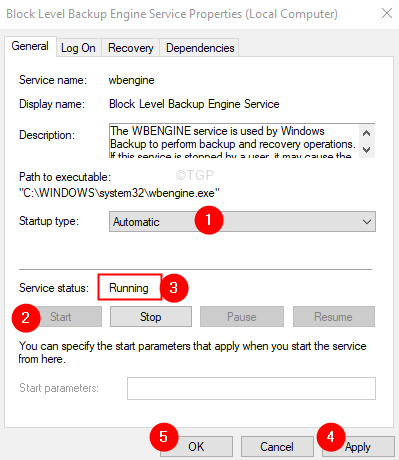
Step 3: In the services windows that open, scroll down and locate the service named Block Level Backup Engine Service and double-click on it.
Step 4: In the Properties windows that open, Change the Startup type to Automatic.
Step 5: Under the Service Status section, click on the Start button and ensure the Service Status is Running.
Step 6: Click on the Apply button and then click on the OK button.
Step 7: Now repeat the steps 3-6 and ensure that the below services are running :
- Remote Procedure Call(RPC)
- RPC End Point Mapper
- Windows Backup
Fix 2: Perform Error Checking on the Disk
Step 1: Open the Windows Explorer using the keys Windows+R.
Step 2: From the left-side panel, right-click on Windows(C:) drive(the drive that has Windows OS installed in your system)
Step 3: Select Properties.
Step 4: In the properties window that opens, click on the Tools tab.
Step 5: Under the Error checking section, click on the Check button.
Step 6: In the prompt that shows up, click on Scan drive.
Step 7: You will see that the Scanning starts. This might take some time. Please be patient till the scan finishes.
Step 8: Once, the scan is complete, restart the system.
Fix 3: Run DISM and SFC Scans
Step 1: Open the Run Terminal. One can use the shortcut Windows and R to do the same.
Step 2: Type cmd and hold the keys Ctrl+Shift+Enter to open the Command Prompt in Admin mode.

Step 3: In the confirmation dialog that shows up, click on the Yes
Step 4: Type the below commands one after the other. Make it a point to hit Enter after every command
Dism /Online /Cleanup-Image /ScanHealth
Dism /Online /Cleanup-Image /RestoreHealth
sfc /scannow
Step 5: Wait till the scan finishes and then Restart the system.
Check if this helps resolve the issue.
Fix 4: Disable the Third-Party Antivirus
If you have any third-party antivirus installed in the system, temporarily disabling it or uninstalling the AV might help. Note that the issue is not known to be caused by Windows Defender Firewall. It is usually seen with AVs like Mcafee, Avast, Combo, etc.
Step 1: Firstly, try disabling the antivirus program. Refer to the AV website to see how to disable the antivirus as the instructions are different for every vendor.
Step 2: If disabling did not work, then try uninstalling the AV program altogether.
Step 3: Open the Run window using Windows+R
Step 4: Type appwiz.cpl and hit Enter.

Step 5: In the Program and Features window that opens, locate your Antivirus software.
Step 6: Right-click on the software and choose Uninstall as shown below.
Step 7: Follow the onscreen instructions and complete the uninstallation process.
Step 8: Restart the computer.
Step 9: Try performing the backup again.
Step 10: If you don’t find any error messages, this means that the third-party antivirus caused the issue.
Step 11: Try installing the third-party antivirus software again with the latest version and check if you see the issues.
Step 12: If you are still seeing the issue, you might have to wait till the next version is released.
Fix 5: Repair Install Windows
Many users have reported that this issue has helped them fix the issue.
NOTE: You should have the Windows bootable installation DVD ready
Step 1: Insert the Windows bootable installation DVD
Step 2: You will be asked if you want to continue booting from CD or DVD. Press Enter
Step 3: Choose your Language Preference and hit the Next button
Step 4: In the bottom left corner of the window, click on Repair your computer

Step 5: In the blue window that you see, click on Troubleshoot

Step 6: Now, click on Advanced options

Step 7: Finally, click on Automatic Repair or Startup Repair

Step 8: Sit back and wait patiently till the Automatic Repair finishes.
Step 9: Restart the System.
That’s All
We hope this article has been informative. Kindly comment and let us know the fix that helped you solve the issue.
Thank you for Reading.


