AutoArchive feature in Outlook helps users manage the space in their mailbox by automatically moving emails from the current folder to the archive location. The archived items are stored in an Outlook Data File (.pst). In some cases, users have noticed that the AutoArchive is either missing or not working properly even when all the settings are correct.
In this article, we have listed strategies to troubleshoot and get AutoArchive working again.
Method 1 – Change AutoArchive settings
Users have suggested that changing the AutoArchive settings has helped them fix the issue. This can be set at multiple levels: Default, per folder, and manual settings.
Level 1 – Default AutoArchive Settings
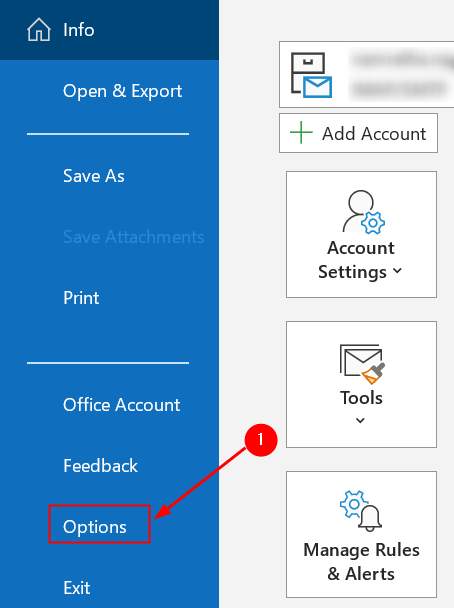
1. Go to File menu.

2. Now select the Options tab.

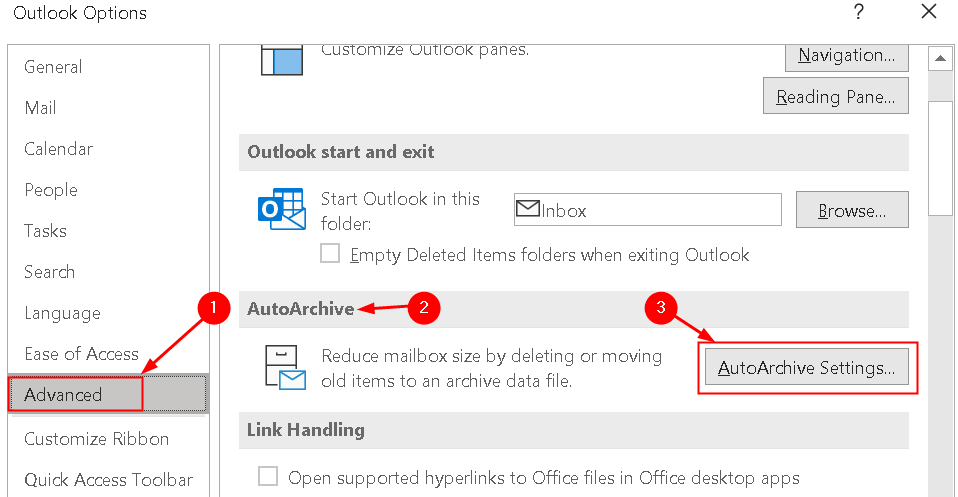
3. In the window that opens, select the Advanced tab.
4. Search for AutoArchive in the right pane and click on AutoArchive Settings… button.

5. To make sure AutoArchive works, check the first box and configure it for how frequently you want AutoArchive to run.
6. Select the checkbox Prompt before AutoArchive runs to get a notification before AutoArchive happens.
7. Check the following options :
- Delete expired items(e-mail folders only) if you want expired items to be deleted
- Archive or delete old items else only expired items will be deleted.
- Show archive folder in the folder list to let the archive.pst appear in the folder list which helps to find archived items easily.
- You can set the age of the items that you want to archive in the field of Clean out items older than x, which is based on the last modified date by default
8. You have options to decide whether to move old items to an archive file or permanently delete them.
9. Once you have selected the option you can apply them and click on OK to save the settings.

Level 2 – Per Folder AutoArchive Settings
If the AutoArchive is not working on a specific folder in your mailbox then follow the steps below:
1. Right-click on the folder and select Properties.

2. Click on the AutoArchive tab.
3. Based on your requirements select the following:
- If you want this folder to be an exception of AutoArchive, select Do not archive items in this.
- If you want to archive items in this folder using the default settings as discussed previously, then select Archive items in this folder using default settings
- If you want to set different AutoArchive options for this folder, select Archive this folder using these settings. You can change the age of items to be deleted and create a separate file for archiving.
4. Click on OK once you are done.

Note: These settings are specific to the folder and not applied to subfolders.
Level 3 – Manually Archive Settings
You can also start the archiving process manually if the above doesn’t work.
1. Go to File and then select Tools.
2 In Tools, select Clean up old items. It starts the archiving process and the progress is displayed in the Status bar.

Method 2 – Modify the ArchiveIgnoreLastModifiedTime registry value
The archive process in Outlook is based on the last modified date and time by default. If you reply, forward, move, edit, save or import an item, then the modified date will change which may cause the AutoArchive not to archive the item.
Users have found AutoArchive to work by setting the registry value for ArchiveIgnoreLastModifiedTime, which makes Outlook archive items based on the received date. Before changing the registry value, keep a backup of it in case of errors.
1. Press Windows key + R to start Run. Type regedit to open the Registry Editor.

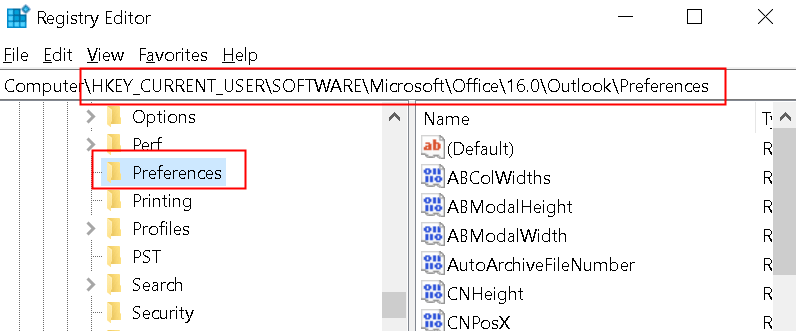
2. Go to the location below or copy-paste it into the navigation bar.
HKEY_CURRENT_USER\Software\Microsoft\Office.0\Outlook\Preferences
3. Once you reach the above registry subkey, click on Edit menu.
4. In the Edit menu, select New and click on DWORD (32-bit) Value to create a new item in the registry.

5. Name the new item as ArchiveIgnoreLastModifiedTime and press Enter.
6. Right-click the newly created item, and then select Modify.

7. Set the value to 1 in the Value Data box and click on OK.

8. Close the Registry Editor and restart Outlook to make the registry changes take effect.
Now check whether Outlook archives the items properly by trying to Archive manually and seeing if items are archived based on their received date.
Method 3 – Excluded from AutoArchive
If you notice that a specific item has not been archived, it means that the property for it is set to exclude it from AutoArchive.
1. Double-click to open the item which has been excluded from the archive process.
2. Click on the File menu and then select Properties.

3. In the Properties window, uncheck the option Do not AutoArchive this item.

4. You can customize your view to get an overview of the items for which this option has been configured. You need to allow the in-cell editing function as below:
- Select View and click on View Settings.

- Here click on the Other Settings button.

- Now check the option Allow in-cell editing.

- You can now click on a particular items checkbox under Do Not AutoArchive directly from the View to turn on/off archiving for that item.
Note: You might not see a checkbox for your items unless you click on the field itself. No checkbox or a not-selected checkbox both means that the item will be archived according to your archive settings.
Method 4 – Archive Command not available in Corporate environment
AutoArchive disabled by Group Policy
In case you are working in a corporate environment and you are not able to find the AutoArchive and Archive settings as mentioned in Method 1 above, it means that the administrator might have disabled the settings as a group policy. This helps to prevent mailbox data from spreading around various computers across the network in pst files.
In this case, you need to ask the mail administrator about where you should archive your data and how long items should be kept. Also, your administrators can set Group Policies to disable AutoArchive and prevent the creation of pst-files.
Exchange with Online Archive
Another reason for the missing settings is when you have an Exchange account, an Online archive has been enabled for you on the Exchange server. In such cases, the client-side archiving options will be disabled automatically by Outlook and the archive happens according to the corporate policies set on the Exchange server.
The advantage is that you can have access to your archive on any computer running Outlook or even via a browser when accessing your mailbox via Outlook on the Web. As a result of this being enabled for your account, the AutoArchive and manual archive features will no longer be available to you in Outlook.
Method 5 – Check for Damaged or Full archive.pst
When the archive.pst file becomes corrupted, Outlook will not be able to archive to that file. In that case, you need to close Outlook and use the Inbox Repair Tool (scanpst.exe) to scan it for errors and create a new archive file. Click here to find the location of the scanpst.exe and the steps to perform the scan in Fix 5 of the article.
When the archive.pst file becomes full, it will not allow Outlook to store any more items in it. When the warning limit is reached, you won’t be able to move items to the archive either manually or by using AutoArchive. Once the limit is reached, it’s recommended to create a new archive file. The size limit is based on the version of Outlook used.
- Outlook 97 – 2002 pst files (ANSI): Maximum file size is 2GB and a warning is issued when it reaches 1.8 GB.
- Outlook 2003 – 2019 pst files (Unicode): Default limit is 20 GB Outlook 2003/2007 and 50GB in later versions 2010, 2013, 2016, 2019, and Microsoft 365. A warning is issued when the limit reaches 19GB and 47.5GB respectively.
Method 6 – Delete mails from Full Mailbox
In the case your mailbox is full, you’ll receive a message stating that the mailbox is full when you are trying to send a message. However, when you try to archive when the mailbox is full, the archive will not work and you won’t receive an error stating the same either.
To get it back to work, you can either delete or move some items to your archive file manually or contact your mail administrator to temporarily increase the size of your mailbox.
To clean up your mailbox, you can proceed with the cleanup process in the following order of the folders: Deleted Items, Junk Email, Inbox, Sent Items and other mail folders, Journal, Calendar, Contact, and Notes.
If any of the above fixes does not work for you, then we recommend you to either perform a repair of your Office suite or reinstall Office and check whether it helps resolve the issue.
Thanks for reading this article.
We hope you have been able to resolve the AutoArchive not working error.