Are you unable to connect to the network on your Windows 10 computer? Are you getting the error message “Windows sockets registry entries required for network connectivity are missing” , or the “One or more network protocols are missing“? If the answer to any of these questions is ‘Yes‘ then this article is for you. Go through these workarounds to do check some initial pre-requisites, and if they don’t work out try the main solutions.
Workarounds-
1. Check if you can access the WiFi network from another device (preferably another computer).
2. Restart your WiFi manually. Don’t forget to check if the issue is fixed.
3. Check all the network cables for any loose connections.
If these aren’t causing this issue, go for the solutions-
Fix-1 Troubleshoot network problems-
1. Search for the “troubleshoot network” in the search box.
2. Now, click on the “Troubleshoot network“.

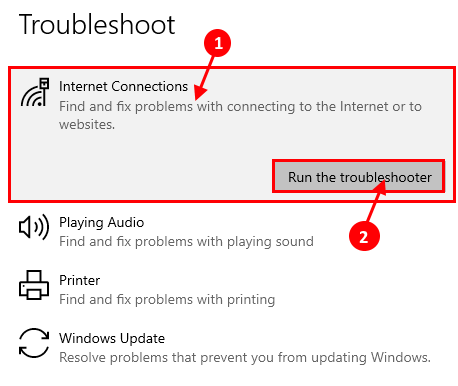
3. Now, on the left side of the Settings window, you have to click on “Internet Connections“.
4. After that, click on “Run the troubleshooter“.

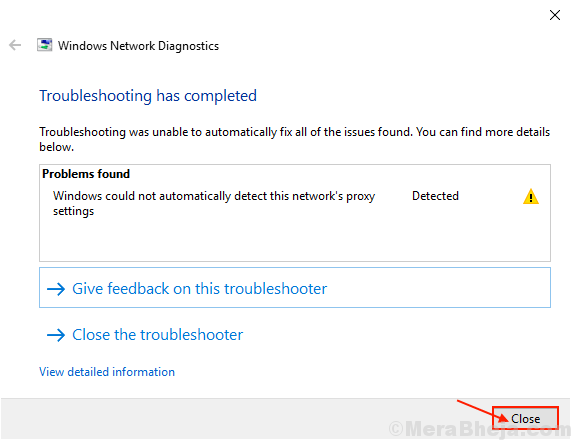
5. Next, follow on-screen instructions and the troubleshooter will automatically attempt fixes for your problem.
6. Then, you have to click on “Close“.

Now, try to connect to the internet.
If you can’t connect to the network, maybe you are having some trouble with the network adapter. Try troubleshooting it-
4. Scroll down to find, click on “Network Adapter” and click on the “Run the troubleshooter” to run the troubleshooter.

Wait for a while, till the Troubleshooter attempts a fix for your problem. Close the Troubleshooter window.
Restart your computer and after restarting your computer, check if you are able to connect to the network or not.
Fix-2 Use netsh in CMD-
1. Press the Windows key and type “cmd” in the Search box.
2. Right-click on the “Command Prompt” and then click on “Run as administrator“.

3. To reset the net configuration, copy-paste this command and hit Enter.
NETSH INT IP RESET C:\RESETLOG.TXT

Close Command Prompt window.
Reboot your computer and after rebooting you will be able to connect to the network once again.
NOTE-
In case if you face ‘Access is denied’ message in Command Prompt window when you are executing this command, go for these steps-
1. Press Windows key+R to launch Run window on your computer.
2. Type “regedit” in Run window and then click on “OK“.

The Registry Editor window will be opened.
3. Now you have to go to this location-
Computer\HKEY_LOCAL_MACHINE\SYSTEM\CurrentControlSet\Control\Nsi\{eb004a00-9b1a-11d4-9123-0050047759bc}
4. In Registry Editor window, on the left-hand side, right-click on the key “26“.
5. Then, click on “Permissions” to modify it.

6. In the Permissions window, select “Everyone” and then check the option “Allow” of the permission parameter “Full control“.

7. Finally, click on “Apply” and then click on “OK” to save the changes on your computer.

Close Registry Editor window.
Now, again try to execute the command from Command Prompt (Step-3 of Fix-2).
Reboot your computer.
After rebooting the problem will be fixed for sure.