When a user wants to connect a new device like a mouse, keyboard, printer, speaker, etc sometimes the user might get a network profile missing for the device issue. Most of the time this issue is solved by changing the network profile from public to private. There are other solutions as well. In this article let us see the different methods to solve the network profile missing issue.
Method 1: Change Network Profile From Public To Private Using Settings
Step 1: Open windows settings using Windows + I keys together
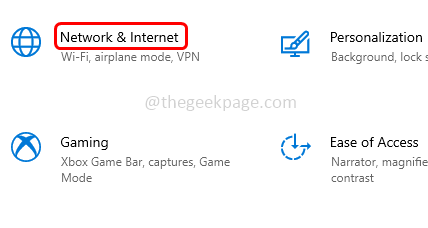
Step 2: Click on Network & Internet
Step 3: From the left side, click on Status
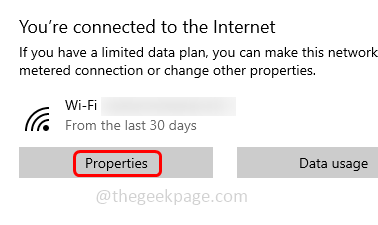
Step 4: On the right check for your connection and click on the properties
Step 5: If the network profile is public change it to private by clicking on the radio button beside it
Step 6: Restart the system and then check if the issue is solved.
Method 2: Change Network Profile From Public To Private Using PowerShell
Step 1: Open windows power shell in the admin mode. You can do this by pressing Windows + X keys together and from the list click on Windows PowerShell (Admin)
Step 2: A user account control window will open click on yes.
Step 3: Type the following command in the PowerShell prompt and hit enter
Get-NetConnectionProfile
Step 4: Type the following command and hit enter to change your network profile
Set-NetConnectionProfile -InterfaceIndex <index number> -NetworkCategory Private
Method 3: Change Network Profile Type Windows 10 Using Registry
Step 1: Open the run prompt using Windows + R keys together
Step 2: Type regedit.exe in the run prompt and hit enter
Step 3: A user account control window will open click on yes. This will open the windows registry editor
Step 4: Navigate to the following path in the registry
Computer\HKEY_LOCAL_MACHINE\SOFTWARE\Microsoft\Windows NT\CurrentVersion\NetworkList\Profiles
Step 5: Expand the Profiles option and click on each profile to find the profilename key
Step 6: Double click on the category option at the right side
Step 7: Then change its value data from 0 to 1 to change network from Public to Private
Method 4: Change Network Profile Type Windows 10 Using Local Security Policy
Step 1: Open the run prompt using Windows + R keys together
Step 2: Type secpol.msc in the run prompt and hit enter. This will open Local security policy window
Step 3: On the left, click on Network List Manager Policies
Step 4: Double click on the preferred network
Step 5: In the opened window go to the network location tab
Step 6: From the location type section select private by clicking on the radio button beside it
Step 7: To save the changes click on apply and ok.
Method 5: Update The Device Driver
Step 1: Open the run prompt using Windows + R keys together
Step 2: Type devmgmt.msc in the run prompt and hit enter
Step 3: Scroll down and expand the hardware categories whose hardware driver you want to update
Step 4: Right click on that particular device and click on update driver
Method 6: Run The Network Troubleshooter
Step 1: Open the windows settings using Windows + I keys together
Step 2: Click on update & security
Step 3: On the left click on troubleshoot
Step 4: Click on additional troubleshooters which is at the right side
Step 5: Scroll down and find network adapter
Step 6: Then click on run the troubleshooter
Method 7: Run Hardware And Devices Troubleshooter On Windows
Step 1: Open the run prompt using Windows + R keys together
Step 2: Type control in the run prompt and hit enter. This will open the control panel
Step 3: In the control panel search bar type troubleshooting and hit enter
Step 4: Then click on Troubleshooting option
Step 5: Select hardware and sound. Then click on the hardware device that is troublesome
Step 6: In the opened window click on next
Step 7: If there are any problems the system will detect it and fix the issue
Step 8: If there are no issues found then close the window.
Method 8: Modify SNMP Service Settings
Step 1: Open the run prompt using Windows + R keys together
Step 2: Type services.msc in the run prompt and hit enter. This will open services window
Step 3: Right click on SNMP trap
Step 4: From the list click on the properties
Step 5: From the startup type dropdown select automatic
Step 6: To save the changes click on apply and ok and then check if the issue is solved.
That’s it! I hope this article is helpful and let us know which of the above method helped you. Thank you!!


