NVIDIA cards are used by many users around the world. It usually works quite well, but sometimes it runs into some problems. Some NVIDIA users have complained about a problem they have witnessed on their system, recently after updating their system. The error prompt reads – “NVIDIA Display settings are not available. You are not currently using a display attached to an NVIDIA GPU.” This usually means that your system (or, any NVIDIA applets) is not detecting the NVIDIA GPU. There are some easy fixes that you can apply to quickly resolve this problem.
Workaround –
1. Sometimes just a simple system restart may actually solve the issue. Just restart your system and then check whether that helps.
Fix 1 – Test the connection manually
Before you jump on to the software-side solutions, check whether the wire is connected correctly or not.
1. Shut down your system.
2. Take a look at the backside of the cabinet. You will find the display wire is connected to the display port.
3. If it is not corrected correctly, disconnect it and connect it to the port.
4. Check the status of the wire. Look whether you can find anything defective in the wire.
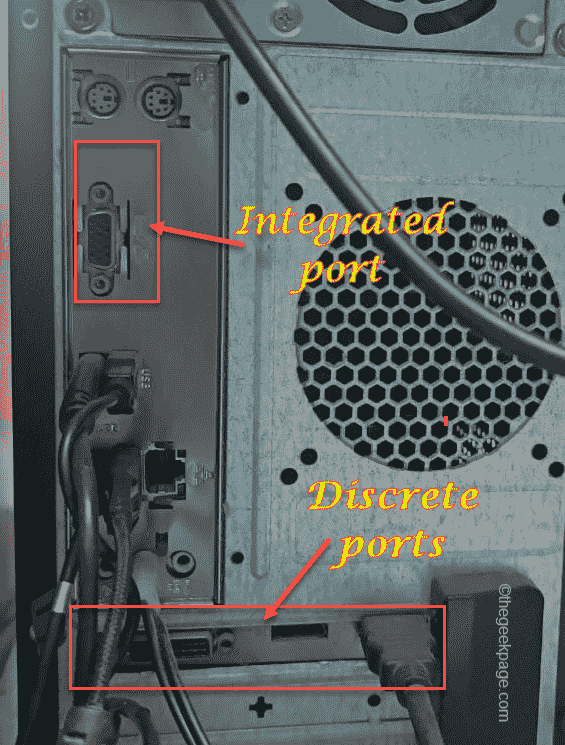
5. If your system has the Intel Integrated graphics card, check whether the display cable is connected to the integrated graphics card port.
Usually, the discrete card ports are on the lower side of the cabinet and the integrated port is on the middle section.
6. Now, once you have connected the port, restart the system.
Check whether you are seeing the “NVIDIA Display settings are not available“.
Fix 2 – Detach all external devices
External devices can cause this malfunction.
1. Shut down the machine completely.
2. Then, very carefully remove the power cord from the source. Next, check the power cable for any external defects (like ruptures, tearing, etc.).
3. In the next step, detach all the external USB devices (like any Bluetooth adapters, external HDDs) one by one from the setup.
4. Make sure there is not a single piece of an external device is connected to the system. Then, just connect the power cable to the system and turn it ON.
5. Further, make sure there aren’t any CDs/DVDs running in the slot.
6. Finally plug in the power cord and start the device.
After this, test whether you are still facing the graphics card error.
Fix 3 – Alter the display port
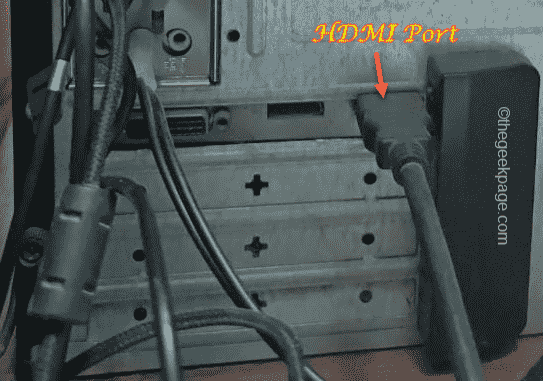
Try connecting your display cable to the HDMI port on the rear side of your cabinet. If you are using a VGA port, try switching to the HDMI port of the NVIDIA card. Try this approach and check whether this is helping or not.
Fix 4 – Disable and re-enable GPU
The quickest and easiest solution for this issue is to just disable the GPU and re-enable it back on.
1. Press the Windows key+X keys together.
2. Then, tap on the “Device Manager” to access it.
3. When the Devcie Manager opens up, expand the “Display adapters” and you should see the NVIDIA graphics adapter.
4. Then, right-click the NVIDIA adapter and tap “Disable device” to just disable the display adapter.
5. Tap on “Yes” to completely disable the device.
Just wait for a while as the default system display kicks in.
6. Once you are back, right-tap the disabled NVIDIA driver, and this time click “Enable device” to enable it.
Once you are done, close the Device Manager and launch NVIDIA Control Panel.
Check if this works out.
Fix 5 – Start NVIDIA Display driver service
Check whether the NVIDIA Display Driver service is running or not.
1. Search for “Services” from the search box.
2. Then, tap on “Services” to access it.
3. Once the Services page opens up and look for the “NVIDIA Display Driver Service“.
4. Now, right-click on the service and tap “Properties“.
5. Before you do anything, check whether the service is set to run automatically or not.
6. If not, tap on ‘Startup type:’ and set it to “Automatic“.
7. If the service is not running, tap “Start” to start the service.
8. Once you are done, tap “Apply” and “OK” to save the changes.
After that, close the Services and launch NVIDIA Control Panel and test.
Fix 4 – Use Display Driver Uninstaller
Display Drive Unistller, as the name suggests, can help you with a clean graphics driver installation. Follow these steps very carefully.
Step 1 – Download the NVIDIA driver and DDU
You have to download the latest version of the NVIDIA driver before you do anything else.
1. Open the NVIDIA Driver downloads website.
2. Next, just put the specifications of your graphics card in the particular sections one by one (like the ‘Product’, the ‘Operating System’, etc).
3. Once you are done, tap “Search” for the graphics card.
4. Once you are done, tap on the “Download” button to download the latest graphics driver.
5. Once you have downloaded the driver, you have to download the Display Driver Uninstaller.
After downloading the zip file, close the browser.
6. Then, extract the “DDU v18.0.4.7” zip file somewhere you can easily extract it.
Close the File Explorer once you are done.
Step 2 – Boot in Safe Mode
You can have to boot your device in Safe Mode.
1. Open Settings.
2. In the Settings window, tap on “System“.
3. After that, tap “Recovery“.
4. Later, tap “Restart now” in the Advanced startup section.
This will restart the system.
5. Just, click on the “Troubleshoot” to troubleshoot this issue.

6. Next, just click “Advanced options” to go to the next page of settings.

7. Here locate the “Startup Settings” and tap it.

8. Now, click “Restart” to restart the system.

This will restart your system.
9. Then, just press the F4 from your keyboard to choose the “Enable Safe Mode” option.
Just wait for your system to boot into safe mode.
Step 3 – Use DDU
Once you are in Safe mode, you can use DDU to clean up graphics driver files.
1. Now, navigate to the folder where you have extracted DDU files.
2. Just, double click on the “DDU v18.0.4.7” to open the folder.
3. Then, tap on the “Display Driver Uninstaller” to access it.
4. In the DDU window, set the ‘Select device type’ to “GPU“. Set the next option to “NVIDIA“.
5. Later, to clean GPU files and restart, tap “Clean and Restart“.
All you have to do is to wait for the process to be over.
Step 4 – Use the installer
Once the system restarts, you can use the installer file to perform a clean installation of the driver.
1. Simply, double-tap on the installer to launch it.
2. When you see the NVIDIA Graphics Driver window, choose the “NVIDIA Graphics Driver and GeForce Experience“.
3. Then, click on “Agree and continue“.
4. After that, choose the “Custom (Advanced)” option to try it out.
5. To proceed tap “Next“.
6. Now, this is very important. Check the “Perform a clean installation” box on the installer page.
7. Finally, tap on “Next“.
Just wait for the installer to complete the process.
Fix 5 – Rollover graphics driver
You can rollover the recent driver updates from the Device Manager.
1. Just right-tap the Windows icon and tap “Device Manager” to access it.
2. When the Device Manager screen opens up, just tap once the “Display adapters“.
3. Just, right-tap the NVIDIA driver and tap “Properties“.
4. In the Properties screen, go to the “Drivers” section.
5. Just, tap “Rollback driver” to rollback the graphics driver.
6. You will see a prompt. Just choose “Previous version of the driver performed better” option and tap “Yes” to complete the process.
This process should automatically restart the system and roll back the graphics driver while the system is restarting. If it doesn’t restart, restart the machine manually and test.
Once you are done, your system should load up the previous version of the driver.
Fix 6 – Reset/ Repair NVIDIA software
Sometimes this problem may originate directly from the corrupted software you are using.
1. You can press the Windows key+X keys together.
2. After that, click “Apps and Features“.
Here, you will find several apps on your window.
4. Now, just click on the three-dot sign of “NVIDIA Control Panel” app and tap on “Advanced options“.
5. Now just scroll down to find the ‘Reset’ and ‘Repair’ options.
6. Tap on “Repair” to repair the app completely. Once you have repaired the app, try to open the NVIDIA Control Panel.
Check whether you are seeing the same error message or not.
7. If you continue to see such error message, come back to the Settings page.
8. Now, click on the “Reset” option to reset the app completely.
Now, you have done that, close Settings.
Check whether this works out for you.
This should have fixed your problem.

