Ntoskrnl.exe is a system application that manages essential items like hardware virtualization, process, and memory management in Windows 10. Sometimes, bad or out-dated device drivers, malware or viruses, and even corrupted system files may cause an abnormality of Ntoskrnl.exe. The main abnormality of Ntoskrnl.exe includes consumption of a huge amount of processing power and/ or available free memory.
But before going ahead for the main fixes you should attempt these workarounds-
Initial Workarounds–
1. Run a full scan for viruses or malware on your system files.
2. Check if any Windows Update is pending or not.
If these didn’t work out go for these fixes-
Fix 1 – Disable RunFullMemoryDiagnostic in Task scheduler
1. Search Task scheduler in windows 10 search box.
2. Click on Task scheduler search icon.
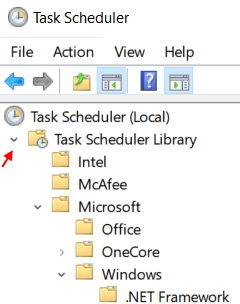
3. In the task scheduler window, in the left side menu, browse to the following location by expanding items:-

Task Scheduler Library -> Microsoft -> Windows -> MemoryDiagnostic
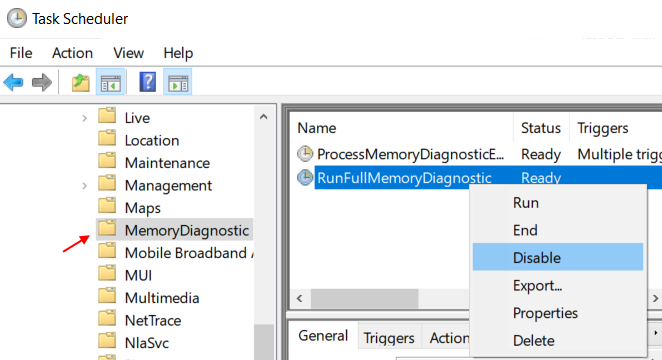
4. In the right side just right click on RunFullMemoryDiagnostic and choose disable.

Fix-2 Modify Registry-
Modify the registry to clear paged files at shutdown may solve this issue.
1. Press Windows key+S. Then start to type “regedit“.
2. Now, click on “Registry Editor” from the search results to open it on your computer.

3. Now, go to this header file-
4. On the right-hand side of the same window, double click on “ClearPageFileAtShutdown” to modify it.

5. Next, you need to set the ‘Value Data‘ to “1“.
6. Now, click on “OK“.

Now, close Registry Editor window. Reboot your computer and then check if this works or not.
Fix-3 Disable Runtime Broker-
1. Press Windows + I key together to open Settings.
2. Click on System.
3. Click on Notifications & Actions from the left menu.
4. Uncheck the option “Get tips, tricks and suggestions as you use Windows”.

Alternative method to disable Runtime broker via Registry editor
Run this registry script to disable Runtime Broker on your computer.
1. At first, right-click in the empty space of Desktop and then click on “New>“.
2. Then, click on “Text document“.

2. Now, double click on ‘New Text Document‘ to access it.
3. When the Notepad window appears on your screen, copy-paste these lines.
Windows Registry Editor Version 5.00

[HKEY_LOCAL_MACHINE\SYSTEM\ControlSet001\Services\TimeBroker] “Start”=dword:00000003
[HKEY_LOCAL_MACHINE\SYSTEM\ControlSet001\Services\SysMain] “DisplayName”=”Superfetch” “Start”=dword:00000003

4. Then, click on “File” and then click on “Save as…“.

7. Now, you have to name the file as “Regfix.reg” and choose “All Files” from the file type.
8. Choose a particular location to store the file.
9. Then simply click on “Save” to save the file on your computer.

Close Notepad window.
10. Now, navigate to where you have just saved the file.
11. When you have reached the place, right-click on the “Regfix.reg” script and then click on “Merge” to merge it with your original registry.

12. If you receive a warning message, just click on “Yes” to run the script on your computer.

Reboot your computer.
After rebooting, Ntoskrnl.exe will not consume high amount of processing power.
Fix-4 Free virtual memory from Windows drive-
Freeing paged file from your Windows drive may fix this issue.
1. Press Windows key+R to open Run.
2. In Run window, type “sysdm.cpl” and then hit Enter to open System Properties.

3. Now you need to click on the “Advanced” tab.
4. Under the ‘Performance‘ tab, you have to click on “Settings“.

5. After that, go to the “Advanced” tab.
6. Under the option ‘Adjust for best performance of:‘ settings click on the “Program“.

7. Now, under the ‘Virtual memory‘ section, click on “Change“.

8. In Virtual Memory window, uncheck the option “Automatically manage paging file size for all drives“.
9. In order to free your Windows drive of paging files, follow these steps-
a. At first, select “C:” drive.
b. Then. select the radio button beside the option “No paging size“.
c. After that, click on “Set” to set it.

10. In case a warning message pops up, click on “Yes” to confirm the change.

11. Click on “OK” when you have done setting page files.

12. Sequentially, click on “Apply” on “OK” to save the changes.

13. At the last step, click on “Apply” and then on “OK“.

Restart your device.
After resetting the virtual memory on your computer Ntoskrnl.exe will stop consuming high amount of CPU or available memory power.