Some services and apps automatically start up when you power on the system. If the Microsoft Edge browser is opening up automatically at the system startup, don’t worry. This is completely normal behavior. But, it can prolong the booting process and make the system slower (as Edge consumes memory). So, you can get rid of this annoying issue if you follow these easy and quick steps.
Workaround –
Windows Spotlight on your lock screen contains several links for more information about the lock screen picture. Do not click these links, because if you do, several new tabs in Edge will be opened up when you log in!
Fix 1 – Check the Edge startup settings
Check whether MS Edge is starting up correctly. Misconfigured Edge startup settings may lead to this problem.
1. Open Microsoft Edge.
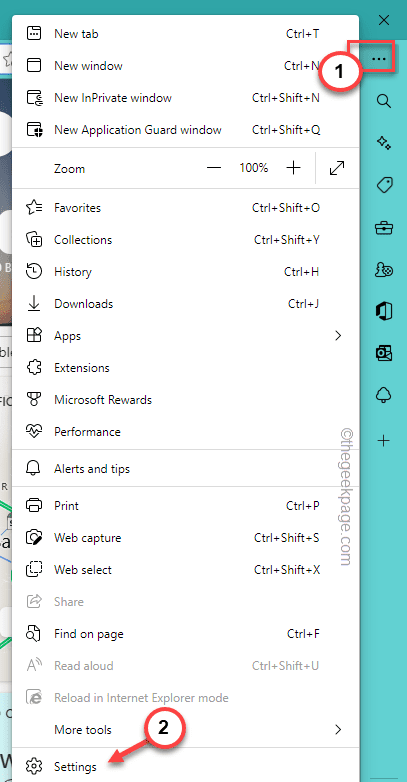
2. Then, on the left-hand pane, you can view a three-horizontal dot sign.
3. Tap it and click “Settings” to access the Edge settings.
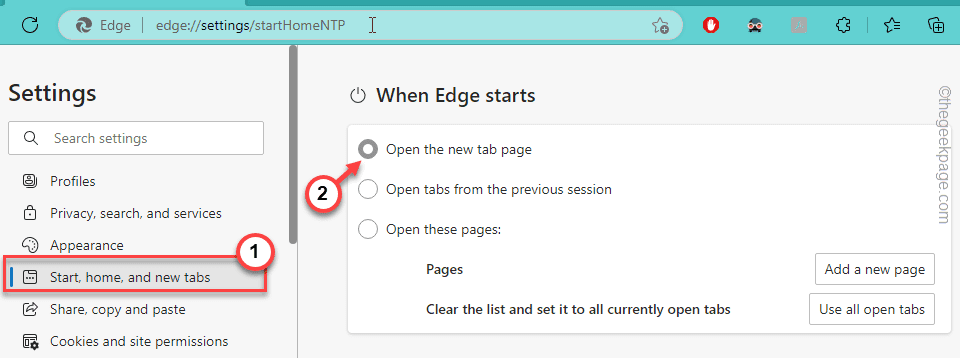
4. Now, in the left-hand pane, look for the “Start, home, and new tabs” settings to open it.
5. Then, on the right-hand pane, at the top, you can find the “When Edge starts” menu.
6. You have to set this to “Open the new tab page“.
This will make sure Edge starts up only with a single new tab page.
Fix 2 – Tweak Import browser data settings
1 -Open Microsoft Edge
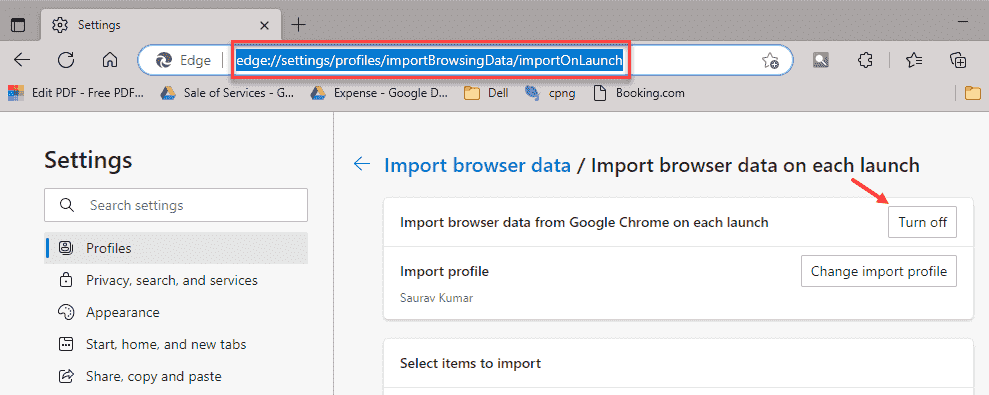
2 -Now, Copy and paste the path given below in the address bar.
edge://settings/profiles/importBrowsingData/importOnLaunch
3 – Now, Turn Off “import browser data from Google chrome on each launch” option.

After this your issue will be resolved
Fix 2 – Disable Edge automatic startup
Edge is by default automatically started in Windows. But, you can very easily disable this startup.
1. You can use the Win+X hotkeys to bring up the power user menu.
2. Then, from there, tap “Task Manager” to access that utility.
3. When the Task Manager screen opens up, go to the “Startup items” from the left-hand pane.
4. This enlists all the items that start up when the system starts.
5. Look for “msedge” here. When you have found that, right-tap that and click “Disable” to disable Edge from starting up.
6. In some computers, you may also notice the “Microsoft Edge“. Again, right-click and tap “Disable” to disable that as well.
7. Following the same steps, if you can find the “Microsoft Edge Update“, disable it using the Task Manager.
After disabling Edge and Edge-related apps, close the Task Manager. Now, if you restart your device you won’t see any web pages on Edge opening up automatically!
Fix 3 – Disable Edge startup via Settings
Sometimes when Windows finishes up the post-update process with your sign-info, Edge can automatically open up.
1. Open the Settings window. You can do it by right-clicking the Windows icon and tapping, “Settings“.
2. Now, tap “Accounts” on the left-hand pane.
3. On the right-hand pane, tap “Sign-in options” to open that setting.
4. On the Sign-in options page, scroll down and switch this “Use my sign-in info to automatically finish setting up after an update” setting to “Off“.
After that, close Settings.
Fix 4 – Update Edge
Update the Edge to the latest version. Usually, this is an automatic process.
1. At first, open MS Edge on your system.
2. Then, tap on the three-dot menu and tap “Help and feedback>“.
3. Next, tap “About Microsoft Edge“.
4. This will lead you straight to the About page.
5. When you open this page, Edge, automatically performs a search for the latest version of the browser available and download, and install it.
6. Once the update is installed, tap “Restart” to restart the Edge to finish the update process.
Reboot the system and test if this works. Go to the next fix, if this one doesn’t work.
Fix 5 – Clean Edge browsing data
Clean the Edge browsing data on your computer. Corrupted browsing data may cause this problem.
1. Launch Microsoft Edge, if you haven’t already.
2. Then, open a new tab and copy-paste this into the address bar, and hit Enter.
edge://settings/clearBrowserData
3. In the Clear Browsing Data panel, check all these items one-by-one
Browsing data

Download History

Cookies and other site data

Cached images and files
4. Then, tap “Clear now” to clean the Edge browsing data from your computer.
After this, close Edge.
Now, test if this works out by rebooting the system.
Fix 6 – Repair/Reset Edge
If updating Edge or clearing out the Edge cache data doesn’t work, you should repair/ reset Edge for possible faults.
1. You can open the context menu using the Win key+X keys together.
2. Then, tap “Installed apps” to go directly to the Installed app section in Settings.
3. Now, among all the apps look for Microsoft Edge.
4. Then, tap on the three-dot menu and tap “Modify“.
You will need administrative permission for this.
5. When the Repair Microsoft Edge panel opens up, tap “Repair” to repair the Edge browser.
Once you have repaired the browser, relaunch Edge and test.
Fix 7 – Re-register Edge browser
There is another way you can reset Edge on your computer.
1. You can open a Run box using the Win key+R keys together.
2. Then, type this code and click “OK“.
%localappdata%
3. Now, navigate to the following Edge folder –
Packages > Microsoft.MicrosoftEdge_8wekyb3d8bbwe
4. Next, select all the contents and press the Delete key from your keyboard to clean up it.
5. Next, write “powershell” in the search box.
6. After that, right-click the “Windows PowerShell” in the search results and tap “Run as administrator” to access the terminal with administrative access.
7. Then, just copy-paste this code and hit Enter to re-register MS Edge.
Get-AppXPackage -AllUsers -Name Microsoft.MicrosoftEdge | Foreach {Add-AppxPackage -DisableDevelopmentMode -Register "$($_.InstallLocation)\AppXManifest.xml" -Verbose}
After that, your problem will be solved.
Fix 8 – Uninstall Edge and reinstall
Uninstall Microsoft Edge from your computer and reinstall the latest version. Though there is no easy way to do it, you can do it via the PowerShell commands.
1. Type “powershell” in the search box.
2. Then, right-click the “Windows PowerShell” in the search results and tap “Run as administrator” to access the terminal with administrative access.
3. Then, run this command to know the exact PackageFullName of Microsoft Edge. Just, write this line and hit Enter.
get-appxpackage *edge*
A complete list of MS Edge-related applications will appear on the screen. So, note down/copy the PackageFullName from the list of details.
In our case, the PackageFullName is this –
Microsoft.MicrosoftEdge_44.22621.819.0_neutral__8wekyb3d8bbwe
4. So, modify this code and hit Enter.
Remove-appxpackage PackageFullName
NOTE – Replace the PackageFullName with the name that you have noted/ copied before.
Example – In our case, this code is –
Remove-appxpackage Microsoft.MicrosoftEdge_44.22621.819.0_neutral__8wekyb3d8bbwe
After uninstalling the Microsoft Edge browser, close the terminal.
Then, download Edge and install it on your computer.


