Some MSI users are complaining about an issue they are experiencing with the MSI Realtek HD Audio Manager on their system. Going into the depths of the issue, we have discovered that the problem may include the sudden absence of Realtek HD Audio Manager from the affected system, slow loading, and other random issues. This problem may be problematic for regular users, but there are some quick resolutions to fix the issue with minimal effort.
Fix 1 – Uninstall MSI app
Some users have fixed the issue just by uninstalling the MSI app from their system.
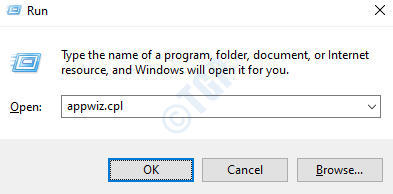
1. Press the Windows key+R.
2. Then, type “appwiz.cpl“. Click on “OK“.

3. In the list of applications, right-click on the problematic MSI software and click on “Uninstall“.

4. Then, right-click on the “Realtek audio manager” and click on “Uninstall“.

Once you have uninstalled both the softwares, restart the system.
5. After that, type “regedit” in the search box and hit Enter.

6. When the Registry Editor opens up, click on “Edit” and click on “Find…“.

7. After that, type “NAHIMIC” in the ‘Find what’ box.
8. Click on “Find next” to search for the associated key.

9. When the key appears on your screen, right-click on it and click on “Delete” to delete the key from your system.

Further, press the “F3” to look for the next key and delete it also.
Repeat this process until there are no keys associated with “NAHIMIC“. You will notice a message like this –

Now you can go to the MSI website and download the latest audio driver for your system.
Same way, you have to download the newest version of Realtek HD audio driver for your system. Install these drivers and restart the system, if required.
This should fix the problem in most cases.
Fix 2 – Uninstall Realtek Audio driver
Try uninstalling the Realtek audio driver from your system.
1. Press the Windows key+R keys together.
2. Then, write “devmgmt.msc” and click on “OK“.

3. After that, expand the “Sound, video and game controllers” section.
4. Now, in order to uninstall the particular adapter, right-click on the “Realtek Audio driver” and then click on the “Uninstall device“.

5. Click on “Yes” to confirm the uninstallation of the driver.

After that, simply restart your computer once. This will load the default driver for the Realtek Audio driver.
If the driver still isn’t there, follow these steps-
Open the Device Manager window.
a. In the Device Manager, click on “Action“.
b. After that, click on “Scan for hardware changes“.

This should help you out.
Fix 3 – Check if the Realtek Audio is set correctly
If you have multiple audio devices connected to your device, there is a chance that you are not using Realtek Audio.
1. Right-click on the speaker icon in the taskbar and choose the “Realtek Audio” from the list of speakers.

Try to access the Realtek HD Audio manager once more. Check if this works out for you or not.
Fix 4 – Repair the Realtek driver
You can repair the Realtek driver on your system that in turn will fix the issue you are currently facing.
1. You need to download the latest version of the Realtek driver.
2. Unzip the downloaded file. Go to the location where you have extracted the file.
3. In the driver folder, double click on “Setup“.

4. When the Realtek audio driver appears, click on “Repair“.
5. Click on “Next“.

Wait for the setup to repair the driver and install the latest driver on your computer.
6. Click on “Finish” to close the window.

This should fix the problem you are currently facing.
Fix 5 – Inspect the external speaker connection
Sometimes the connection to the external speaker can arise this problem. Follow these instructions to fix the issue.
1. Open Realtek Audio Console on your computer.

NOTE– In case, if you can’t find the ‘Realtek Audio Console’ on your computer, you can easily download it from MS Store on your computer. Simply, click on this link and install it on your computer.
2. Once that window opens up, click on the “Device advanced settings”.
3. Then, plug in the external speaker to your PC.
Check out if the corresponding jack is lit ON or not.
Fix 6 – Enable HD Audio Controller
1. At first switch off your computer.
2. After a while switch on your computer. When your computer boots up, you need to press the “Delete“* key from your keyboard to access the bios setup on your system.
* NOTE–
The actual key to open your system settings varies from manufacturer to manufacturer. Below we have mentioned the set of keys that should work-
Esc, F1, F2, F10, F11, F12 or Delete

3. Once the MSI BIOS setting appears, go to the “Settings “on the left-hand side.
4. In the ‘Advanced” settings, set the “HD Audio controller” to “Enabled“.
5. Again, press the particular key to save the settings.
[Example – It is the “F10” key for this system. It may be different for your system.]

4. After that, select “Yes” to finally save and exit the bios settings on your computer.

Restart your computer normally. Check out the issue again.