You are trying to get a print of an online document and you suddenly see an error “printer requires your attention“. This error prevents you from getting a print due to a configuration issue or if there are any problems with the printer itself. You may see different error messages for the same issues, for instance, “Printer needs user intervention“, “Canon, Brother, Epson printer attention required“, etc. So, when you experience the “printer requires your attention” error in your Windows 10 PC, you can try the below possible solutions.
Method 1: Restart the Print Spooler Service
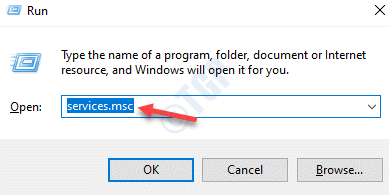
Step 1: Press the Win + R hotkey on your keyboard to open the Run command window.
Step 2: In the Run command search box, type services.msc and hit Enter to open the Service manager window.

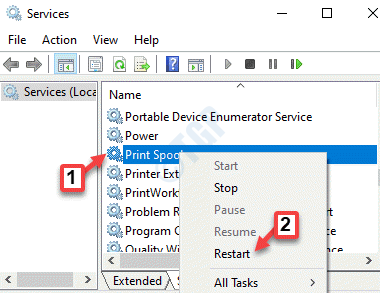
Step 3: In the Services window, navigate to the right side of the pane and under the Name column look up for the Print Spooler service.
Right-click on the service and select Restart.

Now, that the Print Spooler services has been restarted, try getting a print and it should work fine now.
Method 2: Update the Printer Driver
Solution 1: Install Drivers Automatically
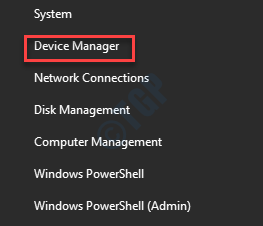
Step 1: Right-click on Start menu and select Device Manager to open the Device Manager window.

Step 2: In the Device Manager window, expand the Print queues section.
Now, right-click on your printer and select Update driver.

Step 3: Here, you can select Search automatically for drivers option.

Step 4: Windows will now start detecting any latest available drivers and if found, will automatically download and install them.
Wait for the process to be over. Then, restart your PC and you should now be able to print.
Solution 3: Install Drivers Manually
To download and install drivers manually, visit the manufacturer website of the printer and download the latest drivers. Save them in your preferred location. Now, proceed with the below steps:
Step 1: Right-click on Start menu and select Run to open the Run command window.

Step 2: In the Run command search box, type devmgmt.msc and hit Enter to open the device manager window.

Step 3: In the Device Manager window, go to the Print queues section and expand it.
Now, right-click on your printer device and click on Update driver.

Step 4: In the Update Drivers window, under How do you want to search for drivers, click on Browse my computer for drivers.

Step 5: Next, under the Search for drivers in this location field, click on Browse.

Step 6: You can now select the downloaded driver from the location where you saved it and finish the installation.
Restart your PC and try getting a print. You should be able to print your documents now.
Method 2: Run the Windows Troubleshooter
Step 1: Press the Win + I keys together on your keyboard to open the Settings window.
Step 2: In the Settings window, click on Update & Security.

Step 3: In the next window, click on Troubleshoot on the left.

Step 4: Now, on the right side of the pane, scroll down and click on Additional troubleshooters.

Step 5: Next, under Get up and running, click on Printer and then press the Run the troubleshooter button below.

Now, follow the instruction on the screen to finish the troubleshooting process. Once done, go back and try printing the document. You should not see the “printer requires your attention” error anymore.
Method 3: Turn Off Protected Mode in Internet Explorer
If you are using Internet Explorer as your default browser and you are facing the printing issue on it, you can try the below method.
Step 1: Launch Internet Explorer and navigate to the top right corner of the browser.
Click on Tools (gear icon) and the select Internet Options.

Step 2: In the Internet Options dialogue box, go to the Security tab and uncheck the box next to Enable Protected Mode.
Press Apply and then OK to save changes and exit.

Now, re-launch your Internet Explorer and try getting a print. It should work properly now.
Method 5: By Adding a Printer Using It’s IP Address
Before you proceed with the method, make sure you have the IP Address of your printer handy. Let’s see how to get it.
How to check the IP Address for Network Printers
Step 1: Press the Win + E keys together on your keyboard to open the File Explorer window.
Step 2: In the File Explorer window, click on the Network shortcut on the left.
Now, on the right side of the pane, go to your printer and double-click to open it’s interface.
Step 3: Now, look for the IP address of your printer here.
*Note – Her, our printer is a network printer and hence, you must look for the IP Address for the Local Area Network (LAN) for the printer.
For other printers, you can look for the IP address using the process below:
How to check the IP Address for Other Printers
Step 1: Right-click on Start and select Run.

Step 2: It opens the Run command window.
Now, type Control Panel in the search box and press OK to open the Control Panel window.

Step 3: In the Control Panel window, select the Devices and Printers option on the right.

Step 4: Now, in the Devices and Printers window, right-click on your Printer and select Properties.

Step 5: In the Properties window, go to the Web Services tab.
Now, under the Troubleshooting Information section, note down the IP address.
Now, let’s proceed with the method to add a printer using it’s IP address:
Step 1: Right-click on Start and select Run to open the Run command window.

Step 2: As the Run command window opens, write control.exe in the search field and hit Enter to open the Control Panel window.

Step 3: In the Control Panel window, go to the View by field and set it to Category.
Now, click on Hardware and Sound.

Step 4: In the Hardware and Sound window, go to the right side and click on Devices and Printers.

Step 5: In the Devices and Printers window, click on Add a printer option on the top.

Step 6: If it doesn’t detect the printer, click on The printer that I want isn’t listed.

Step 7: Next, under Find a printer by other options, select the radio button next to Add a printer using a TCP/IP address or hostname.
Click Next to continue.

Step 8: In the next window, let the Device type be at Autodetect.
Now, paste the IP address of the your printer that noted down above, in the Hostname or IP address field.
Click Next to continue.

Step 9: Next, under Which version of the driver you want to use, select the radio button next to Replace the current driver.
Press Next to continue.
Step 10: In the next window, under Type a printer name, let the Printer name field be as it is and click Next.
Step 11: Click Next again and press the Finish button.
You will now see the new printer that you added with a green tick. You can trying printing your document now with the freshly added printer and it should work fine.
*Note – To avoid confusion, you can delete the old printer. Follow the below process:
Step 1: Press the Win + X keys together on your keyboard and select Run to open the Run command.

Step 2: Write Control.exe in the Run command window and hit Enter to open the Control Panel window.

Step 3: In the Control Panel window, go to the View by field and select Category from the drop-down next to it.
Now, select Hardware and Sound from the list.

Step 4: In the next window, go to the right side of the pane and click on Devices and Printers.

Step 5: Now, in the Devices and Printers window, right-click on the old printer and select Remove device.

You should now be able to get print outs of your documents normally.
Alternatively, you can also try updating your Windows to the latest version and check if that works, because sometimes the issue may be due to missed Windows updates. It can also be possible, that your printer has low ink levels, so make sure that you remove the ink cartridges at frequent intervals and shake them to see if it works. This is a temporary solution. If the error is showing up due to the ink cartridges, for a permanent solution, you must replace the cartridges with new ones.
You can also check if the printer is installed properly, If you are not sure, uninstall and re-install the printer to make sure irt’s working right. But, if the issue is with the browser, you may want to try another browser to get a print of your document.