Have you ever wondered about how the presentation guy managed to get a moving background for his presentation? Of course, you had all your attention focused on it, and you definitely can’t wait to implement the same in your own slides! Well, it’s nothing but a video playing on the slide that is selected. A moving background/video indeed makes your presentation much more lively and interesting for the audience. It makes the presentation aesthetically appealing and never fails to draw attention.
So, now is the time to ask that question. How can you add a moving background to your PowerPoint presentation or how you can add a video to your PowerPoint slides? Well, the answer is simple and it is well detailed in the steps below. So without wasting any time, let’s dive in, shall we?
Solution
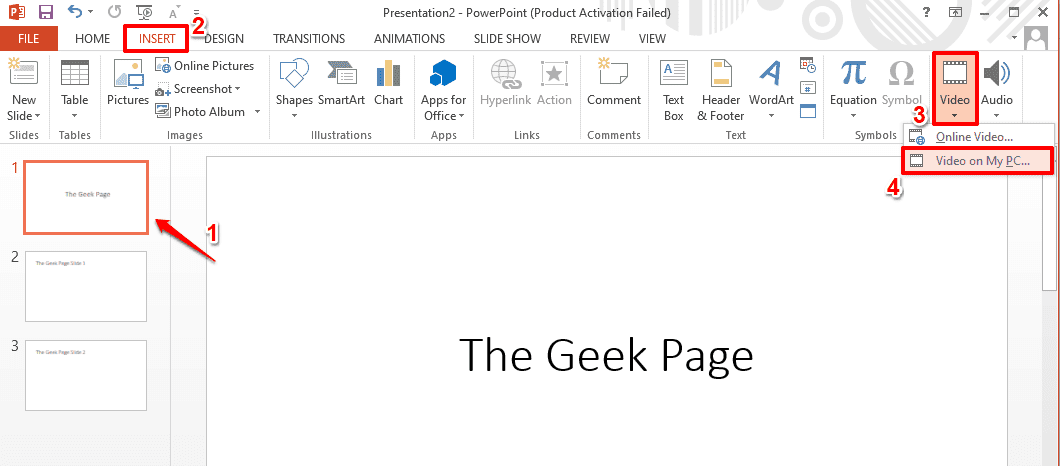
Step 1: Firstly open the PowerPoint presentation and click on the slide to which you want to add a moving background.
As next, click on the INSERT tab from the top ribbon and then click on the Video dropdown button.
From the list of options available in the Video dropdown, click on Online Video if you want to find a video online. Or if you already have the video available on your PC, then you can click on the option Video on My PC option. I have selected the second option as I already have the video available locally.
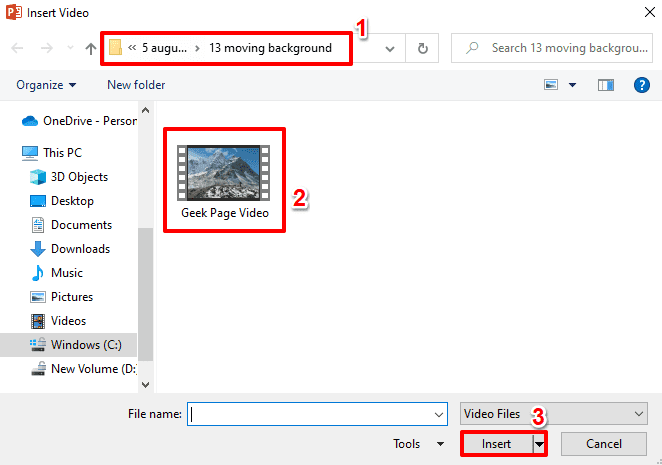
Step 2: On the Insert Video window, navigate to the location where your video is present.
Click on the video to select it and then hit the Insert button at the bottom of the window.
Step 3: The video might be huge and you might want to use only a portion of that video in your presentation. There is no need to depend on an external application to trim down your video though. You can do it straight from PowerPoint itself. Let’s see how.
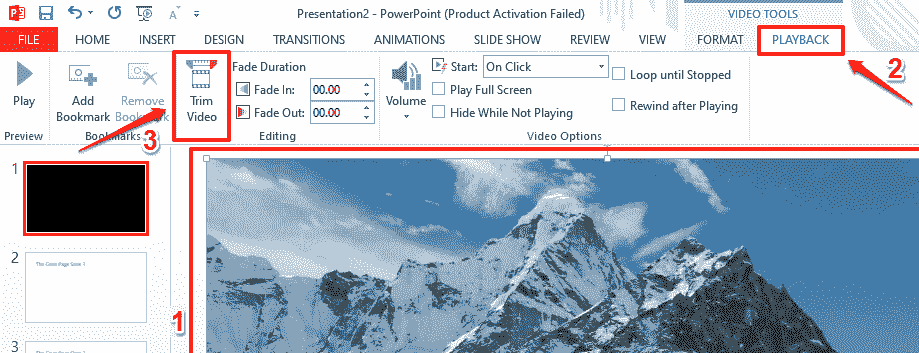
To trim the video inserted, click on the video first to select it. Now a new contextual tab named VIDEO TOOLS would appear at the very top part of the window. Click on the sub-tab named PLAYBACK under the VIDEO TOOLS main tab.
Now under the group named Editing, click on the button Trim Video.
Step 4: On the Trim Video window, you have the option to set the start and end timings of the video to take out the slice that you want.
You can either drag the sliders to set the start time and the end time or you can use the time entering fields to enter the time.
To preview the slice you have cut off, you can hit the Play icon located at the bottom part of the window.
Once you are all done, hit the OK button to proceed.
Step 5: Now if you would like to mute the audio when the video plays, you have options to do that as well.
To set the volume preferences, click on the video once and then hit the PLAYBACK contextual tab at the top ribbon.
Now click on the Volume dropdown button and then choose the Mute option to mute the volume while the video plays during the slideshow. You also have the options to set the volume as Low, Medium, or High instead of completely muting it.
Step 6: If you would like to start the video the moment the slide gets presented without any external trigger, then you click on the video once, then hit the PLAYBACK contextual tab, and then select the option Automatically from the Start dropdown menu under the group Video Options.
Or if you would like to start the video only when the slide is clicked on, then you can choose the option On Click instead of Automatically.
Step 7: The other Video Options are as follows.
For all the points below, make sure you have clicked on the video and have clicked on the PLAYBACK contextual tab from the top ribbon.
- If you would like to play the video on full screen and display nothing else, tick the checkbox for the option Play Full Screen.
- If the video is not completely covering the screen and if you would like to hide it when it’s done playing, you can check the checkbox corresponding to the option Hide While Not Playing.
- If you want the video to keep repeating in a loop, check the checkbox corresponding to Loop until Stopped.
- If you want the video to rewind after it is done playing, then the option Rewind after Playing needs to be ticked.
Step 8: The whole point is to have the video playing in the background. Which means you got to see the text in the foreground. Let’s see how you can bring the text that you had in Step 1 to the front.
Right click on the video and from the list of options that get expanded out, click on Send to Back. This will send the video to the background, which in effect, brings the text behind it to the front.
Step 9: That’s it. You can now see that the text is brought to the front. However, if you feel like you cannot read the text well enough, there is a quick fix as detailed in the steps below.
Step 10: Click on the text box to select it. Now a new contextual tab named DRAWING TOOLS will be visible at the very top part of the window.
Click on the sub-tab FORMAT under the DRAWING TOOLS main tab.
Now click on the dropdown button named Shape Fill.
Step 11: From the options available, click on the Gradient option and then click on the More Gradients option as shown in the screenshot below.
Step 12: On the right side of the window, a new window now opens up, by the name Format Shape.
Click on the Paint Bucket icon first.
Now choose the radio button corresponding to the option Solid fill.
Now choose a color of your preference and set its transparency according to your preference.
I have chosen the color white and the transparency is set to 55% to make the text readable.
Step 13: Just before starting the slideshow, there is one last step to do.
Click on the video once again and then click on the PLAYBACK contextual tab from the top ribbon.
Under the Video Options, uncheck the checkbox corresponding to the option Play Full Screen. If this option is checked, then the video would play on full screen and thus the text would not be visible.
Step 14: That’s it. Let’s start the slideshow now. For that, click on the SLIDE SHOW tab from the top ribbon and then hit the button From Beginning to start the slide show from the beginning. Hope you enjoy your presentation that has a moving background!
Please tell us in the comments section if you are stuck at any of the steps, we are always just a comment away.
Stay tuned for more amazing tricks, tips, how-tos, and hacks; all on your favorite technical topics.


