If you see your mouse pointer is moving automatically on its own, without you touching the mouse, then it is a huge problem for you, specifically when you are typing. Don’t worry, there are some easy fixes available to solve your problem. But before moving ahead for the fixes, don’t forget to attempt these initial workarounds.
Initial Workarounds-
1. If you are facing this issue for the first time on your computer, Restart your computer. After rebooting check if your mouse is working fine or not.
2. Unplug the mouse from the USB port and plug the mouse again. If that did not work out, try plugging the mouse into other USB ports available on your device.
3. Turn around the mouse and clean sensor sensitive areas and also make sure that the surface is non reflective.
4. Check if your mouse is working by plugging it to another computer. If it do not work on other computer also, then it may be that your mouse is defective.
If your mouse is working fine on another computer then go for these fixes.
Fix-1 Adjust your mouse pointer speed-
You can fix this problem just by adjusting the mouse pointer speed on your device. You can adjust the mouse pointer speed just by following these easy steps-
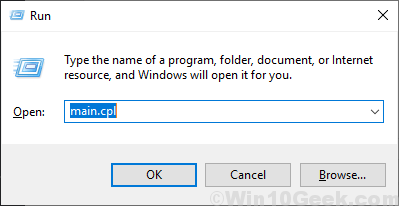
1. Simply by pressing the Windows key and the ‘R‘ key you can open the Run window.
2. Type the below-mentioned command in the Run window.
main.cpl

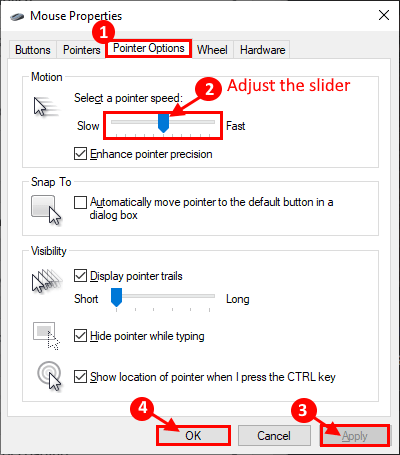
3. Now, in the Mouse Properties window, go to the “Pointer Options” tab.
4. After that, under the “Motion” section, adjust the pointer speed according to your choice (not too fast or not too slow).
5. Click on “Apply” and “OK” to save your changes.

Check if your mouse is working fine again. If your problem is still there go for the next fix.
Fix 2 – Uncheck Hide Pointer option
1. To open the Run window you can press Windows key+R.
2. In the Run window, type “main.cpl” and then hit Enter.

2. Now, go to the “Pointer Options” tab.
3. Then, uncheck the “Hide pointer while typing” option.
4. Finally, click on “Apply” and on “OK“.

Also Read:
- Fix: Mouse lagging and stuttering
- Fix- Mouse is scrolling automatically
- Fix Mouse pointer automatically Moves
Fix-2 Update your mouse driver-
It is possible that the version of your mouse driver is old/compatible. You can update your mouse driver from Device Manager. You can update your mouse driver just by following these steps-
1. To open the Device Manager window, you need to press Windows key+X.
2. Now, on the left corner of your screen, click on the “Device Manager“.

3. Now, click on the “Mice and other pointing devices” to expand it.
4. Then, right-click on the mouse device you are using currently. Now, click on “Update driver“.

5. Now, what you have to do is to select the option “Search automatically for updated driver software“.

Wait till Windows searches for the compatible driver for your mouse, download-install it on your computer.
6. You may notice there is a message that has arrived. In case if you see “The best driver for your device is already installed.“, then click on “Search for updated drivers on Windows Update“.

You will have your driver installed along with Windows Update.
5. Press ‘Alt+F4‘ to close the Device Manager window.
Reboot your computer.
Check if your mouse pointer is working fine or not. Your problem should be solved.
NOTE-
If you are using a laptop, try updating the touchpad driver using the same process of Fix-2.