Some users have reported that the Wi-Fi option or icon is missing on their Windows 11 PC. Missing or corrupt network drivers or a problem with the Windows Operating system or the hardware maybe some of the reasons for this issue to pop up on your Windows 11 PC.
If you are not able to find the WiFi icon in the system tray on your PC, then we have listed some methods that can help you resolve this issue and get back the missing Wi-Fi icon. Go ahead and try the fixes mentioned in this article one after the other in the order mentioned below. Before trying the fixes, check if there is any button/physical switch on your laptop with the WiFi icon. If there is any such switch, press it once to enable the WiFi option.
Fix 1 – Restart Windows Explorer
Step 1. Right-click on the Windows start button to open the context menu.
Step 2. Click on Task Manager in the menu.
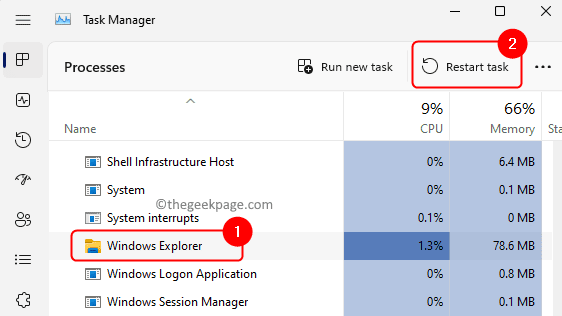
Step 3. In the Processes tab, look for Windows Explorer in the list of processes running on your PC.
Step 4. Select Windows Explorer and click on Restart task at the top-right corner of the Task Manager.
Step 5. After the explorer restarts, check if your Wi-Fi icon missing issue is fixed.
Fix 2 – Enable the Wi-Fi Network Adapter
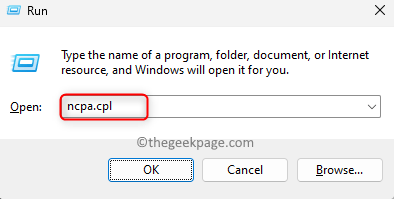
Step 1. Press Windows + R to open the Run dialog.
Step 2. Type ncpa.cpl and hit Enter to open the Network Connections.
Step 3. Check if your WiFi network adapter is disabled.
If so, then right-click on your WiFi network adapter and choose Enable.
Fix 3 – Add the Wi-Fi Icon in System Tray
Step 1. Click anywhere near the speaker icon in the system tray.
Step 2. You will see the notification or action area. Check if the WiFi icon is present in this area or not.
Step 3. If the WiFi icon is not showing here, then click on the Edit quick settings icon at the bottom of this action area.
Step 4. Then, click on Add and select Wi-Fi in the options.
Step 5. You will see that the WiFi icon gets added. The position of this icon can be changed by dragging and dropping the icon to wherever you want it to be placed.
Then, click on Done.
Fix 4 – Check WLAN AutoConfig Service
Step 1. Tap on the Windows key on your keyboard and type services in the search box.
Step 2. Select the Services app in the search result.
Step 3. Look for WLAN AutoConfig in the list of services.
Double-click on it to open the Properties.
Step 4. In the Properties, make sure that the Startup type is set to Automatic.
Step 5. If the service is not running, then click on the Start button to start the service.
Finally, click on Apply and then on OK to save the changes.
Step 6. Back in the Services window, right-click on WLAN AutoConfig and choose Restart.
Step 7. Reboot your computer and check if the issue is resolved.
Fix 5 – Disable and Enable Network Adapter in Device Manager
Step 1. Press Windows + X keys simultaneously to open the Start button context menu.
Step 2. Click on Device Manager here.
Step 3. Expand the Network adapters section by clicking on the small arrow next to it.
Step 4. Right-click on your wireless network adapter from the list and choose Disable device.
Click on Yes in the confirmation prompt to disable the device.
Step 5. After the adapter is disabled, right-click on it again and select Enable device.
Step 6. Now, check if the missing WiFi icon has appeared back in the system tray.
Fix 6 – Update the Network Driver
Step 1. Press Windows + R to open Run.
Step 2. Type devmgmt.msc and hit Enter to open the Device Manager.
Step 3. Double-click on Network adapters to expand it.
Step 4. Right-click on the problematic Wi-Fi device and choose Update driver.
Step 5. In the Update drivers window, click on Browse my computer for drivers.
Step 6. Next, click on Let me pick from a list of available drivers on my computer.
Step 7. Select the proper driver for your WiFi device from the list and click on Next.
Step 8. Reboot your PC after the driver is updated.
Check if you are still facing the problem.
Fix 7 – Reinstall the Network driver
Step 1. Open Device Manager as mentioned in Steps 1 and 2 in Fix 6 above.
Step 2. Click on the arrow next to Network adapters to expand it.
Step 3. Right-click on the WiFi network driver and select Uninstall device.
Step 4. Check the box next to Attempt to remove the driver for this device.
Then, click on Uninstall.
Step 5. After the device is uninstalled, click on the Action menu at the top of the Device Manager.
Select Scan for hardware changes.
Step 6. Windows will now automatically detect any missing drivers and install them.
Reboot your system and check if the issue is fixed.
Fix 8 – Perform Network Reset
Step 1. Hit the Windows key on your keyboard and type network reset in the search box.
Step 2. Click on Network reset in the search results.
Step 3. Then, click on the Reset now button to remove and reinstall all your network adapters.
Step 4. Click on Yes in the confirmation prompt to continue resetting your network settings.
See if the problem with the missing WiFi icon is solved.
Fix 9 – Reset Network Devices via Command Prompt
Step 1. Press Windows + X and choose Terminal (Admin) in the context menu that opens.
Click on Yes when prompted by User Account Control for permissions.
Step 2. Execute the commands given below one after the other in the given order.
netsh int ip reset

netsh advfirewall reset

netsh winsock reset

ipconfig /flushdns

ipconfig /release

ipconfig /renew
Step 3. Reboot your PC. Check if the Wifi option is back after the system starts up.
Additional Fixes
1. Check for Windows Update
Step 1. Press Windows + R to open Run.
Type ms-settings:windowsupdate and hit Enter.
Step 2. Click on Check for updates.
Step 3. Wait for Windows to check for updates. If any updates are found they will be downloaded and installed.
Restart your PC after the update and check if the WiFi icon is restored.
2. Run the Troubleshooter
Step 1. Hit the Windows key and type troubleshoot settings in the search box.
Step 2. Click on Troubleshoot settings.
Step 3. Then, choose Other troubleshooters.
Step 4. Tap on the Run button associated with Internet Connections.
Windows will start checking for any problems and display them to you along with the fixes that can be applied.
Step 5. If the problem persists, then run the troubleshooter for Network Adapter.
That’s it!
The Wi-Fi icon must be back and visible to you in the system tray on your Windows 11 PC. Did you find this article informative enough in resolving the missing WiFi icon issue? Please let us know your thoughts and opinions in the comments below.


