If you are using the latest WiFi 6 on your laptop, there is a chance that you may have stumbled upon this error message “WIFI 6 Mediatek MT7921 “the device could not be started (code10)” in your Device Manager. This problem usually starts with the user being not able to find any network on their device. This seems to be a driver issue, and there are a ton of ways you can fix this.
NOTE – Though this problem is generally witnessed in Asus systems, it can happen on any other machine which is using the Mediatek WiFi 6 network adapter.
Fix 1 – Restart the system and router
If this is just a bug or your system has received some updates, restarting the system should fix the problem. So, before you do anything, restart your system and check.
Additionally, restarting the router or any other networking equipment you are using (like – a range extender) may help.
Fix 2 – Reset network components
Flush the DNS configuration, release the IP and renew it. Check if this works.
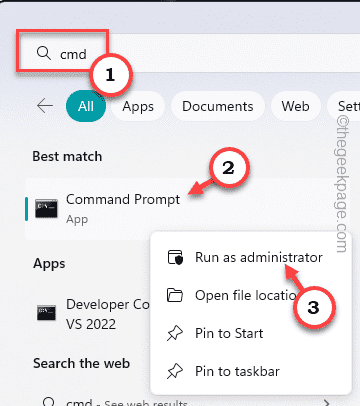
1. Type “cmd” in the search bar.
2. Then, right-tap “Command Prompt” and tap “Run as administrator“.
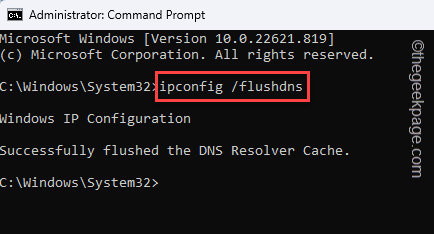
3. This way, you can open the terminal as an administrator. There, paste these codes one by one, and then, hit Enter to flush the DNS configuration and renew the IP.
ipconfig /flushdns
ipconfig /release
ipconfig /renew
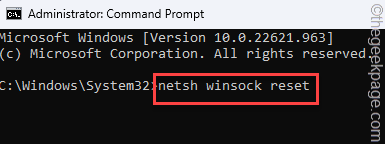
4. Now, execute these two commands in the same way.
netsh winsock reset
netsh int ip reset
After this, close the terminal.
Then, restart your system. When the system boots up, you can connect to the WiFi network.
Fix 3 – Reset the BIOS to default
If your device has received a BIOS update, there is a chance that is causing this problem. So, you should reset the issue following these easy steps.
1. Open Settings. You can do it using the Windows key+I shortcut.
2. Then, click the “System” menu.
3. Next, tap “Recovery” settings to open it.
4. In this Recovery settings page, see whether you can find the Advanced startup option.
5. Then, click “Restart now” and the system will boot into the Advanced Startup mode.
This will boot your system into the Windows Recovery Environment. Wait until your system does so.
6. Just, click “Troubleshoot” on the screen to open that.
7. Next, just tap “Advanced options” to open the next page of settings.
8. This should lead you to the Advanced options page. Next, click “UEFI Firmware Settings“.
9. Now, click “Restart” to restart the system and open the BIOS page.
When you have appeared on the BIOS page, follow these steps –
1. On the BIOS page, look for a key that upon pressing will reset everything to normal. It will read something like this – Restore default settings or Reset BIOS settings with the number of the key along with it.
Generally, this particular key is a function key (mainly it is the F9), but be very careful and notice it accurately.
2. If you see a warning message has appeared, select “Yes” and hit Enter to restore the default BIOS settings on your computer.
Now, this should automatically restart your system back to the normal Windows environment. Log in and check whether you can view the available network connections.
Fix 4 – Uninstall the driver
Uninstall the network driver from your computer and use the latest driver.
Step 1 – Uninstall the driver
The first thing you should do is uninstall the WiFi 6 network card from your computer.
1. You have to open the Device Manager. You can open it by right-tap the Win icon and click “Device Manager“.
2. Now, expand the “Network adapters” section to view the actual WiFi 6 adapter.
3. Then, right-tap that and click “Uninstall device” to uninstall it.
4. A warning message will appear. Tap “Uninstall” to uninstall the driver.
Don’t forget to restart your system. Restarting the system will uninstall the driver completely.
Step 2 – Install the new driver
As you have uninstalled the driver from your computer, you won’t be able to connect to any network for now. You have to download & install the new driver.
You can download the drivers on another computer and then transfer the driver files via a USB drive. that process will work also.
Steps for Asus device users –
If you are on an Asus system, you can just download an app and use it to install the driver.
1. Open the Store or you can go to the MyASUS app directly in Store (or from their official website).
2. Tap “Get” and “Install” to download the MyASUS app on your system.
3. Open the app. Allow it to scan your device for the identification of model, and Windows type. Then, go to the Customer Service section.
4. Now, there, head on to the “LAN” tab. Here, you will see the latest driver.
5. Download it on your computer. Usually, these driver files come in a zip format.
6. Unzip the downloaded file and run the setup file to start the installation.
Complete the installation and restart your computer (only if the installer asks to do so).
Now, open the WiFi pane and check whether the network is appearing there or not. Connect to it.
Steps for general users –
If you are not using an Asus device or can’t use the internet on the affected system, you can directly download the WiFi driver from the manufacturer’s website and install it.
We have enlisted some OEM sources for you to download the driver for your device –
Just do these steps to install the driver on your system.
1. Unzip the contents of the driver file.
2. Then, you can run the setup file inside there.
3. Follow the on-screen steps to complete the installation.
Once the driver is updated, go forward and try to connect to the WiFi network. Check if this solves the problem.
Fix 4 – Troubleshoot the network adapter
Windows has a dedicated network adapter troubleshooter. Use it to troubleshoot the problem.
1. Open Settings.
2. Then, tap “System” to open it.
3. After that, click “Troubleshoot” on the opposite pane.
4. Next, click “Other troubleshooters” to open it.
5. Here, in the list of troubleshooters, look for the Network adapter.
6. Then, tap “Run” to run the network adapter troubleshooter.
Test if this works on your system.
Fix 5 – Disable and re-enable the driver
Disable and re-enable the WiFi driver.
1. At first, open the power menu using the Win key+X.
2. Then, tap “Device Manager” to open it.
3. On the Device Manager page, find out the Mediatek driver.
4. Then, right-tap it and tap “Disable device“.
5. When you are asked, tap “Yes” to disable it.
6. An arrow mark will appear on the disabled device.
7. Then, right-tap it and tap “Enable device” to re-enable it.
After this, try to reconnect the network again and test.
Fix 6 – Automate & start the WLAN service
Automate the WLAN Auto Configuration service on your computer.
1. Just write “services” in the search bar.
2. Then, click “Services to open that.
3. When the Services panel opens up, look for the “WLAN AutoConfig” service.
4. Just right-tap that and tap “Properties“.
5. Then, just switch the ‘Startup type:’ to “Automatic“.
6. Don’t forget to tap “Start” to start the service.
7. After that, tap “Apply” and “OK” to save these changes.
Close Services.
Now, you won’t face any issues regarding your WiFi.


