Teams have a very useful add-in in Outlook that installs automatically when you install the former app while using Outlook 2013 or later edition of apps. After installing both the applications, just open Outlook and you can find the add-in preinstalled. But, some users have reported an abnormality where they can’t find the Team add-in inside Outlook.
Fix 1 – Re-register the DLL file
Sometimes the particular Teams add-in dll file needs to get re-registered.
Step 1 – Find the Microsoft.Teams.AddinLoader.dll file
1. At first, you have to ensure the location of the “Microsoft.Teams.AddinLoader.dll” file in your account folder.
2. Open the File Explorer by pressing the Win key+E keys together.
3. Then, proceed this way-
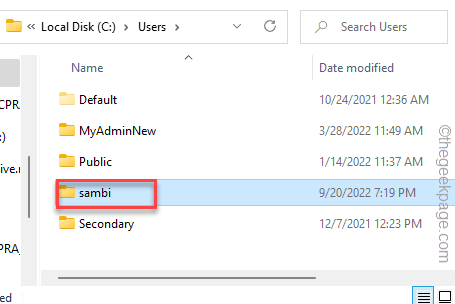
C:\Users\your username
[Select the account you are using currently.
4. Once you have opened the username folder, try to view the “Appdata” folder.
5. If you can’t see it, Make sure your files are not hidden. Read: How to unhide files on Windows PC
7. Once you are inside the Appdata folder, proceed this way –
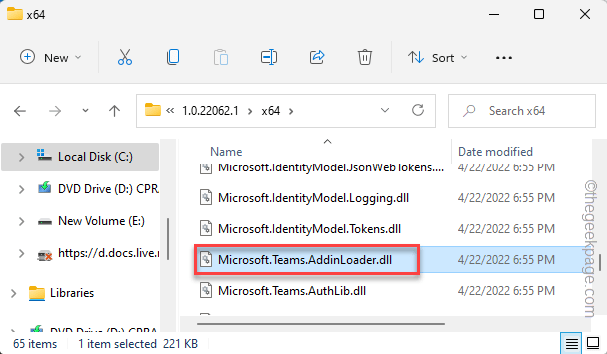
Appdata\Local\Microsoft\TeamsMeetingAddin.0.22062.1\x64\
8. Once you are here, look for the “Microsoft.Teams.AddinLoader.dll” file.
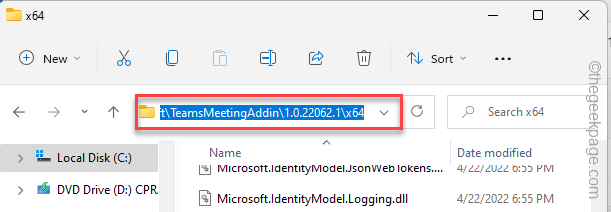
9. Once you have found the DLL file, click on the address bar to select the address at once.
10. Then, press the Ctrl+C keys together to copy it.
In our case, the copied address is –
C:\Users\%username%\AppData\Local\Microsoft\TeamsMeetingAddin.0.22062.1\x64
Minimize the File Explorer page.
Step 2 – Re-register the DLL file
Now, you can easily re-register the Microsoft.Teams.AddinLoader.dll file using the Command Prompt terminal.
1. Hit the Win key once and type “cmd” in the elevated search bar.
2. Now, right-tap the “Command Prompt” and tap “Run as administrator“.
3. Once you have opened the CMD terminal, write this code and paste the address, and finally hit Enter to change the directory.
cd paste_the_copied_address
Replace the copied address with the “pastetheaddress” with the path that you have copied before.
Example – In our case, the command is like this –
cd C:\Users\%username%\AppData\Local\Microsoft\TeamsMeetingAddin.0.22062.1\x64
4. Finally, copy-paste this command and hit Enter to re-register the dll file.
regsvr32 Microsoft.Teams.AddinLoader.dll
This way, you have successfully re-registered the Teams dll file on your computer.
5. You will see the “DllRegisterServer in Microsoft.Teams.AddinLoader.dll succeeded.” message has appeared. Click “OK“.
After this, restart your computer to successfully complete the dll registration process.
Once the device restarts, open Outlook and check whether you can find the Teams add-in.
Fix 2 – Edit the registry
There is a registry hack that you may perform to solve the problem.
1. Just press the Windows key+R keys at once to invoke the Run box.
2. Then, type “regedit” and click the “OK” to open the Registry Editor.
NOTE –
Changing a particular value in the Registry Editor may create some problems sometimes. So, if you don’t have a backup of the registry keys, you can create one following these easy steps –
a. After opening the Registry Editor, tap on “File” in the menu bar and then, click on “Export…“.
b. Name and store this backup in a location of your choice.

3. After you have exported the registry backup, reach this place –
Computer\HKEY_CURRENT_USER\Software\Microsoft\Office\Outlook\Addins\TeamsAddin.FastConnect
4. On the right-hand side, look for the “LoadBehavior” value.
5. Once you have found that value, double-tap that to edit it.
6. Now, set the value to “3” in the ‘Value Data:’ box.
7. After that, click “OK” to save the changes.
Next, close the Registry Editor window. Then, restart your computer.
Fix 3 – Make sure Add-in is enabled
You can enable or disable various Add-ins in Outlook.
1. Open Outlook on your computer.
2. Once it opens up properly, click on “File” on the menu bar, and on the left-hand pane, click on “Options“.
3. This opens up the Outlook Options panel. On the left-hand side, click on “Add-ins“.
4. On the right-hand pane, you can see an extensive list of add-ins.
5. Look for the “Microsoft Teams Meeting Add-in for Microsoft Office” add-in. ]
If it isn’t there, it is disabled and you have to manually enable it.
6. Then, set the ‘Manage:’ to “COM Add-ins” and then, click “Go…” to proceed.
7. On the COM Add-ins page, check the “Microsoft Teams Meeting Add-in for Microsoft Office” add-in.
8. Finally, click on “OK“.
Now, you have enabled the Microsoft Teams Meeting Add-in in Outlook.
This change only takes place when you restart Outlook. Once you have restarted it, you can see the Teams add-in again.
Fix 4 – Check the Office 365 policies
If your system administrator has placed a meeting policy to block any Outlook add-ins, you may not see the Teams add-in Outlook.
NOTE – In this process, you will need the Teams administrator account credentials. You may need to contact designated authorities before you do this.
1. Open the Microsoft Teams Admin Center.
2. It will open up in your browser page. Choose or input the email address and hit “Next“.
3. Going forward, input your account password and hit Enter to get access to the Teams Admin Center.
4. Once you are there, expand the “Meeting” section.
5. Now, in the expanded menu list, choose the “Meeting policies” on the left-hand pane.
6. Coming to the right-hand side, search for the “Allow the Outlook add-in” policy in the General section. Make sure to turn it “On“.
After this, close the browser. Close and relaunch the Outlook client. Now, test whether the Teams add-in is present there or not.
Fix 5 – Register Teams as the default Office chat app
You should register the Teams app as the default Office chat app.
1. Launch Teams.
2. When it loads up, click on the three horizontal dots button on the menu bar and click “Settings” to open the Teams settings.
3. Coming to the Teams settings page, on the “General” tab on the left-hand pane.
4. Then, check the “Register Teams as the chat app for Office (requires restarting Office applications)” option on the opposite side.
You can close Teams for now. If Outlook or Office 365 is opened, close it and wait for a minute.
Then, launch Outlook. This time you’ll have the Teams extension again on your computer.
Fix 6 – Empty Teams cache
Try clearing the Teams cache and test.
STEP 1
1. Exit from the Teams app. Teams do continue to run in the background.
2. Now, tap the arrow icon (˄) on your taskbar.
3. Just, right-click on the “Microsoft Teams” app and further click “Quit” to close Teams.
Additionally, you can also make sure any Teams process is not running in the background.
4. So, press the Win key+X keys together. Then, tap the “Task Manager” to open the utility.

5. You may see that the “Microsoft Teams” process is still there.
6. Just right-tap that Teams process and tap “End task” to kill that.
You can close the Task Manager.
STEP 2
Now, you can clear out the corrupted Teams cache.
1. Like all other apps, Teams keep the cache hidden in the AppData folder.
2. So, press the Windows key along with the R key, and paste this line into the box.
C:\Users\%username%\AppData\Roaming\Microsoft\Teams
3. Once you are in there, double-click to open the “Cache” folder.
4. Inside this Teams folder, it stores all the temporary files.
5. You can select all the contents at once and tap the bin icon to remove the cache files.
Once you have emptied the Cache folder, launch Teams, and Outlook on your system.
This should resolve the absence of the Teams add-in issue in Outlook.
Fix 7 – Uninstall and Teams
Uninstall Teams and reinstall the latest version on the device to resolve the issue. A new installation of Teams is automatically put in the Outlook add-in.
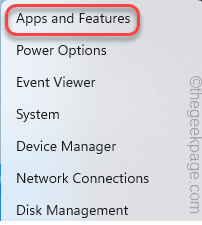
1. If you right-tap the Windows icon, you can see a context menu.
2. In that context menu, tap on the first option “Apps and Features“.
3. On the right-hand side, you can find all your installed apps. Look for the “Teams” app.
4. Then, click on the three-dot sign and click “Uninstall“.
Next, just make sure that you proceed and completely uninstall Teams from your system.
5. Next, download teams from here.
6. Next, click on “Download Teams” to download the latest edition of the Teams app.
7. Come back to the download location.
8. Then, double-tap the setup file to start the installation process.
The best way to fix this issue is to just uninstall Teams and reinstall it.
Once you have reinstalled Teams, you can find the add-in inside Outlook.
Your problem is solved.


