Are you seeing the ‘Acquiring License’ error message in the ‘Updates & Downloads’ page of the Windows Store? Usually, Microsoft Store starts to download and update the existing apps as soon as opens the Microsoft Store on your computer. But in some rare cases, the process got stuck and shows up ‘Acquiring License error 0xC0020036’ on the Store page.
Fix 1 – Reset the Windows Store
You have to reset the Windows Store configurations.
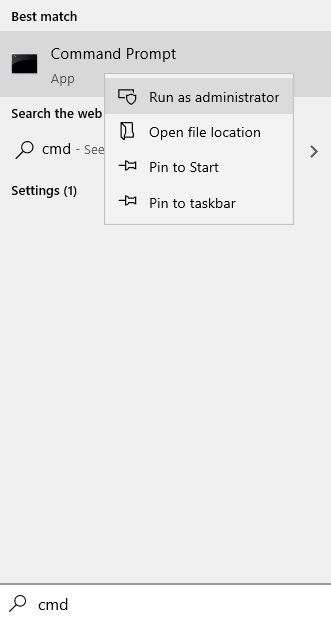
1 – Search cmd in Windows search box. Right click and choose run as administrator

2 – Type wsreset in command prompt window and hit Enter key

You will see that a terminal has opened. You won’t have to do anything.
Fix 2 – Merge the registry script
You have to merge the registry script with the existing registry on your computer.
[
Warning –
You are going to run a registry script on your computer that alters certain keys and values on the system. If this goes wrong, it can cause fatal errors in your system files. So, we suggest you create a backup of the registry keys if you haven’t created one yet.
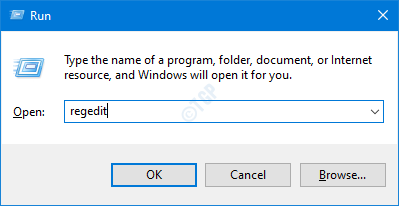
1. At first, tap the Windows key and the R key at the same time.
2. Once the Run terminal appears, type “regedit” and hit Enter.

3. Once you have opened the Registry Editor, you will need to click on the “File” and then click on “Export“.
4. Save the backup in a secure place.

After taking the backup, close the Registry Editor window.
]
1. Download the Starting Clipsvc Service script on your computer.
2. Then, unzip the “Starting Clipsvc Service.zip” in a location of your choice.

3. Go to the location where you have saved the registry script.
4. Here, right-click on the “Starting Clipsvc Service” file.
5. Then, click on “Merge” to run the script file and merge the values with your existing registry keys.

6. You will see a prompt has appeared on your computer asking for confirmation.
7. Just, click on “Yes” to confirm the merger.

8. Now, type “cmd” in the search box.
9. Then, right-click on the “Command Prompt“. Further, click on “Run as administrator” to open up the terminal as an administrator.

10. Once the terminal appears, copy-paste this command and hit Enter to run the command.
net start clipsvc

This will start the clipSVC service if it isn’t started yet.
Close the Command Prompt terminal.
Try to access any Store app on your computer. Check further it is opening or not.
Fix 3 – Re-register the Store
Re-registering the application packages should solve this issue.
1. Press the Windows key+X keys together.
2. Just click on “Windows PowerShell (Admin)‘ to open the Windows PowerShell.

3. Once the Windows PowerShell in administrative opens up, copy-paste these two codes in the terminal and hit Enter to run both these commands one after another.
Get-AppXPackage *WindowsStore* -AllUsers | Foreach {Add-AppxPackage -DisableDevelopmentMode -Register "$($_.InstallLocation)\AppXManifest.xml"}
Get-AppXPackage -AllUsers -Name Microsoft.WindowsStore | Foreach {Add-AppxPackage -DisableDevelopmentMode -Register "$($_.InstallLocation)\AppXManifest.xml" -Verbose}

After running these commands, close the PowerShell window.
Fix 4 – Reset MS Store
If nothing is working, try resetting the Store app on your computer.
1. Open the Settings window.
2. Then, click on the “Apps” settings.

3. Now, in the Apps settings, on the left-hand side, tap on the “Apps & Features“.
4. Then, search for the “Store“.
Microsoft Store will appear in the search result.

5. Then, click on “Microsoft Store” from the search result.
6. After that, click on “Advanced options“.

7. Now, just scroll down and click on “Reset“.
8. You will see a confirmation tab. Further, click on “Reset” to reset the Store on your computer.

After resetting the Store, close the Settings window.
Fix 5 – Make sure these services are running
There are some certain services are required so the Microsoft Store can function properly.
1. At first, press the Windows key+R keys together.
2. Once the Run window appears on your screen, type this code, and click on “OK“.
services.msc

3. Once the Services window opens up, look for the “Application Identity” in the list.
4. Now, double-click on the service to access it.

5. Now, check the ‘Service Status:’. If the service is running, click on “Start” to start up the service.
6. After that, set the ‘Startup type:’ to “Automatic“.

8. To save the changes, just click on “Apply” and “OK“.

9. Following the same steps, start and automate all these services in the Services screen –
Update orchestrator service
Windows Update
Background Intelligence transfer service
Cryptographic service
Once you have done all these, just close the Services window.
Fix 6 – Run a batch file
Create a new batch file and run it on your computer.
1. At first, you need to search for “Notepad“.
2. Then, click on “Notepad” in the elevated search result.

3. Once the Notepad has opened, just copy these commands and paste them on the Notepad page.
regsvr32.exe /s atl.dll
regsvr32.exe /s urlmon.dll
regsvr32.exe /s mshtml.dll
regsvr32.exe /s shdocvw.dll
regsvr32.exe /s browseui.dll
regsvr32.exe /s jscript.dll
regsvr32.exe /s vbscript.dll
regsvr32.exe /s scrrun.dll
regsvr32.exe /s msxml.dll
regsvr32.exe /s msxml3.dll
regsvr32.exe /s msxml6.dll
regsvr32.exe /s actxprxy.dll
regsvr32.exe /s softpub.dll
regsvr32.exe /s wintrust.dll
regsvr32.exe /s dssenh.dll
regsvr32.exe /s rsaenh.dll
regsvr32.exe /s gpkcsp.dll
regsvr32.exe /s sccbase.dll
regsvr32.exe /s slbcsp.dll
regsvr32.exe /s cryptdlg.dll
regsvr32.exe /s oleaut32.dll
regsvr32.exe /s ole32.dll
regsvr32.exe /s shell32.dll
regsvr32.exe /s initpki.dll
regsvr32.exe /s wuapi.dll
regsvr32.exe /s wuaueng.dll
regsvr32.exe /s wuaueng1.dll
regsvr32.exe /s wucltui.dll
regsvr32.exe /s wups.dll
regsvr32.exe /s wups2.dll
regsvr32.exe /s wuweb.dll
regsvr32.exe /s qmgr.dll
regsvr32.exe /s qmgrprxy.dll
regsvr32.exe /s wucltux.dll
regsvr32.exe /s muweb.dll
regsvr32.exe /s wuwebv.dll
netsh winsock reset
netsh winsock reset proxy
net start bits
net start wuauserv
net start appidsvc
net start cryptsvc
3. Click on “File” and then, click on “Save as“.

4. Now, set the File name: as “fix_update.bat” and click on ‘Save as type:‘ and set it as “All files“.
5. Finally, click on “Save” to save the batch file.

Once you have saved the file, close the Notepad window.
7. Go to the location where you just saved the batch file.
8. Now, right-click on “fix_update.bat“, and then, click on “Run as administrator“.

This will run the batch file on your computer.
After this, restart your computer.
Fix 7 – Update the computer using the MCT
Now, you can install the update again on your computer.
1. First of all, go to the Microsoft Software Download page.
2. Then, click on the “Download tool now“.

3. Next, click on “Save” to save the package.

Once the downloading process completes, close the browser.
4. Next, go to the file location.
5. Then, double click on “MediaCreationTool2004“.

6. Just, click on “Accept” to accept the terms and conditions.
7. After that, click on the radio button beside, “Upgrade this PC now“.
8. Then, to start the up-gradation process, click on “Next“.

This will download the latest version of Windows for your computer. After downloading the update, it will automatically install it.
This process will take a while to complete. If you see the message – “This PC can’t be upgraded.”, follow these steps –
a. Right-click on the Windows key and the “R” keys together.
b. Then, type or paste this command and hit Enter.
C:$WINDOWS.~BT\Sources\Panther

c. Then, right-click not the “compatscancache.dat” file and click on “Delete” to remove the file.

Once you have deleted the file from your computer, restart the system.
Then try to update the computer with the MCT again following the steps mentioned before.
Fix – 8 Check date and time-
Wrong date and time settings
1. To open the Settings window, press Windows Key+I keys.
2. Next, click on “Time & Language“.

3. Just click on the “Date & time” settings.
4. Then, switch the “Set time automatically” setting to “Off“.
5. In the same way, toggle the “Set time zone automatically” settings to “Off“.

6. You need to click on “Change“.

7. To change the date according to your location click on “Date“.
8. Change the “Time” in a similar fashion.
9. After setting the date and time manually, click on “Change“.

10. Coming back to the Settings window, scroll down and find ‘Time Zone‘.
11. Just click on the Time zone section and select the right time zone from the list of the available zones.

Close Settings window.
Now, reboot your computer.
Fix 9 – Troubleshoot the Windows Store Apps
Troubleshoot the Store using the built-in Windows Store Apps troubleshooter.
1. Press the Windows key+ I keys together.
2. Once the Settings window is open, tap on the “Update & Security” settings.

3. After that, click on the “Troubleshoot“.
4. Next, tap on the “Additional Troubleshooters“.

5. Next to that, click on “Windows Store Apps“.
6. To run the troubleshooter, click on “Run the Troubleshooter“.

Allow the Windows Store Apps troubleshooter to detect if there is any problem with the MS Store.

Once Troubleshooter fixes the issue on your computer, reboot your computer to apply the fix.
After restarting, your problem should be solved.