Is your Microsoft Outlook not sending or receiving any email until the system restarts? If you found yourself in this peculiar situation, you will need this guide to fix the problem. This problem can be related directly to the Offline Mode in MS Outlook program, that doesn’t allow connection to the mail exchange servers. Apart from these, there are several other reasons that can create this anomaly in your Outlook client.
Fix 1 – Turn off the COM Add-ins
The COM Add-ins can be in your way many ways. So, you should disable all the COM Add-ins on your device.
Step 1 – After you have launched the Microsoft Word, go to the “File” menu.
Step 2 – Open the “Options“.
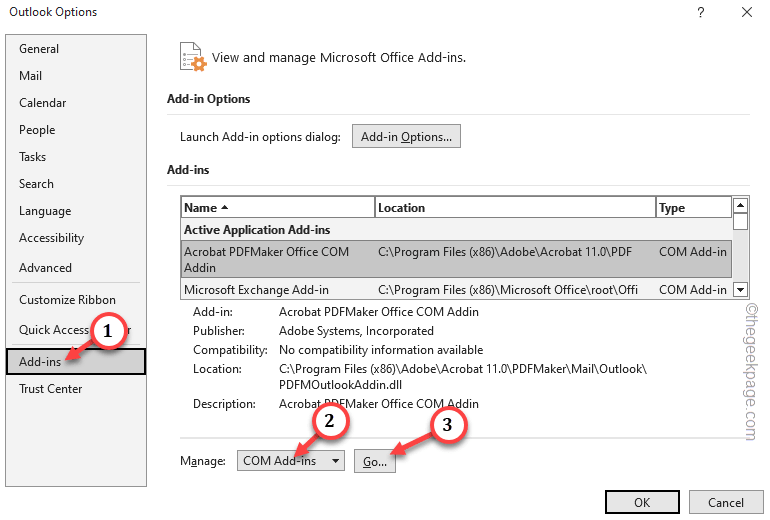
Step 3 – When the Outlook opens up, head down to the “Add-ins” tab.
Step 4 – On the main right hand side, fix the “Manage:” to “COM Add-ins” from the drop-down. Tap “Go” to get the full list of Add-ins.
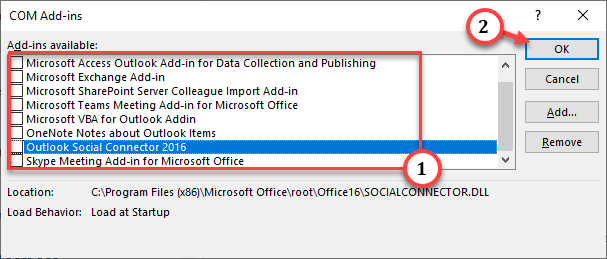
Step 5 – After you have opened up the list of COM Add-ins. Make sure all the Add-ins are unchecked in that list.
Step 6 – Tap “OK“.
After disabling the COM Add-ins, try to send a test email from/to your account and test.
Fix 2 – Switch offline mode off
There is a chance that you are working in Offline Mode in MS Outlook. In that case, switch that feature off and test.
Step 1 – Go to the Microsoft Outlook.
Step 2 – In there, go to the “Send/Receive” tab.
Step 3 – When you are in there, take a look at the “Work Offline” option. If it is shaded, that means you are currently in offline mode.
Step 4 – If that is turned on, tap it once to switch the offline mode off.
Now, check whether you are receiving any mails in the inbox. Hit the sync button in the mailbox to sync the inbox.
Fix 3 – Test the account settings
Test the account from Control Panel page.
Step 1 – Just write “control” after pressing the Windows key once and opening up the search box.
Step 2 – Next, open up the “Control Panel” to access that.
Step 3 – After opening the Control Panel, toggle the “View by:” option to “Small icons“.
Step 4 – Go ahead and open up the “Mail (Outlook)(32-bit)” option.
Step 5 – When this opens up the Mail Setup, tap the “Email accounts” option to access that.
Step 6 – In there, hit the “Test Account Settings…” option to start testing the account.
Outlook will send a test mail to the exchange server and check the connection between your device and the server.
Step 7 – If it can’t establish a connection, tap “More Settings” on the same page.
Step 8 – Go to the “Advanced” settings.
Step 9 – Toggle the email settings (like incoming and outgoing ports) and click “OK” to save the changes.
Coming back to the main Outlook window, try sending a sample email. Check if this helps.
Fix 4 – Create a new Outlook Proflie
Instead of using the older Outlook profile, create and use a new one.
Step 1 – In the Outlook window, go to the “File” menu.
Step 2 – Now, on the “Info” tab, make sure you are using the correct email account.
Step 3 – Next, tap the “Account Settings” and choose “Manage Profiles” to manage the profiles.
Step 4 – Next, in the Profiles section, hit the “Show Profiles…” option to access that.
Step 5 – Next, tap “Add” to start the profile creation process.
Step 6 – After this, type a new name of the profile.
Step 7 – Then, click “OK” to create the profile.
Step 8 – Now, simply input the email address, password in correct boxes.
Step 9 – Then, tap “Next” to start the account creation process.
Go ahead and finish the setup process.
Step 10 – Returning to the Profile page, make sure to choose the “Always use this profile” and choose the new Outlook profile from the drop-down.
Step 11 – Don’t forget to tap “Apply” and “OK” buttons consecutively
After this, Outlook will automatically launch with the new Outlook profile. This time, send a demo mail from your account and check the status from other devices.
You won’t have any further issues.


