Is your Inbox full and are you finding it challenging to identify the important emails? Then Creating a Rule in Outlook is of great help. You can set a few conditions like moving the specified email to a folder in such a way that the next time when you get the email and if it meets the conditions which you have set, it will automatically move to a specified folder. By doing so it will be very helpful for you to select and read the important emails. You can create a rule by applying certain conditions, actions, and exceptions. In this article, let us learn how to create rules, create a new folder, and move the emails to the folder.
Create Rules And Move Emails To A Folder In Outlook
Step 1: Open the Microsoft Outlook.
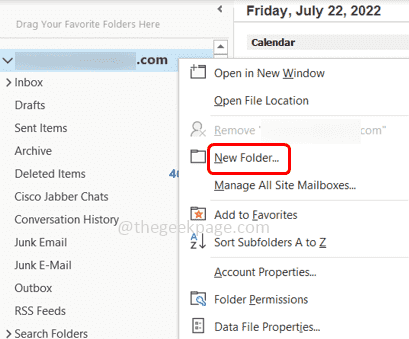
Step 2: Firstly create a new folder, by right-clicking on your email id at the left.
Step 3: Select New Folder from the list.
Step 4: Give the folder a name and you can see the newly created folder on the left.
Step 5: Right-click on the email message you want to move and select Rules from the list.
Step 6: Select Create Rule from the fly list option.
Step 7: In the create rule window, select the conditions so that emails that match the given conditions will only be moved to the new folder. This can be done by clicking on the checkboxes under ‘When I get email with all of the selected conditions‘.
Here I have selected From condition which says to apply this rule only to emails coming from the specified Id.
Step 8: Under ‘Do the following’ section, select the checkbox beside ‘Move the item to folder‘ and click on the select folder button.
Step 9: In the opened window browse and select the newly created folder by clicking on it. Click on OK. This will move your messages to the new folder if the specified conditions are met.
Step 10: If you want to add more conditions, click on the Advanced options button.
Step 11: In the appeared window choose the conditions which you want to apply by clicking on the checkboxes under the Select conditions(s) section. Then click on Next.
Step 12: Since you have selected the conditions from which email, now you can choose what action to be performed on the email by clicking on the checkboxes under the select action(s) section. Then click on Next.
Step 13: Here comes the exception section, where you can choose if any exception conditions should be applied to your rule. Ex: If you don’t want the email to be moved if you are listed in the Cc field. Click on Next
Step 14: Give a name to the rule in the name field. Then click on Finish.
Done! your rule is set. Going forward the emails will be moved automatically to the created folder if the conditions that you specified are met.
That’s it! I hope this article is helpful. Thank you!!


