Did you encounter an Error Code 30038-28 while trying to install or update your Microsoft Office suite? Some users on Windows 10 computers have reported that they encounter this error when they try to perform an update for Microsoft Office. The error message reads as below:
“Something went wrong
We’re sorry, we ran into a problem while downloading updates for Office. Please check your network connection and try again later.”
Error Code: 30038-28
Usually, this error can occur due to your network connection, or interruption from firewall and antivirus software. Also, there may be corrupted system files, or pre-existing Office installations not being removed properly that may conflict with the update.
Quick Fix
1. Most users have reported that after a restart of the system the error stopped appearing.
2. Check your internet connection: This error occurs due to poor internet connectivity. Also, check whether you are connected to any VPN.
3. Try disabling the antivirus and firewall on the system and check whether it fixes the issue.
If the quick fix did not work check out the methods listed below and follow them one at a time. Also, try to update your Office Suite again and see if it works.
Method 1 – Perform SFC scan
SFC can help fix altered and damaged files of the Windows OS. It can also fix several updates failures, other violations done by several mismatched files.
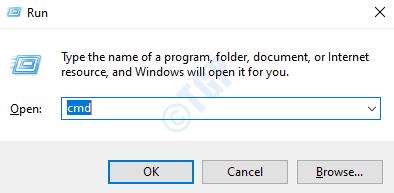
1. Open Command Prompt as Administrator by typing cmd in the Run Dialog (Windows key + R) and press Ctrl + Shift + Enter keys together.

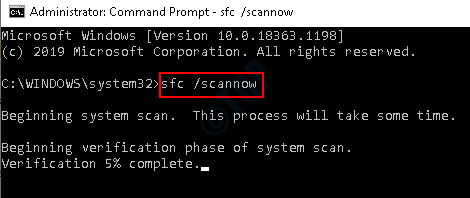
2. In the prompt type the following command
sfc /scannow
3. It will take some time to complete the scan and show the results.

Method 2 – Clear temporary files
Every time you download and install any product/Office on Windows, many temporary files are created. Normally these files are closed and deleted when a windows session is quit. However, if you quit Windows by restarting or turning off the system during an active session the files are not closed or deleted. These files may interrupt while updating the product next time.
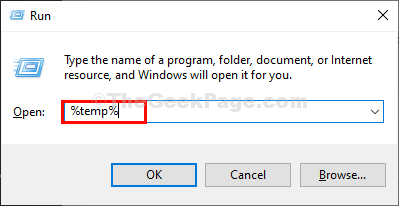
1. Press Windows Key + R together to open the Run window. Type %temp% and press Enter.

2. It opens the Temp files and folders window in the local system.

3. Select All (Ctrl + A) and then press Shift + Delete to remove these temporary files permanently. Some files may require permission before deleting, click on OK.

Once all the temporary files are cleared try to update Office again and check. You can also use Disk Cleanup to delete temporary files.
Method 3 – Repair/Reset MS Office Application
1. Open Run using Windows key +R . Type appwiz.cpl and press Enter to open Programs & Features.

2. Search for Microsoft Office or Microsoft 365 installation in the Programs & Features window. Select it and click on the Change button which opens the Microsoft Office Repair Utility.

3. If UAC prompts then click on Yes to continue.
4. Now there are two options, Quick Repair, and Online Repair to fix the office suite. First, choose Quick Repair and then click on Repair.

5. Select Repair in the Ready to start a Quick Repair.

6. Restart your computer once the repair completes and check whether the error is resolved.
In case Quick Repair doesn’t resolve the issue, try with the Online Repair option and check again after restart.
Method 4 – Reinstall Microsoft Office
If the error persists even after repairing MS Office, try removing the Office suite from your PC and try reinstalling again.
1. Using the combination of Windows Key + I open the Settings app. Select Apps in the list of options.

2. In the Apps & Features tab, locate Microsoft Office in the list of apps on the right side. Select it and click on the Uninstall button.

3. Confirm the uninstall by clicking on the Uninstall button in the confirmation prompt.

4. Using the Web Browser, log in to your Microsoft account. Click on Install Office located at the top right to down the Office installer.

5. To complete the installation double click on the downloaded file. Once installation completes, check whether the error is resolved.
Method 5 – Remove Office manually
If the error persists even after reinstalling Office as in Method 4, a manual uninstallation is required to remove the Office suite completely from your system. We have listed the steps below which have to be performed in the same order.
Step 1 – Remove Windows Installer Packages
1. Locate the Office installation folder in your PC, usually located at C:\Program Files (x86)\Microsoft Office.
2. Right-click on the Office 16 folder and select Delete.

Step 2 – Remove Office Scheduled Tasks
1. Press Windows key + R to open Run dialog. Type cmd and press Ctrl + Shift + Enter to open command prompt as an administrator.

2. Type the following command and press Enter after each one.
schtasks.exe /delete /tn “\Microsoft\Office\Office Automatic Updates”
schtasks.exe /delete /tn “\Microsoft\Office\Office Subscription Maintenance”
schtasks.exe /delete /tn “\Microsoft\Office\Office ClickToRun Service Monitor”
After executing the commands all the office scheduled tasks like automatic updates, office subscription maintenance, click to run service monitor etc are deleted.
Step 3 – End the Click-To-Run Tasks using Task Manager
1. Open Task Manager by pressing the Ctrl + Shift + Esc keys together.
2. Click on the Processes tab.
3. Check if the following processes are running :
OfficeClickToRun.exe
OfficeC2RClient.exe
AppVShNotify.exe
setup*.exe
4. If you find any such process running, select each one and click on End task.

Step 4 – Delete the Office Files
1. Open Run using Windows key + R.
2. Type %ProgramFiles% and then click on OK.

3. Delete the Microsoft Office 16 and Microsoft Office folder present in this location.
4. Open Run again and type %ProgramFiles(x86)% and then click on OK.

5. Delete the Microsoft Office folder.

6. Again open Run, type %CommonProgramFiles%\Microsoft Shared and click on OK.

7. Delete the ClickToRun folder.

8. Open Run and type %ProgramData%\Microsoft and click on OK.

9. Delete the ClickToRun folder. If the folder does not exist, go to next step.

10. Open Run and type %ProgramData%\Microsoft\Office and click on OK.

11. Delete the ClickToRunPackageLocker file.

If any folder is not found in the above steps then move to the next option.
Step 5 – Delete Office Registry subkeys
Before you start working with the registry, backup the registry for restoration in case problems occur.
1. Open Run dialog (Windows keys + R). Type regedit to open Registry Editor.

2. Locate the following Registry subkeys and delete them.
HKEY_LOCAL_MACHINE\SOFTWARE\Microsoft\Office\ClickToRun

HKEY_LOCAL_MACHINE\SOFTWARE\Microsoft\AppVISV
HKEY_CURRENT_USER\Software\Microsoft\Office
3. Then delete the Office key .
Step 6 – Delete the Start Menu Shortcuts
1. Just press Windows + R to open Run dialog.
2. Type %ALLUSERSPROFILE%\Microsoft\Windows\Start Menu\Programs and press Enter.

3. Delete the Microsoft Office 2016 Tools folder.

Once you have followed the steps to uninstall Office manually, install Office again after logging into your Microsoft account. After installation, open Office app and check whether it resolves the error.
Method 6 – Use the Windows Event Viewer
Event Viewer is a built-in Microsoft utility that helps to keep track of any keys that may be causing a problem to your system.
1. Press Windows + R keys together to open the Run command prompt, and type eventvwr before pressing Enter.

2. Double click on Windows Logs on the left side pane of the Event viewer window and select Application below it.

3. This will show you several logs on the center panel of the Event Viewer window. Select Filter current log option from the right side.

4. Filter Current Log allows you to filter out the logs and center your attention around the ones that concern Microsoft Office-related issues and warnings.

5. Look through the logs to see if there’s anything you suspect to have caused this issue.
Thanks for reading this article.
Hope it has helped you solved the problem. Comment and let us know which fix worked for you.