Creating Envelopes for one or two entries can be quite fun. But, as soon as the task overhead increases, the process becomes montonous and tedious. There is a way you can create mail merge envelopes in Word without much effort or hassle. You just need to have the list of recipients ready at your hands and you should be good to go.
How to Mail Merge Envelopes in Microsoft Office 365 (using Word and Excel)
You can create the Mail Merge Envelopes from the Microsoft Word. But, keep the email recipient’s list handy as it will be needed sooner.
Step 1 – Start by loading a fresh new blank Document in Word.
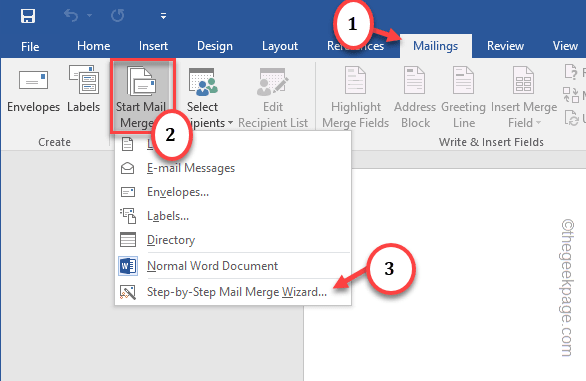
Step 2 – Then, go to the “Mailings” tab.
Step 3 – There, you have to click the “Start Mail Merge” option.
Step 4 – From that same drop-down, tap “Step-by-Step Mail Merge Wizard…” to run the wizard.
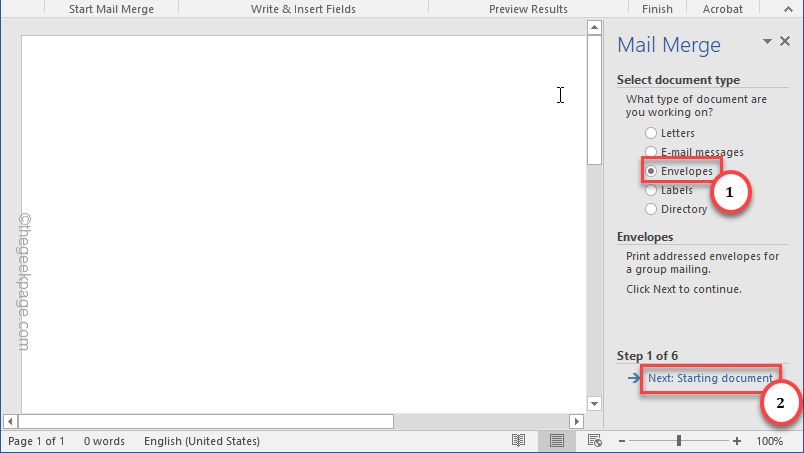
Step 5 – Now, as the wizard shows up in the side bar, in the ‘Select document type’, choose “Envelopes“.
Step 6 – Tap “Next: Starting document” to proceed.
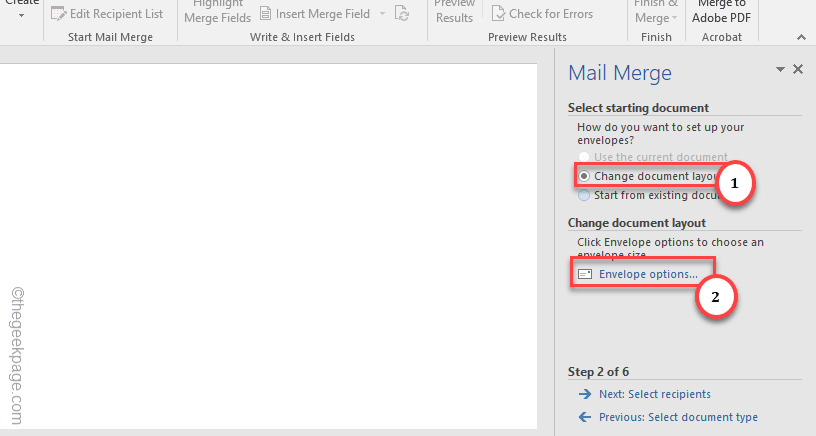
Step 7 – Set the ‘Select starting document’ to “Change document layout“.
Step 8 – Tap “Envelope options…” to access that.
Step 9 – In the Envelope Options panel, select the envelope size from the list of options listed there. Choose according to your need.
Step 10 – You can change the fonts of Delivery and Return address as well.
Step 11 – Finally, tap “OK“.
Step 12 (optional) – If you are changing the style of any of the address, make sure to maintain the size and style of the fonts legible. Tap “OK” when you are done modifying.
Step 13 – Coming back to the Mail Merge section, tap “Next: Select recipients” from there.
Step 14 – The next step is very important. If you have a list of recipients ready, choose the “Use an existing list” option.
Step 15 – Tap “Browse” to choose the file.
[If you don’t have any list created before, you can use the ‘Type a new list’ option to create a new list of recipients. ]
Step 16 – Choose the data sheet from the list and click “Open“.
Step 17 – Tap “OK“.
Step 18 – Word will now fetch the complete list of recipients from the excel sheet.
Step 19 – Make sure to check or unchek or use “Sort” or “Filter” to choose the particular recipients.
Step 20 – Click “OK“.
Step 21 – Finally, tap “Next: Arrange your envelope“.
Step 22 – Now, tap the paritcular section where you want to place the address box and tap “Address book…“.
Step 23 – In the Insert Address Block page, you should be seeing the address in the ‘Preview’ pane.
[1. If the Preview section is blank, tap “Match Fields…“.
2. Then, set the “First Name“, “Last Name” from the drop-down and tap “OK“.
]
Step 24 – Click “OK“.
Step 25 – This way, you can include Greeting line, Electronic Postage.
Step 26 – Tap “Next: Preview your envelope” to proceed.
Step 27 – Now you can view the entire list of envelopes in the main section. Scroll between the ‘Recipient 1’ from the right bar and to preview all the recipients.
Step 28 – Finally, when you are satisfied, tap “Next: Complete the merge“.
Step 29 – You have arrived at the final stage. Tap “Print…” to start printing all the envelopes.
Or,
If you want to edit the envelopes individually, tap “Edit individual envelopes“.
That’s it! This is the basic way of Mail Merge Envelopes using Microsoft Word.


