Microsoft Edge WebView2 is an application that helps to embed Web-base technologies into native applications. This is the reason you notice a similar interface of Office applications in the web view also. This Edge component runs in the background and does consume an insignificant portion of available free memory. If your computer is lagging and you have seen the “MSEDGEWEBVIEW2” eating a huge chunk of memory, follow these easy steps to fix the problem.
Fix 1 – Close MS Teams and Widgets
As we have native Microsoft applications use this component to retain the same interface on two platforms. Kill these processes and test them.
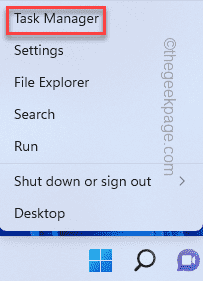
1. At first, press the Windows key+X together.
2. Then, click on “Task Manager” to open the Task Manager page on your computer.
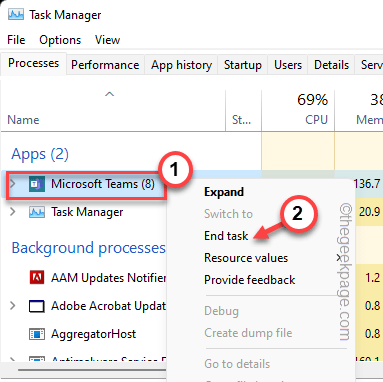
3. On the Task Manager page, go to the “Processes” tab.
4. Here, look for the “Microsoft Teams” process. Just, right-tap that process and tap “End task” to kill it on your computer.
5. Additionally, check for any other Teams-related processes and end those as well.
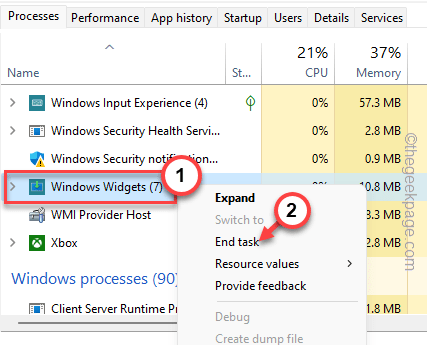
6. After ending the Teams processes, find the “Windows Widgets” process.
7. Simply, right-tap that process and tap “End task” to kill that as well.
Now, check the memory usage of the msedgewebview2.exe process in the Task Manager. You will notice a significant drop in memory usage.
Fix 2 – Block Windows widgets using the Registry
Widgets are an integral part of Windows 11. So, even if you remove the icon from the taskbar, the app along with the MSEdgeWebView2 component runs in the backyard.
1. Type “regedit” after tapping the Windows key from your keyboard.
2. Then, click on “Registry Editor” to open it up.
NOTE – Before making any changes to the Registry Editor page, take a quick backup of the existing registry keys and proceed to the leading solutions.
a. To do that, click “File” on the menu bar and tap the “Export” option.
b. Give this backup item a name and save it on your computer.
3. Now, expand the “HKEY_USERS” list.
4. You can see various folders like “S-1-5-21-3620773455-1947684263-1023720982-1002” when you expand that. These are all associated with the user accounts that you have created on your computer.
5. Expand each of these key folders and go this way and find a folder called “Dsh“.
Software\Microsoft\Windows\CurrentVersion
6. Check all the folders one by one. On our computer, the full address is –
Computer\HKEY_USERS\S-1-5-20\Software\Microsoft\Windows\CurrentVersion\Dsh
7. When you have reached the specified location, look on the right-hand pane and identify the “IsPrelaunchEnabled” value.
8. Just double-tap that value to edit it.
9. Set the new value to “0“. This will disable the widget.
10. After that, tap “OK” to save the changes.
Finally, close the Registry Editor page and restart your computer after this to save the changes.
After restarting the device, take a look at the memory usage of the MSEdgeWebView2 process.
Alternative Method –
If you can’t find the ‘Dsh’ subfolder anywhere in the specified user’s folder, try out these steps.
1. You have to open the Registry Editor. So, press the Win key+R keys together.
2. Then, type “regedit” in the Run box and hit Enter to open the Registry Editor page.
3. On the Registry Editor page, go to this location –
HKEY_CURRENT_USER\Software\Microsoft\Windows\CurrentVersion\Explorer\Advanced
You can find several taskbar-related settings here.
4. Now, look for a DWORD 32-bit Value named “TaskbarDa“.
5. Then, just double-tap that value to edit it.
6. Then, set the value to “0” in the ‘Value data:’ box.
7. After that, click “OK” to save the changes.
After this, close the Registry Editor screen. Now, you have to just restart your computer.
Once your restart your device, the widgets will stop working. As the widgets aren’t working, MSEdgeWebView2 will not run and eat up the memory resources.
Fix 3 – Disable Microsoft Teams from startup
Some apps are set to automatically startup while your system starts. Disable the Teams automatic startup from the Task Manager.
1. Open the Task Manager. You have to hit the Ctrl+Shift+Esc keys together to bring up the Task Manager.
2. Then, straight go ahead to the “Startup” section.
3. Now, right-click on “Microsoft Teams” and tap “Disable“.
This way, you can disable the startup of the Teams app.
Close the Task Manager page after this. Then,
Fix 3 – Uninstall the Edge WebView 2 Runtime
If none of the methods are working, you can uninstall this component from your computer.
NOTE – Uninstalling Microsoft Edge WebView2 Runtime doesn’t actually affect anything. But, some apps like Widgets may not work properly.
1. You can find this app on the Apps page. So, press the Win key+X keys together.
2. Then, click on “Apps & Features“.
3. In the Settings page, scroll down through the right-hand pane and look for the “Microsoft Edge WebView2 Runtime” app.
4. Once you have found that, click on the three-dot menu and tap “Uninstall“.
5. Then, tap “Uninstall” when you see the warning message.
After uninstalling the component, restart the device. MSEdgeWebView2Runtime won’t be eating up any more resources.
Fix 4 – Run SFC,DISM checks
Run these checks on your computer to fix the problem if any corruption in the system files is causing the problem.
1. At first, hit the Windows key and type “cmd” in the search box.
2. After that, right-click “Command Prompt” and tap “Run as administrator“.
3. Now, input this command in the terminal and hit Enter to run an SFC scan check.
sfc /scannow
4. The SFC scanning process will take some time. After that, copy-paste this line there in the terminal and hit Enter to run a disk checking operation.
chkdsk /f /r /b
This disk-checking operation only starts when you restart the system. So, when you see this message “Would you like to schedule this volume to be checked the next time the system restarts?“, press the “Y” key and hit Enter.
5. Finally, paste this code into the black terminal page and press the Enter key to run the DISM check.
DISM.exe /Online /Cleanup-image /Restorehealth
Just like the SFC command, the Deployment Image tool will take some time. So, you have to wait for the process to complete.
Now, restart your computer and you will notice the check disk commadn has begun checking the system files.


