Are all the cells in the Microsoft Excel showing up “#Name” error on your spreadsheet? Generally, when Microsoft Excel is unable to calculate a cell output according to the provided formula, it shows this sign in all the defected cells. We have discussed the main key reasons behind the issue and the resolutions to take care of this.
Fix 1 – Fix the formula
The main key reason why this “#NAME” error code is appearing in the cell is maybe due to the wrong formula that you are using. Excel can’t calculate the output data using that formula. That is the reason why it is showing the “#NAME” error code in there.
Step 1 – To fix this, tap the “#NAME” cell once.
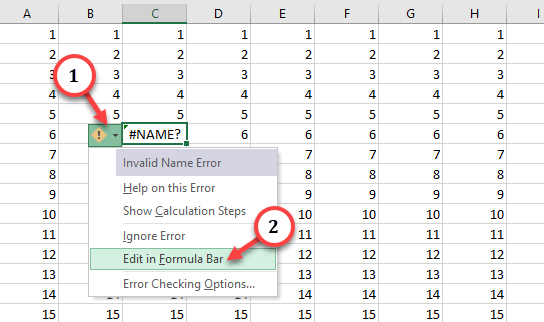
Step 2 – You will see the exclamatory sign beside the cell. Tap that once and click “Edit in Formula Bar” in the context menu.
This shall highlight the formula bar and used formula in there.
Check the formula very carefully and address any mistakes in there.
Fix 2 – Used range is invalid
The range you are using may be wrong in this case.
Step 1 – You are using an invalid range. So, just tap the “#Name” cell block to highlight the associated formula.
Step 2 – Then, check the range in the formula. Rectify that in the cell to adjust that.
You will see the desired output in the Excel cell box.
Fix 3 – Evaluate the formula
If you are unsure about the formula, evaluate the formula to automatically rectify it.
Step 1 – Go to the Excel chart and view the “#Name” in the cell bar.
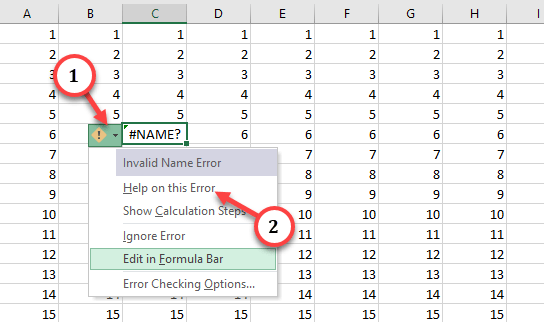
Step 2 – You will get to see the “❗” icon. Tap that drop-down menu and tap “Help on this Error” from the context button to start the process.
This way, you can fix the #NAME error in the Excel workbook.
Fix 3 – Missing quotations
It is necessary for you to add quotations to properly structure an Excel formula.
Step 1 – Tap the “#Name” formula in the cell to edit that.
Step 2 – Using the quotations correctly is the crucial part of the process. As you click on the specific quotations in the formula bar, it will highlight the range or the cells it affects.
Step 3 – So, use the quotations in proper places to ensure the integrity of the formula.
Step 4 – Now, press the Enter key and get the desired result in the cell.
Keep this in your mind that small quotations (“) or single quotations (‘) won’t work in the workbook.
Repeat the same process for all the “#Name” in all the cells in the workbook.
Fix 4 – Test the local scope of the range data
If you have declared a variable with local scope and you are trying to use it as a global one, Excel may return the “#NAME” error code.
Step 1 – You have to check and alter the scope of a specific data. To do this, select the data from the table and go to the “Formulas” tab.
Step 2 – There, tap the “Name Manager“.
Step 3 – You have to add this name. So, choose “New…“.
Step 4 – It will automatically register the name of the value as “Criteria“.
Step 5 – Now, click the “Scope” and set it to “Workbook” from the drop-down. This way, this value should have the scope through the whole workbook.
Step 6 – Finally, tap “OK“.
Save the changes and close the Name Manager window.
Come back to the spreadsheet and try to use that in other sheets. You won’t see the “#NAME” error again.
Fix 5 – Use proper add-ins
You can get into this trouble if Excel is unable to use a formula due to a blocked add-in. So, enable the add-ins and test.
Step 1 – Just go ahead to the “File” menu in the Excel workbook.
Step 2 – At the bottom of the left ribbon, tap “Options“.
Step 3 – As the Excel Options window loads up, go to the “Add-ins” pane.
Step 4 – Next, set the ‘Manage:’ tab to “Excel Add-ins” using the drop-down menu.
Step 5 – Finally, tap “Go” to load the complete list of Add-ins.
Step 6 – Turn on all the add-ins by ticking all the boxes. Then, tap “OK“.
Step 7 – After you have turned on these add-ins, go back to the workbook and highlight the “#NAME” error.
Step 8 – Just hit Enter and the error should be gone.
This way, you can take care of the problem.
Fix 6 – Undefined range is the reason
Undefined range can force Excel return the “#Name” in the cell.
Step 1 – To fix this problem, at first, tap the cell that says “#Name” data.
Step 2 – Now, you can take a look at the range provided in the formula.
Step 3 – Fix the range according to the entered data and double check the viability of the range used in the formula.
Once you have fixed the range, check other “#NAME” cells as well.
Fix 7 – Proper correct formula
If you are using improper formula in the MS Excel sheet, it may iterate it as “#NAME” as the output.
Step 1 – To do this check, go ahead and tap the “#NAME” in the cell box.
Step 2 – Double-tap the cell to edit the formula right there.
Step 3 – Check whether the formula is wrong or not. Correct the formula and hit Enter to get the output.
These are the ways, you can take care of the “#Name” errors in the Microsoft Excel.
Alternative Solutions –
1. If you are still facing the “#NAME” error in particular cells, clean them up and rewrite the formula.
2. If the document you are working on is a shared version or you are collaborating with others on your team, make sure that you are using the same version of the Excel.


