You’re on a voice call with your friend and your friend complains that your voice is not clear. Mostly, your response would be, “bad weather, mate, connection issues”. Well, is it really a problem with your network? Or is it something wrong with your microphone? We know that you are confused and that you want answers. Well, now is the time to dig those answers out.
So, firstly we would suggest that you record your own voice using the native voice-recording application that came with your phone. After you record your voice, try hearing it and check if there’s something wrong with it. If something is wrong, you can conclude that there are issues with your microphone.
Now as the most basic first aid for your device, we would suggest you restart it once. Most Android device issues are solved with a simple restart. If the issue is still not resolved, please try out the solutions listed in this article one by one. We are sure you won’t leave disappointed!
Solution 1: Check Whether the Phone Case is Blocking the Microphone Port Hole
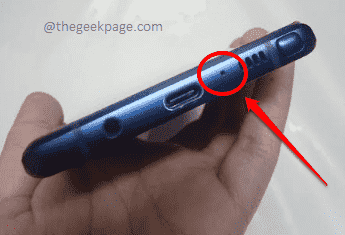
If you have a protective case for your phone, make sure the case is not blocking the microphone port hole. The microphone port hole is usually located at the bottom part of your device. However, it can be in a different location also, based on your phone’s manufacturer and model. The main thing is, the microphone hole should not be blocked.
Solution 2: Clean the Microphone Port
Now if the microphone port hole is not blocked and still you are facing issues with the microphone, then it could be because your microphone port hole is dirty. In that case, try cleaning up the microphone hole which is usually located at the bottom part of your device. You can clean the hole using a thin needle, pin, or something similar.
Solution 3: Close Recording Applications if Running
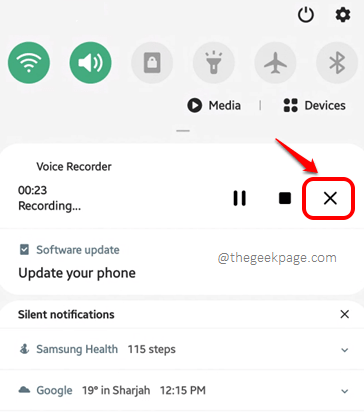
Another reason why your microphone is not working could be because a recording application might be accessing the microphone. Pull down your notifications panel and check if any recording application is running or not. If a recording application is running, stop it and then check if the issue with your microphone is fixed or not.
Solution 4: Turn On Airplane Mode and then turn it Off
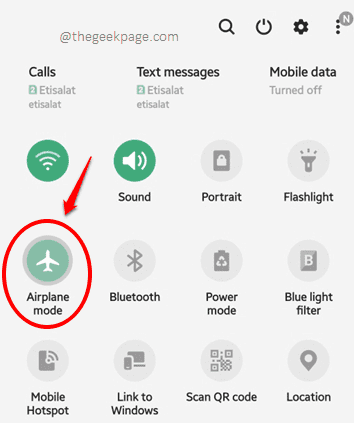
Sometimes the issue could actually be because of the network. In that case, you need to pull down your notifications panel and turn on the airplane mode by tapping on the Airplane mode icon. Wait for a minute and then turn it back off. Check if your microphone issue is now fixed.
Solution 5: Turn off Bluetooth
Also, if your Android device is connected to some other device using a Bluetooth connection, your microphone might be accessed by that device. In that case, it will not work for you. So, pull down your notification panel and make sure the Bluetooth connection is turned off, as shown in the screenshot below.
Solution 6: Boot Up in Safe Mode
In this solution, let’s boot up your device in safe mode and check if your Microphone is working perfectly fine in boot mode. Boot mode would enable only the basic applications and services. It would disable all third-party applications. Thus if your microphone is all fine in boot mode, then the issue could be caused because of a third-party application and we can quickly proceed to finding the culprit from your third-party applications installed.
Step 1: Long press the Power button to view the Power options menu.
As next, long press on the Power off option to view the Safe mode menu.
Step 2: That’s it. Just hit the Safe mode option to boot up your phone in safe mode.
Once the phone boots in safe mode, check if your microphone is fine or not. If it is fine, definitely the issue is caused because of a third-party application installed. You can restart your phone to enter the normal mode now. Once the device boots to normal mode, follow the steps below to find the application that is causing you trouble.
Step 3: Launch the Settings application by clicking on its icon.
Step 4: From the Settings screen, click on the Apps option.
Step 5: Now on the Apps screen, click on the 3 vertical dots icon present at the top right corner of the screen.
Step 6: As next, from the list of options available, click on the Permission manager option.
Step 7: On the Permission manager screen, find and click on the Microphone permission.
Step 8: Now all the applications that can access your microphone get listed in front of you. If you can easily figure out which application might be interfering with your microphone just by looking at the list, then you can straight away select it by clicking on it.
Step 9: Now you need to choose the radio button against the Deny option to revoke the suspected application’s microphone permission.
You can try checking if your microphone is working fine or not after performing the above steps. If it is still having issues, then revoke the microphone permission of all the applications in step 7 and then check if the microphone is fine. If the microphone is fine with that step, then give microphone permission to only the most necessary applications and check if that fixes your issue.
Solution 7: Reset App Preferences
If your issue is still not resolved, let’s try resetting your application preferences.
Step 1: Launch the Settings application.
Step 2: From the Settings screen, click on the Apps option.
Step 3: As next, on the Apps screen, click on the 3 vertical dots icon at the top right corner.
Step 4: Choose the Reset app preferences option from the menu available.
Step 5: When the following confirmation window opens up, hit the Reset option to proceed.
Solution 8: Check for Android Software Updates
Sometimes the issue can happen if your device is missing important software updates. So, in this solution, let’s check for system updates.
Step 1: Once again, click on the Settings application from the app drawer to launch it,
Step 2: Now on the Settings screen, click on the Software update option.
Step 3: As next, click on the Download and install option.
Step 4: If you have any pending updates available, the Download button will be available on the screen that follows. Click on it to proceed with downloading the updates.
Once the updates are downloaded, you will be asked to restart your device. Proceed with the restart. During the restart process, the downloaded updates will get installed on your device. After that, the device would boot up. Once it does, check if you are facing issues with your microphone.
Solution 9: Factory Reset the Android Device
If none of the above solutions worked for you, we can now try factory resetting your Android device. This will definitely solve the issue if it is a software issue. However, remember that factory resetting your device would wipe your device clean. So take a backup of all your data before you proceed with this operation. Also, make sure your device has enough battery power.
Step 1: Click on the Settings application from the apps drawer.
Step 2: As next, scroll down and click on the General management option.
Step 3: On the General management screen, click on the Reset option next.
Step 4: Now, from the Reset options available, click on the one that says Factory data reset. When asked for confirmation, confirm the operation. That’s it. Let the process run to completion. This usually takes some time. After that, check if your issue is resolved or not.
Note: Based on your phone’s version and OS model, the pictures and steps mentioned in this article might slightly vary. Please tell us in the comments section if you are finding it difficult to figure out the correct configurations in your device.
We are all excited to hear which method fixed the issue for you, please tell us in the comments section. Stay tuned for more and more super cool technical tricks, tips, solutions, how-tos, and hacks.


