Memory Integrity is the main core feature of Windows Security. So, if you can’t turn this feature ON or if this completely greyed out on your system, your system can be exposed to constant threats. In different scenarios, different reasons can be behind this issue. If you are experiencing this issue, don’t underestimate or overlook it, as you do for any other Windows error messages.
Initial Workarounds –
1. The first and most preliminary workaround that you can try is to restart the machine. If that doesn’t take care of the matter, go to the main solutions.
2. Are you using another antivirus tool? Third-party antivirus packages have their own facilities (including a memory protection plan). So, in that case, you should disable the antivirus and check.
Fix 1 – Figure out the culprit driver and delete
You can figure out which is the culprit driver and delete it using the CMD terminal.
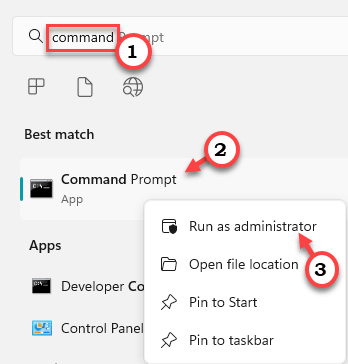
Step 1 – You have to open an elevated Command Prompt page. So, open the search box using the Win key+S keys together.
Step 2 – Just, start to type the word “command“.
Step 3 – You will notice “Command Prompt” among the search results. There, right-tap it and click “Run as administrator“.
Step 4 – You can get the list of all the installed drivers on your computer by copy-pasting this code and hitting Enter.
dism /online /get-drivers /format:table
You will get to know the complete list of installed drivers.
Now, look for the “Published Name” from the driver description to identify which is the problematic driver. This name reads like this – “oem11.inf“. You may not distinguish which driver is this. But, it will be useful to delete that particular driver from your system.
Step 5 – Modify and execute this particular code to delete the driver from your system.
[Make sure you are deleting only the problematic driver. Otherwise, you can be in trouble removing a good, working driver.]
pnputil /delete-driver <Published Name> /uninstall /force
[Replace the “<Published Name>” with the published name that you have noticed in the chart.
Example – Like, suppose you are getting this problem with “oem71.inf“, then the command will be –
pnputil /delete-driver oem71.inf /uninstall /force
]
Exit the terminal after running the driver uninstaller code. Then, restart the system.
Windows will remove the driver, even if the driver is working with a device at that time. So, the next time you reboot, the effect of the driver will be gone.
If you want to get back the driver, download the latest version (from your device manufacturer’s website) and reinstall it.
Fix 2 – Detect the driver with AutoRuns
There is a free tool called AutoRuns, from Microsoft that you can use to detect the faulty driver and uninstall the same from your machine.
Step 1 – You can directly download the AutoRuns portable from here.
The best part of this is you don’t have to install anything.
Step 2 – After downloading the tool, run “AutoRuns“.
Step 3 – Wait until Windows loads up AutoRuns. Now, go to the “Drivers” tab.
Here, you will notice all the drivers have appeared in the list format.
Step 4 – Find out which driver is incompatible with the list. Just, right-click that driver and click the “Delete” to delete the driver from your computer.
This way, you can remove the driver very easily.
Remember to restart your computer.
Fix 3 – Enable the HypervisorEnforcedCodeIntegrity key
There is a registry hack you can try to enable/ disable the Memory Integrity feature.
Step 1 – Write “regedit” in the search bar.
Step 2 – Then, tap “Registry Editor” to open that.

Step 3 – Now, reach this place following the left-hand pane –
HKEY_LOCAL_MACHINE\SYSTEM\CurrentControlSet\Control\DeviceGuard\Scenarios\HypervisorEnforcedCodeIntegrity
Step 4 – Look on the right-hand pane and you shall find a DWORD value named “Enabled“.
Step 5 – Then, double-tap it to open it.
Step 6 – Now, there are two conditions.
0 means Off
1 means On
Step 7 – So, set the value to “1” to enable the Memory Integrity feature.
Step 8 – Then, click “OK“.
After settings the value, exit Registry Editor. Then, restart your system.
Memory integrity will be turned On once the system restarts.
Fix 4 – Enable Secure Boot, TPM, Virtualization Support
Secure Boot, TPM, Virtualization Support, and UEFI mode need to be enabled so that you can turn on Memory Integrity.
Step 1 – Restart your system.
While your computer is starting up, look closely and you will notice certain keys associated with multiple functions. Such as some key opens the BIOS, and another takes you to the boot options page.
Step 2 – So, press and hold the key that is associated with BIOS. In some computers, you may have to use both the Fn and the associated key to open the BIOS screen.

Step 3 – Now, once you reach BIOS settings, locate these items –
Secure Boot

TPM

Hardware Virtualization Support
Step 4 – Enable all these items one by one.
Step 5 – Save the changes.
Let the computer restart.
Fix 5 – Turn off the Virtualization based Security policy
If you have Windows 11 Pro or Enterprise, you can disable the Virtualization-based security policy and then turn on the Memory Integrity feature.
Step 1 – Click the “Search” icon and type “group policy“.
Step 2 – Then, tap “Edit group policy” to open it.
Step 3 – Expand the left section here –
Computer Configuration > Administrative Templates > System > Deice Guard
Step 4 – Then, double-tap the “Turn on Virtualization Based Security” policy to edit it.
Step 5 – Set this policy to “Disabled” mode.
Step 6 – Now you can save these changes. So, click “Apply” and “OK“.
Exit the Local Group Policy Editor.
Restart your computer once after doing this.


