If you have turned on airplane mode (also called flight mode), the Bluetooth, Wi-Fi, and internet connection will be turned off automatically. Due to this, you cannot use any apps that are dependent on the internet. But you can still manually turn on the Bluetooth and Wi-fi option though airplane mode is on. Sometimes it happens that the device is stuck in airplane mode and you are not able to perform the necessary actions on that particular device. When this happens one goes clueless. But in this article, we have different solutions that help you to fix this problem. Try them and see if the problem is resolved. Let us start!
Method 1 – Turn Off Airplane Mode Using Windows Settings
Step 1 – Open windows settings using Windows + I keys together
Step 2 – Click on Network & Internet
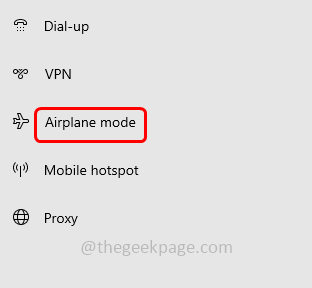
Step 3 – From the left click on airplane mode
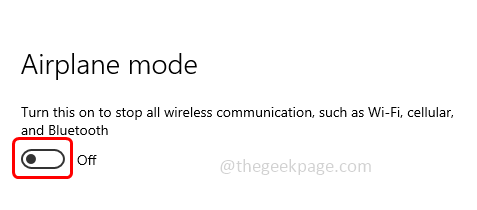
Step 4 – At the right, turn off the airplane mode by clicking on the toggle bar ( a blue color should not be present in the toggle bar)
Step 5 – Restart the computer and then check if the issue is solved.
Method 2 – Make Sure The Radio Management Service Is Running
Step 1 – Open the run prompt using Windows + R keys together
Step 2 – Type services.msc in the run prompt and then hit enter. This will open the Windows services
Step 3 – Scroll down and find Radio Management Service
Step 4 – Check if the radio management service is running. If it is not then, right click on the service
Step 5 – Click on properties
Step 6 – In the startup type dropdown, select manual
Step 7 – Then click on start button
Step 8 – To save the changes click on apply and ok
Step 9 – Again right click on Radio Management Service and click on restart
Step 10 – Restart the computer and then check if the issue is solved
Step 11 – If the radio management service is already running, then right click on the service
Step 12 – Click on properties
Step 13 – In the startup type dropdown, select disabled
Step 14 – To save the changes click on apply and ok then restart the computer
Step 15 – Again follow the steps mentioned in [Step 4 – Step 9]
Now check if the issue is solved.
Method 3 – Flush The DNS Cache
Step 1 – Open the command prompt as an administrator. To do that, type cmd in the windows search and hold Ctrl + Shift keys then hit enter
Step 2 – A confirmation pop up occurs click on yes
Step 3 – In the command prompt type the below command and hit enter
ipconfig /release
Step 4 – Once the execution is complete, copy and paste the below command in the command prompt or type the below command in the command prompt then hit enter
ipconfig /renew
Step 5 – To complete the execution it will take a few seconds. Once done, there is one more command to execute. Type the below command and then hit enter
ipconfig /flushdns
Step 6 – Wait till the execution process completes. Now restart the computer and check if the issue is solved.
Method 4 – Run The Network Adapter Troubleshooter
Step 1 – Open the windows settings using Windows + I keys together
Step 2 – Click on Update & Security
Step 3 – In the opened window, at the left click on troubleshoot
Step 4 – At the right side, click on Additional troubleshooters
Step 5 – Scroll down and find Network Adapter
Step 6 – Click on run the troubleshooter
Step 7 – It will start to detect if there are any problems, follow the onscreen instructions and complete the troubleshooting process
Step 8 – If any fixes are suggested apply them and then restart the computer. Check if the problem is resolved.
Method 5 – Disable Airplane Mode Using Registry Editor
Step 1 – Open the run prompt using Windows + R keys together
Step 2 – Type regedit in the run prompt and hit enter
Step 3 – A user account control window will open click on yes. This will open the registry editor window
Step 4 – Navigate to the following path in the registry
HKEY_LOCAL_MACHINE\System\CurrentControlSet\Control\Class
Step 5 – Right click on the class and click on find
Step 6 – In the find dialog box, type radioenable and click on find next button
Step 7 – The registry will find the RadioEnable key and point you there
Step 8 – At the right side, right click on RadioEnable and from the list appeared click on modify
Step 9 – In the value data field, give the value as 1 and click on ok. This will disable the airplane mode
Step 10 – Restart your system and then check if the issue is solved.
Method 6 – Check If There Are Any Windows Update Available
Step 1 – Open the windows settings using Windows + I keys together
Step 2 – Click on Update & Security
Step 3 – In the Windows update page click on check for updates button
Step 4 – If there are any updates available, it will get installed. If no updates are there then it will show you’re up to date
Step 5 – Restart the computer and check for the issue to be solved.
Method 7 – Perform A Network Reset
Step 1 – Open windows settings using Windows + I keys together
Step 2 – Click on Network & Internet
Step 3 – The status window will be opened, at the right side scroll down and under advanced network settings click on network reset
Step 4 – Click on reset now button
Step 5 – In the confirmation pop up click on yes and it will reset the networks
Step 6 – Restart your computer and then check if the problem is resolved.
That’s it! I hope the above provided information is helpful and easy to follow. Let us know which of the above methods worked for you. If you have any other solutions share them as well. Thank you and happy reading!!


