There are some certain scenarios where the memory integrity may not work on your computer. One of these issues is the driver incompatibility such as ftdibus.sys, that can lead to this error on your device. As Memory Integrity of the system is the crucial part of the machine, you should not overlook this. These are the only solutions you will need to tackle this problem.
Fix 1 – Update the Bus drivers
The FTDI bus driver is a legtimate driver located in the System32 folder. But, the lack of proper updates can lead to this issue.
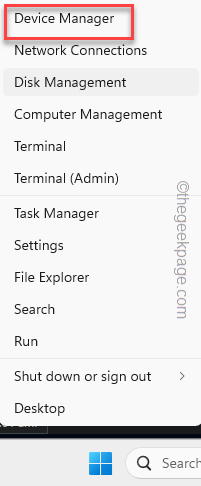
Step 1 – At first, right-click the Windows icon and further tap “Device Manager“.
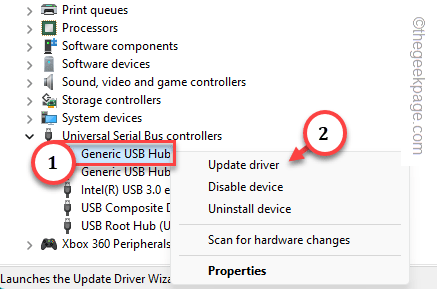
Step 2 – As the Device Manager opens up, expand the “Universal Serial Bus Controllers” tab.
Step 3 – Next, rigth-click the first entry in the list and tap “Update driver“.
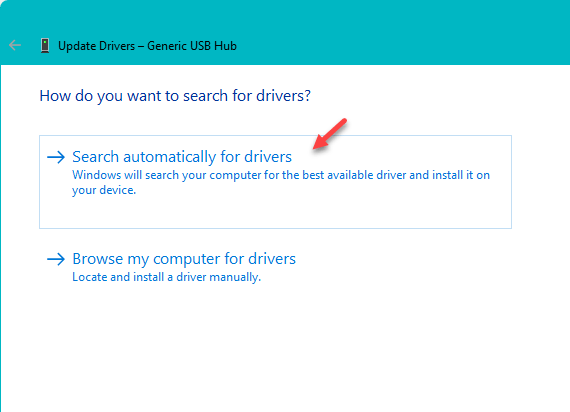
Step 4 – Later, choose the “Search automatically for drivers” option to let the computer search for the latest driver.
Step 5 – Repeat the same steps on all the drivers listed there in the Universal Serial Bus Controllers to update them all.
Once you have done this, make sure to restart your computer once.
Go ahead and try to re-enable the memory integrity from Windows Security page.
Fix 2 – Install all the Windows Updates
Windows updates all the bus drivers and chipsets through the Windows Update. So, make sure to install all of those.
Step 1 – To do this, open the Settings.
Step 2 – Then, go to the “Windows Update” on the left pane.
Step 3 – On the opposite side, tap “Check for updates” to perform a check for updates.
Wait for Windows to recognize the latest update package for the device. Usually, these updates are very small and won’t take much time.
Step 4 – Windows enlist the driver updates in the optional category. So, in the Windows Update page, tap “Advanced options“.
Step 5 – Now, open the “Optional updates” .
Step 6 – If you see any updates related to the BUS drivers/controllers or chipsets, check those one-by-one and use the “Download & install” to download and install the updates on your system.
Finally, as all the updates are installed, a system restart is due.
Step 7 – So, come back to Windows Update page and tap “Restart now“.
You won’t have the ftdibus.sys problem in the Windows update anymore.
Fix 3 – Uninstall the faulty bus driver
Uninstall the faulty bus driver from your system and restart your computer.
Way 1 Using the terminal
Step 1 – To do this, type “cmd” in the search box.
Step 2 – Next, right-tap the “Command Prompt” tab and tap “Run as administrator“.
Step 3 – Paste these code and hit Enter to know the driver.
dism /online /get-drivers /format:table
Check the identity of the ftdibus.sys driver from the list and notice the oem drivers in the list.
Step 4 – Now, you have to uninstall that driver from your computer using the same oem number that you have noticed.
pnputil /delete-driver oemnumber /uninstall /force
[Note – Replace the “oemnumber” with the name that denotes the ftdibus.sys driver.
If the published name of the ftdibus.sys is “oem5.inf“, then the code should be –
pnputil /delete-driver oem5.inf /uninstall /force
]
You will see this message in the terminal after the successful removal of the driver –
Driver package uninstalled.
Driver package deleted successfully.
Ater this, close the terminal. Restart the computer as a system restart is needed after the removal of a driver.
Way 2 – Using the FTDI uninstaller
You should use the FTDI uninstaller tool and uninstall the driver from your computer.
Step 1 – Go to the FTDI utilities page.
Step 2 – Go down to find the CDM Uninstaller tab. Tap “Download CDM Uninstaller (command line version+GUI version)” to download it.
Step 3 – After this, extract the compressed file in a location of your choice.
Step 4 – Go to the folder where you have extracted the files.
Step 5 – Locate the “CDMUninstallerGUI_v1.5“. Right-click that and tap “Run as adminstrator” to run the tool with elevated rights.
Step 6 – As the utility runs, it will automatically detect the Vendor ID and Product ID. Tap “Add” to add that.
Step 7 – Finally, tap “Remove Devices” to remove the device from your system.
Restart your computer and you shall be good to go.
Fix 4 – Use the system repair tools
Use the system repair tools like SFC, DISM to fix the driver file corruption.
Step 1 – To do this, use the Windows+R buttons together.
Step 2 – Input “cmd” in there and press Ctrl, Shift and Enter three keys together.
Step 3 – Use these codes on the terminal to run the file checking scans on your system.
DISM /Online /Cleanup-Image /CheckHealth
DISM /Online /Cleanup-Image /ScanHealth
DISM /Online /Cleanup-Image /RestoreHealth
This entire execution process will take a lot of time. So, leave the computer alone and let it complete the check, scan and restoration steps on your system.
You won’t see the ftdibus.sys error again.


